This repository has a LiDAR-inertial 3D plane simulator in it that allows for custom trajectory through 3D enviroments to be created, and a sensor suite to be sent through it at a given rate. The simplest way to get started is to clone this repository into your ROS workspace, and play around with the example datasets. Please read the guides below on how to get started, and see the ReadMe files in the package directories for more details on each package.
Here is a video of a LiDAR-inertial estimator runnning on the top of this simulator. The paper leveraging this simulator "LIPS: LiDAR-Inertial 3D Plane SLAM" will be presented at IROS 2018.
- lips_comm: This package has the custom message files that the simulator should publish.
- lips_matlab: Contains MATLAB scripts to generate simulated LiDAR sensor moving through a 3D environment.
- lips_simulator: This package has a publisher node that takes the MATLAB exported files and publish on ROS.


- To get up an running using the existing datasets, please perform the following.
- Download one of the following datasets
- Spencer Lab Large Path 01 - download (524MB)
- Spencer Lab Small Path 01 - download (56MB)
- Spencer Lab Small Path 02 - download (13MB)
- Extract the datasets into the
/lips_matlab/output/<name_of_dataset>/ - Launch RVIZ and load the example config in the
/lips_simulator/launch/folder - Launch your specific launch file to publish the simulation
roslaunch lips_simulator spencer_large_01.launchroslaunch lips_simulator spencer_small_01.launchroslaunch lips_simulator spencer_small_02.launch
- Examine the RVIZ output and published topics
- Edit the launch files as needed to new generated datasets or change noise properties
- To generate your own trajectory and enviroment you can follow the followings steps.
- Open MATLAB in the matlab folder
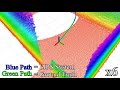
/lips_matlab/matlab/ - You can use an existing floorplan and path or create your own
- To create your own floorplan do the following:
- Create a new text file in the
/lips_matlab/input/folder - A floorplan is made up of pairs of points that create a line
start_x, start_y, end_x, end_y- This floorplan will be extruded vertically
- Should be in the unit of
feet - Use the
plot_2d_floorplan.mscript to help create
- Create a new text file in the
- To create your own trajectory do the following:
- Create a new text file in the
/lips_matlab/input/folder - A trajectory is made up of ordered 3D control points
time,x(ft),y(ft),z(ft),yaw(deg),pitch(deg),roll(deg)- The time isn't the real time used, but instead is a "scale" factor for how you want the spline to weight each node
- Note that the rotations are applied as rotz(yaw)*roty(pitch)*rotx(roll)
- Use the
plot_3d_spline.mscript to help create
- Create a new text file in the
- After creating your floorplan and trajectory we can specify the sensor properties
- Open the
MAINSCRIPT.mfile and edit the paths to the floorplan and trajectory files - Specify the sensor properties you want to use in the top of the file (see matlab comments for units)
- Run the
MAINSCRIPT.mto generate the groundtruth measurement data - Move files from the
/lips_matlab/output/folder to a sub-folder - Follow the "Quicker Quickstart Guide" to publish this new simulation data on ROS