A cheat-sheets and quick but relatively-detailed reference guide for docker CLI commands and some of docker concepts
This repository containes a complete set of DOCKER NOTES organized as follow:
- Docker Architecture
- Docker CLI (current file)
- Dockerfile
- Docker Compose
- Docker Best Practices
Show commands & management commands, versions and infos
$ docker #Display Docker commands
$ docker version #Show the Docker version information
$ docker info #Display system-wide information
Images are read-only templates containing instructions for creating a container. A Docker image creates containers to run on the Docker platform. Think of an image like a blueprint or snapshot of what will be in a container when it runs. discover-docker-images-and-containers-concepts-here
$ docker pull imageOptions & Flags
image : The name of the image to download, , a tag of the image can be specified image:tag. If no tag is provided, Docker Engine uses the :latest tag as a default.
-a: Download all tagged images in the repository--platform: Set platform if server is multi-platform capable you can find here the complete list of options you can use with the docker pull command
Example
$ docker pull nginx #Download nginx latest image
$ docker pull nginx:alpine #Download alpine nginx imageDockerfiles are text files that list instructions for the Docker daemon to follow when building a container image. check-here-to-read-about-Dockerfiles
$ docker build . -t NAME -f DOCKERFILE --rmOptions & Flags
.: ThePATHspecifies where to find the files for the context of the build on the Docker daemon.-t NAME: The name of the image to build, , a tag of the image can be specifiedimage:tag.-f: Specify the Dockerfile name from which to build the image. by default if no dockerfile is specified , docker daemon will search for a file name Dockerfile in the build context (Default isPATH/Dockerfile)--rm: Remove intermediate containers after a successful build
you can find here the complete list of options you can use with the docker build command
Note : All the files in the local directory (PATH) get tar'd and sent to the Docker daemon.You can exclude files and directories by adding a .dockerignore file to the local directory, This helps to avoid unnecessarily sending large or sensitive files and directories to the daemon. check-here-to-read-about-dockerignore
Example
$ docker build . -t custom-image -f Dockerfile.dev$ docker images #Display all images
$ docker rmi [ID/NAME] #Remove one or more images by NAME or ID
$ docker image prune #Remove unused images
$ docker tag [NAME/ID] NAME:TAG #Create a tag NAME:TAG image that refers to the source image by NAME or ID
$ docker history [NAME/ID] #Show the history of an image
$ docker image inspect [ID/NAME] #Display detailed information on one or more images such as Exposed Ports, Environement variables..Options & Additional commands
docker images : Display all parent images
-a: List all images (parents & intermediates)-q: Return only the ID of each image-l: Return the last container
docker rmi [ID/NAME] : Equivalent to docker image rm [ID/NAME]
docker rmi $(docker images -aq): Remove all images
docker rmi $(docker images -f "dangling=true" -q): Remove all dangling images. (Docker images that are untagged and unused layers such the intermediate images)
docker image prune [ID/NAME] : by default this command has same behavior as above command (removing all dangling images)
-a: If this flag is specified, will also remove all images not referenced by any container.
A container is an isolated place where an application runs without affecting the rest of the system and without the system impacting the application. discover-docker-images-and-containers-concepts-here
docker run --name NAME --rm -itd -p PORTS --net=<custom_net> --ip=IP image COMMANDOptions & Flags
--name : The name of the container, should be unique, a tag of the container can be specified (can granted the uniqueness of the container) name:tag
--rm : Remove the container when it is stopped
-i : Keep standard output stream open
-t : Run the container in a pseudo-TTY [interactive mode]
-d : Run the container in the background [detach mode]
-p PORTS : Publish or expose ports
-p 80: Equivalent to-p 80:80-p 80:80: Binds port80of the container to port80of the host machine , accessible externally-p 127.0.0.1:80:80: Binds port80of the container to port80on127.0.0.1of the host machine (only accessible by the host machine)--expose 80: Exposes port 80 of the container without publishing the port to the host system's interfaces
--net : Connect a container to a network check-network-section
--ip: Assign a static IP to containers (you must specify subnet block for the network)
image : The image from which the container will be created and run, a tag of the image can be specified image:tag . The image can be locally stored Docker images (locally built). If you use an image that is not on your system, the software pulls it from the online registry.
COMMAND: Used to execute a command inside the container , example sh -c "echo hello-world", bashthis will grant you access the bash shell inside the container
you can find here the complete list of options you can use with the docker run command
Example
$ docker run --name nginx:malidkha --rm -itd -p 80:80 --net=malidkha-network --ip='10.7.0.2' nginx:1.2 bash -c "echo hello-there"$ docker ps #Display all running docker containers
$ docker container start [ID/NAME] #Start one or more containers by NAME or ID
$ docker container stop [ID/NAME] #Stop one or more containers by NAME or ID
$ docker restart [ID/NAME] #Restart one or more containers by NAME or ID
$ docker rm [ID/NAME] #Remove one or more stppped containers by NAME or ID
$ docker container prune #Removes all stopped containers
$ docker rename NAME-OLD NAME-NEW #Rename a container
$ docker container inspect [ID/NAME] #Display detailed information on one or more containers such as connected Networks settings, container IP, volumes , Port Bindings ...
$ docker attach [ID/NAME] #Attach to a running container and view its output
# copy files/directories between host and container
$ docker cp [NAME]:/PATH/ /local/path #container -> host
$ docker cp /local/path [NAME]:/path/ #host -> containerOptions & Additional commands
docker ps : Equivalent to docker container ls
-a: List all containers (running & stopped)-q: Return only the ID of each container-l: Return the last container
docker stop $(docker ps -aq) : Stop all containers
docker kill [ID/NAME]: Kill one or more containers by NAME or ID, stop command sends SIGTERM signal, while kill sends the SIGKILL signal
docker rm $(docker ps -aq): Remove all containers
-f: By default remove command , remove the container if it is already stopped , this flag forces the container to be removed even if it is running-v: Remove anonymous volumes associated with the container check-volume-section
$ docker container exec -it [NAME] COMMAND

#examples
$ docker container exec -it [NAME] bash #Access the bash shell of the container
$ docker container exec -it [NAME] touch hello.txt #Create hello.txt file inside the working directory of the container
Options & Flags
-w [DIR]: Working directory inside the container-u [UserName/UID]:Username or UID under which the command is executed-e KEY=VALUE: Set environment variables
you can find here the complete list of options you can use with docker exec command
Like any other modern software, logging events and messages like warnings and errors is an inherent part of the Docker platform, which allows you to debug your applications and production issues.
$ docker logs [OPTIONS] [NAME/ID] #Fetch logs of a container by NAME or IDOptions & Flags
docker logs: Equivalent to docker container logs
--details: Show extra details provided to logs.--followor-f: Follow log output--since: Show logs since timestamp (e.g. 2021-08-28T15:23:37Z) or relative (e.g. 56m for 56 minutes)--tailor-n: all Number of lines to show from the end of the logs--timestampsor-t: Show timestamps--until: Show logs before a timestamp (e.g. 2021-08-28T15:23:37Z) or relative (e.g. 56m for 56 minutes)
docker logs -f [NAME/ID] &> malidkha.log & : Redirect all live logs to a specific file. (background task)
Note : Though do note here that the above command is only functional for containers that are started with the json-file or journald logging driver.
Note 2 : As a default, Docker uses the json-file logging driver, which caches container logs as JSON internally (On the host). Read more about this logging driver
Example
$ docker logs -f --since=10m TEST #Show the logs for the container "TEST" for the past 10 minutesDocker, by default, captures the standard output (and standard error) of all your containers and writes them in files using the JSON format. This is achieved using JSON File logging driver or json-file. These logs are by default stored at container-specific locations under /var/lib/docker filesystem.
/var/lib/docker/containers/container_id>/<container_id>-json.logwe can configure logs rotation when running a container with docker runcommand or via a global docker daemon setting
docker run --log-opt max-size=1k --log-opt max-file=5 <image-id/name>Add the following code to /etc/docker/daemon.json (global settings)
	{
	  "log-driver": "json-file",
		"log-opts": {
			"max-size": "1k",
			"max-file": "5"
		}
	  }

#Save the file and restart docker
$ systemctl restart dockermax-size: The maximum size of the log before it is rolled. A positive integer plus a modifier representing the unit of measure (k, m, or g)max-file: The maximum number of log files that can be present. If rolling the logs creates excess files, the oldest file is removed. A positive integer. Defaults to 5.
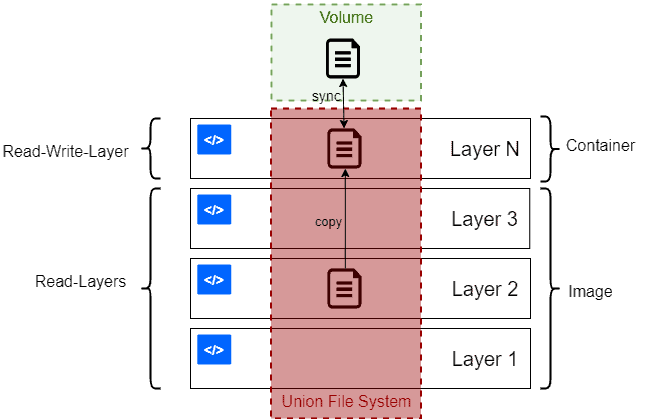
All the changes inside the container are lost when the container stops. If we want to keep data between runs or to share data between different containers, Docker volumes and bind mounts come into play.
A docker container runs the software stack defined in an image. Images are made of a set of read-only layers that work on a file system called the Union File System. When we start a new container, Docker adds a read-write layer on the top of the image layers allowing the container to run as though on a standard Linux file system.
So, any file change inside the container creates a working copy in the read-write layer. However, when the container is stopped or deleted, that read-write layer is lost.
When it comes to storing persistent docker container data , we have three options Volumes, Bind Mounts and Tmpfs mounts
Volumes : Volumes are the preferred mechanism for persisting data generated by and used by Docker containers. A bind mount uses the host file system, but Docker volume are native to Docker.
Bind Mounts : Docker has offered this feature ever since its inception. There is less functionality available with binding mounts compared to volumes. Bind mounts mount files and directories from the host machine into the container.
Tmpfs mounts: Stored in the host system's memory only, and are never written to the host system's filesystem (not persisted on disk).

Note: Volumes are the preferred mechanism for persisting docker containers data . The volumes are stored in /var/lib/docker/volumes.
$ docker volume create NAME   #Create volume NAME ,if a name is not specified, Docker generates a random name.
$ docker volume ls            #Check volumes list
$ docker volume inspect NAME  #Shows some information like the mount-point, mount type...
$ docker volume rm NAME       #Remove a volume
$ docker volume prune NAME    #Remove all unused volumes and free up space:
Options & Flags
docker volume create NAME: will create a named volume,If a name is not specified, Docker generates a random name.
- Using this command , we can specify other information about our created volume. you can find here the complete list of options you can use with this command
docker volume ls:
-f: Filer the list of volumes-f name=dataVolume: Return the volume names dataVolume-f dangling=true: Returns the volume names that are not connected to any containers
-q: Return only the volume names
docker volume rm $(docker volume ls -f dangling=true) : Remove all dangling volumes
To use a volume , we can either specify the volume in the docker-compose-file or starting the container with a volume in the command.
Using -v (--volume)
$ docker run -v data-volume:/var/opt/project(:ro) TEST #Named VOLUME
$ docker run -v /var/opt/project(:ro) TEST #Anonymous VOLUME
$ docker run -v ./src/data:/var/opt/project(:ro) TEST #BIND MOUNT-
1st example : The above example is starting a container TEST, and attaching to it a volume
data-volumeto persist data inside docker container folder/var/opt/project. -
2nd example : The above example is starting a container TEST, and attaching to it an anonymous volume (Docker gives the volume a random name that is guaranteed to be unique within a given Docker host) to persist data inside docker container folder
/var/opt/project. -
3rd example : The above example is starting a container TEST, and attaching to it source directory on the host
./src/datato persist data inside docker container folder/var/opt/project.
The option (:ro) is optional specifying that the data is read-only by the container
Using –mount
$ docker run --mount \
type=volume,source=data-volume,destination=/var/opt/project,readonly NAMEtype: Specify the type of the volumevolumebindtmpfs
source: The source of the mount (volume name or directory/file path for bind mount).destination: the path where the file or directory is mounted in the container.readonly: is optional specifying that the data is read-only by the container
Note: It is preferred to use the more self-explanatory –mount option to specify the volume we wish to mount.
Note 2 : When using the -v or --volume flag, Docker will automatically create the bind-mounted directory on your local machine if it doesn't exist.
When using the --mount flag, Docker will not create the bind-mounted directory on your local machine if it doesn't exist and generate an error.
Note 3 : Bind-mounts and Named volumes are persisted and can be re-used within many containers and after re-run the container.
Anonymous volumes are not to be re-used , and after re-running the container are erased (stop and start commands will preserve the contents)
Note 4 : Docker volumes is the recommended method for persisting Docker container data beyond the life of a container. Bind mounts are another method, but are not recommended for most situations. Bind mounts can have dependencies on the underlying host file system directory, which may change over time.
Volumes are the preferred way to persist data in Docker containers and services. Some use cases for volumes include:
-
Sharing data among multiple running containers. If you don’t explicitly create it, a volume is created the first time it is mounted into a container. When that container stops or is removed, the volume still exists. Multiple containers can mount the same volume simultaneously, either read-write or read-only. Volumes are only removed when you explicitly remove them.
-
When the Docker host is not guaranteed to have a given directory or file structure. Volumes help you decouple the configuration of the Docker host from the container runtime.
-
When you want to store your container’s data on a remote host or a cloud provider, rather than locally.
-
When you need to be able to back up, restore, or migrate data from one Docker host to another, volumes are a better choice. You can stop containers using the volume, then back up the volume’s directory (such as /var/lib/docker/volumes/).
In general, you should use volumes where possible. Bind mounts are appropriate for the following types of use case:
-
Sharing configuration files from the host machine to containers. This is how Docker provides DNS resolution to containers by default, by mounting
/etc/resolv.conffrom the host machine into each container. -
Sharing source code or build artifacts between a development environment on the Docker host and a container. For instance, you may mount a
Maven target/directory into a container, and each time you build the Maven project on the Docker host, the container gets access to the rebuilt artifacts.
If you use Docker for development this way, your production Dockerfile would copy the production-ready artifacts directly into the image, rather than relying on a bind mount.
- When the file or directory structure of the Docker host is guaranteed to be consistent with the bind mounts the containers require.
tmpfs mounts are best used for cases when you do not want the data to persist either on the host machine or within the container. This may be for security reasons or to protect the performance of the container when your application needs to write a large volume of non-persistent state data.
We should note that attaching a volume to a container creates a long-term connection between the container and the volume. Even when the container has exited, the relationship still exists. This allows us to use a container that has exited as a template for mounting the same set of volumes to a new one.
example
We start a container TEST with volume mounted to /var/opt/project
 $ docker run -v /var/opt/project TEST #Anonymous VOLUME

 #Later-on we stop the container and list it
 $ docker stop TEST
 $ docker ps -a
  | CONTAINER ID | IMAGE | COMMAND | CREATED | STATUS | PORTS | NAMES |
  | 4920602f8048 | bash  | "docker-entrypoint.s…" | 7 minutes ago Exited (0) | 7 minutes ago ...
We could run our next container, by copying the volumes used by this one:
$ docker run --volumes-from 4920 \
  bash:latest \
  bash -c "ls /var/opt/project"
Note : --volumes-fromcan be use in order to Back up, restore, or migrate data volumes.
In practice --volumes-from is usually used to link volumes between running containers (volume data migration).
Note 2 : Dealing with file permissions with docker volumes can be confusing , (between the host and the container), you can read more about such topic in docker best practices notes here
Networking is about communication among processes, and Docker’s networking is no different. Docker networking is primarily used to establish communication between Docker containers and the outside world via the host machine where the Docker daemon is running.
Docker uses your host’s network stack to implement its networking system. It works by manipulating iptables rules to route traffic to your containers. This also provides isolation between Docker networks and your host. iptables is the standard Linux packet filtering tool. Rules added to iptables define how traffic is routed as it passes through your host’s network stack. Docker networks add filtering rules which direct matching traffic to your container’s application. The rules are automatically configured, so you don’t need to manually interact with iptables.
Docker supports different types of networks via network drivers, each fit for certain use cases.
There are several default network drivers available in Docker and some can be installed with the help of plugins, Command to see the list of containers in Docker mentioned below.
-
bridge: The
bridgenetwork represents thedocker0network present in all Docker installations. If you build a container without specifying the kind of driver, the container will only be created in the bridge network, which is the default network.- We can see this bridge as part of a host’s network stack by using the
ip addr showcommand:$ ip addr show docker0 Link encap:Ethernet HWaddr 02:42:47:bc:3a:eb inet addr:172.17.0.1 Bcast:0.0.0.0 Mask:255.255.0.0 inet6 addr: fe80::42:47ff:febc:3aeb/64 Scope:Link UP BROADCAST RUNNING MULTICAST MTU:9001 Metric:1 RX packets:17 errors:0 dropped:0 overruns:0 frame:0 TX packets:8 errors:0 dropped:0 overruns:0 carrier:0 collisions:0 txqueuelen:0 RX bytes:1100 (1.1 KB) TX bytes:648 (648.0 B)
- We can see this bridge as part of a host’s network stack by using the
-
host: The
hostnetwork adds a container on the host’s network stack. As far as the network is concerned, there is no isolation between the host machine and the container. Containers will not have any IP address they will be directly created in the system network which will remove isolation between the docker host and containers. For instance, if you run a container that runs a web server on port 80 using host networking, the web server is available on port 80 of the host machine. -
none: The
nonenetwork adds a container to a container-specific network stack. That container lacks a network interface. IP addresses won’t be assigned to containers. These containers are not accessible to us from the outside or from any other container. -
overlay: The
overlaynetwork will enable the connection between multiple Docker daemons and make different Docker swarm services communicate with each other. -
ipvlan: Users have complete control over both IPv4 and IPv6 addressing by using the IPvlan driver.
-
macvlan: The
macvlandriver makes it possible to assign MAC addresses to a container.
Note : When you install Docker, it creates three networks automatically: bridge, none and host.
$ docker network create NAME   #Create network NAME
$ docker network ls            #Check networks list
$ docker network inspect NAME  #Shows some information such as network ips, gateway, connected containers...
$ docker network rm NAME       #Remove a network
$ docker network prune NAME    #Remove all unused networks
Options & Flags
docker volume create NAME: Creates a new network , if driver option is not set , will be defaulted to bridge
-d: Specify Driver to manage the Network--subnet: Subnet in CIDR format that represents a network segment--gateway: IPv4 or IPv6 Gateway for the master subnet- You can find here the complete list of options you can use with this command
- Example :
$ docker network create --subnet 10.7.0.0/16 --gateway 10.7.7.7 malidkha-networkTo use a network with a container , we can either specify the network in the docker-compose-file or connect a container to a network.
$ docker network connect NAME <container-id/name> # Connect a running container to a network
$  docker run -itd --network=NAME <image-name> # Connect a container to a network when it starts
You can specify the IP address you want to be assigned to the container's interface.
$ docker network connect --ip 10.7.0.2 NAME <container-id/name>
$ docker run -itd --net=NAME --ip='10.7.0.2' <image-name>
Use docker network disconnect to remove a container from the network.
$ docker network disconnect NAME <container-id/name>Note: To verify the container is connected, use the docker network inspect command or docker container inspect command.
Note 2 : One container can be connected to many networks, and One network can be attached to many containers.
Note 3 :
- Two containers on same the default bridge network can communicate only by ip-addresses
- Two containers on same the same bridge network (user-defined network) can communicate using both container names and ip-addresses.
- If need to connect using container names and ip-addresses while on two different networks -- use
--link(deprecated, use user-defined networks instead) - Two containers on different networks can't connect via ip-addresses or container names( iptables rules drop the packets)
- Container on whatever network can connect with the host
Docker container monitoring is the process of tracking the performance, health, and resource utilization of applications running in Docker containers Some of the standard metrics monitored in the Docker container are:
- Resource utilization metrics: Metrics that refer to the resources allocated to and used by the Docker containers. Usage can indicate if the container is experiencing a workload too heavy, optimal, or light and helps troubleshoot issues with the application running inside the container. Some examples of these metrics include:
- CPU usage: The percentage of CPU time being used by the container
- Memory usage: The amount of memory being used
- Disk usage: The amount of disk space being used
- Network usage: The amount of network bandwidth being used
- Container status metrics: These metrics refer to the status of the Docker containers to help track availability, overall health, and identify issues related to the container. Some examples of these metrics are:
- Container up-time: The amount of time that the container has been running. High up-time can be an indicator of the stability and reliability of the container
- Container restarts: The number of times that the container has been restarted. A high number of restarts can be an indicator of issues with the container or the application running inside it
- Container exits: The number of times that the container has exited. High numbers of container exits can be an indicator of issues
- Status: This metric refers to the status of the container itself (e.g. running, stopped, restarting)
- Application performance metrics: Metrics that refer to the performance of the applications running inside Docker containers. Some examples are:
- Response time: The time it takes for the containerized application to respond to a request. Tracking response time can help identify performance issues and ensure that the application is responsive to end users
- Request rate: The number of requests being handled by the containerized application per second
- Error rate: The number of errors encountered by the containerized application
- Host machine metrics: Metrics that refer to the performance of the physical or virtual machine on which Docker is running. These metrics are essential to monitor because they can help identify issues related to the overall health and performance of the host machine, which can impact the performance and availability of the Docker containers running on the host. Some examples are:
- CPU usage
- Memory usage
- Disk usage
- Network usage
- Logs: Logs provide a detailed record of the activities and events inside the container. It refers to tracking and analyzing the log output generated by a Docker container
- Processes: Programs or tasks that are running inside the container
There are several ways to monitor Docker containers in real time:
$ docker logs [NAME/ID] #Fetch logs of a container by NAME or ID
$ docker attach [NAME/ID] #Attach to a running container and view its output
$ docker top [NAME/ID] #Show running processes in a container
$ docker events [NAME/ID] #Get real-time events from the  container server such as restarts , starts ....
$ docker stats [NAME/ID] #Show Resource usage statisticsfor one or more containers (or all) such  CPU and memory usage
$ docker system df -v #Show docker disk usage
$ docker port [NAME/ID] #Show mapped ports
$ docker diff [NAME/ID] #Show modified files
Note : You can find here the complete list of the events
Note 2 :Several third-party tools can monitor Docker containers in real time. These tools typically provide more advanced monitoring and visualization features, and integration with other IT systems and tools such Prometheus and cAdivsor.
By default, Docker containers have access to the full RAM and CPU resources of the host. Leaving them to run with these default settings may lead to performance bottlenecks. If you don’t limit Docker’s memory and CPU usage, Docker can use all the systems resources.
To limit a container resources , we can either specify that in the docker-compose-file or using the docker run command,
Configure System to Enable Limiting Resources
Many of these features require your kernel to support Linux capabilities. To check for support, you can use the docker info command. If a capability is disabled in your kernel, you may see a warning at the end of the output like the following:
WARNING: No swap limit supportIf not enabled , enable limiting resources following those instructions
Limit Docker Container Memory Access
There are several RAM limitations you can set for a Docker container. Some of them include:
- Configuring the maximum amount of memory a container can use.
- Defining the amount of memory a Docker container can swap to disk.
- Setting the soft limit for the amount of memory assigned to a container.
$ docker run -it --memory="[memory_limit]" <image-id/name> #Set Maximum Memory Access

$ docker run -it --memory="[memory_limit]" --memory-swap="[memory_limit]" <image-id/name> # Set Swap to Disk Memory Limit

$ docker run -it --memory="1g" --memory-reservation="750m" <image-id/name> #Set Soft Limit to Container Memory--memory="[memory_limit]": The value of memory_limit should be a positive integer followed by the suffix b, k, m, or g (short for bytes, kilobytes, megabytes, or gigabytes). For example, to limit the container with 1 GB of RAM, add --memory="1g".
--memory-swap="[memory_limit]": Using the swap option allows you to store data even after all RAM assigned to the container has been used up. It does this by ignoring the memory limitation and writing directly to the disk. Although this is a useful feature, it is not a recommended practice as it slows down performance. Value should be more than --memory (The swap includes the total amount of non-swap memory plus the amount of swap memory reserved as backup.)
--memory-reservation="[memory_limit]" : Limiting the memory usage of a container with --memory is essentially setting a hard limit that cannot be surpassed. Alternatively, you can set a soft limit (--memory-reservation) which warns when the container reaches the end of its assigned memory but doesn’t stop any of its services.
Limit Docker Container CPU Usage
There are several ways to define how much CPU resources from the host machine you want to assign to containers.
$ docker run -it --cpus="1.0" <image-id/name> # The container will have access to only 1 CPU core

$ docker run -it --cpus-shares="700" <image-id/name> # The container will have a greater or lesser proportion of CPU cycles. By default, this is set to 1024.
Read more about CPU and MEMORY resources constraints here