


Table of Contents

forte is a self-hosted music platform. You can either connect to a forte server or create your own server for your friends & family. However, it is also very convenient to use forte on your local machine as a stand-alone music player. Follow this guide to learn how to connect and how to build your own forte server.
- Add tracks and albums to your queue
- Mark your favorite tracks, albums, artists, playlists
- Endless listening with radio feature
- Create playlists
- Desktop / Mobile Player
- Listen to TuneIn stations
- Specialized context menus
- Make fuzzy searches
- Add friends
- Playing controls
- Keyboard shortcuts
- Lyrics support
- MediaSession API
- Progressive Web App
- Group Sessions
- Admin dashboard
- User profiles
- Last.fm Scrobbling
- Dark mode
- Federation
- Click here for the API documentation.
If you know a forte server and just want to connect to use the service, go to https://forte.buzl.uk. The webpage is hosted with GitHub pages and uses the latest forte version. Therefore, this is the recommended way to access forte services.
If you want to use forte on your mobile device, we suggest using the PWA version of the application. You can access the PWA version by going to https://forte.buzl.uk on your mobile device and clicking on the Add to Home Screen button.
However, Forte works best with the Chrome browser on your mobile device.
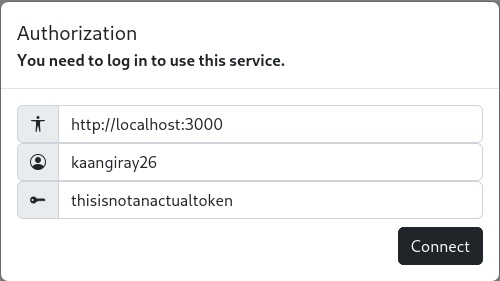
Once you go to the website, you will be prompted with this dialog:

Here's an explanation for the fields:
Forte server: The public address of the forte server.
Username    : The username given to you by the server.
Token       : The token given to you by the server.
If you are wondering about how to create accounts, this will be explained in the Creating your own server section.
Here's an example for the authorization:
If you log in successfully, you will see the homepage of the application, where some track recommendations can be found. Now you can use the application and listen to some music.
Once you log in, your authorization parameters will be saved on the local session of your browser. However, if you ever want to reset these information, you can right click on the Profile button on the top right of the screen, you will see an option to Reset. This will clear the local storage along with your session storage.
To build and host your own server you need a decent computer as we will be dealing with multiple users and streaming audio files to them. In the remaining of this section, we will be going over the steps of building the server.
Forte uses docker to build the server. Therefore, you need to have docker installed on your machine. You can find the installation instructions for your operating system here.
To run the docker container, you need to have the docker-compose.yml file. Download the file here:
Before running the file, you need to edit some fields:
app:
    environment:
        NODE_ENV: production     # Set Node Environment
        POSTGRES_HOST: postgres  # Postgres Host/IP
        POSTGRES_PORT: 5432      # Postgres Database Port
        POSTGRES_DB: forte       # Set Postgres Database Name
        POSTGRES_USER: forte     # Set Postgres Username
        POSTGRES_PASSWORD: forte # Set Postgres Password
    volumes:
        - <library>:/library   # The path to your music library

 postgres:
    environment:
        POSTGRES_DB: forte          # Forte Database name
        POSTGRES_USER: forte        # Forte postgres username
        POSTGRES_PASSWORD: forte    # Forte postgres password
Here's an example for the docker-compose.yml file:
version: '3'
services:
    app:
        image: kaangiray26/forte:2.7
        restart: on-failure
        ports:
            - "3000:3000"
        depends_on:
            postgres:
                condition: service_healthy
        environment:
            mode: public
            port: 3000
            NODE_ENV: production     # Set Node Environment
            POSTGRES_HOST: postgres  # Postgres Host/IP
            POSTGRES_PORT: 5432      # Postgres Database Port
            POSTGRES_DB: forte       # Set Postgres Database Name
            POSTGRES_USER: forte     # Set Postgres Username
            POSTGRES_PASSWORD: forte # Set Postgres Password
        volumes:
            - /home/forte/music:/library
    postgres:
        image: kaangiray26/postgres:2.0
        restart: always
        environment:
            POSTGRES_DB: forte       # Set Postgres Database Name
            POSTGRES_USER: forte     # Set Postgres Username
            POSTGRES_PASSWORD: forte # Set Postgres Password
        volumes:
            - db-data:/var/lib/postgresql/data
        healthcheck:
            test: [ "CMD-SHELL", "pg_isready -U forte" ]
            interval: 10s
            timeout: 5s
            retries: 5
volumes:
    db-data:
If you want to use the server publically, you can edit the docker-compose.yml file and change the mode field to public. This setting wil host the server at 0.0.0.0:3000, which will be accessible from outside the network if you forward your port 3000. Follow the next section to configure a reverse proxy with nginx. If you don't want to use a reverse proxy, you can use the server publically with the following command:
docker-compose up -d
If you want to use the server publically with a SSL certificate, you can use Nginx as a reverse proxy. Here are some example configurations for Nginx:
Let's put an example html file in /var/www/html/index.html:
/var/www/html/index.html
<!DOCTYPE html>
<html>
<head>
<title>Welcome to nginx!</title>
<style>
html { color-scheme: light dark; }
body { width: 35em; margin: 0 auto;
font-family: Tahoma, Verdana, Arial, sans-serif; }
</style>
</head>
<body>
<h1>Welcome to nginx!</h1>
<p>If you see this page, the nginx web server is successfully installed and
working. Further configuration is required.</p>

<p>For online documentation and support please refer to
<a href="http://nginx.org/">nginx.org</a>.<br/>
Commercial support is available at
<a href="http://nginx.com/">nginx.com</a>.</p>

<p><em>Thank you for using nginx.</em></p>
</body>
</html>
We will be using the following nginx configuration as an example:
/etc/nginx/nginx.conf
worker_processes auto;
worker_cpu_affinity auto;

events {
    multi_accept on;
    worker_connections 1024;
}

http {
    charset utf-8;
    sendfile on;
    tcp_nopush on;
    tcp_nodelay on;
    server_tokens off;
    log_not_found off;
    types_hash_max_size 4096;
    client_max_body_size 16M;

    # MIME
    include mime.types;
    default_type application/octet-stream;

    # logging
    access_log /var/log/nginx/access.log;
    error_log /var/log/nginx/error.log warn;

    # load configs
    include /etc/nginx/conf.d/*.conf;
}
Now we will be using certbot to generate a SSL certificate. You can find the installation instructions for your operating system here.
We create a new configuration file for nginx in /etc/nginx/conf.d/forte.conf. Don't forget to change the example.com and www.example.com fields to your domain name.
/etc/nginx/conf.d/forte.conf
server {
    listen 80 default_server;
    listen [::]:80 default_server;
    root /var/www/html;
    server_name example.com www.example.com;
}
Now, we can test the configuration and restart nginx:
sudo nginx -t && sudo nginx -s reload
Now, we can run certbot to generate a SSL certificate:
sudo certbot --nginx -d example.com -d www.example.com
After running certbot, it will edit the /etc/nginx/conf.d/forte.conf file to include the SSL certificate. With some minor changes, we have the following configuration at the end:
/etc/nginx/conf.d/forte.conf
server {
    root /var/www/html;
    server_name example.com www.example.com;

    listen [::]:443 ssl ipv6only=on;                                         # managed by Certbot
    listen 443 ssl;                                                          # managed by Certbot
    ssl_certificate /etc/letsencrypt/live/www.example.com/fullchain.pem;     # managed by Certbot
    ssl_certificate_key /etc/letsencrypt/live/www.example.com/privkey.pem;   # managed by Certbot
    include /etc/letsencrypt/options-ssl-nginx.conf;                         # managed by Certbot
    ssl_dhparam /etc/letsencrypt/ssl-dhparams.pem;                           # managed by Certbot

	location / {
		proxy_pass http://localhost:3000;
		proxy_set_header Host $host;
		proxy_set_header X-Real-IP $remote_addr;
	    proxy_set_header X-Forwarded-For $proxy_add_x_forwarded_for;
		proxy_set_header X-Forwarded-Proto https;
	    proxy_redirect off;
	}
}
With everything set up, we can restart nginx to apply the changes:
sudo systemctl restart nginx
Finally, we can run forte with the following command:
sudo docker-compose up -d
- Default structure:
/library/Artist/Album/Track
Here's an example:
/library/
└── Antimatter/
   ├── Leaving Eden/
   |   ├── 01 - Redemption.flac
   |   ├── 02 - Another Face in a Window.flac
   |   ...
   |   └── cover.jpg # Cover for the album
   |
   └── cover.jpg # Cover for the artist
Here are two examples for multi-disc albums:
/library/
└── Ayreon/
    └── 01011001/
        ├── 101 - Age Of Shadows_We Are Forever.flac
        ├── 102 - Comatose.flac
        ...
        ├── 201 - The Fifth Extinction.flac
        ├── 202 - Waking Dreams.flac
        ...
/library/
└── Ayreon/
    └── 01011001/
        ├── CD1/
        |   ├── 01 - Age Of Shadows_We Are Forever.flac
        │   ├── 02 - Comatose.flac
        │   ...
        │
        └── CD2/
           ├── 01 - The Fifth Extinction.flac
           ├── 02 - Waking Dreams.flac
           ...
- Artist folders under library directory.
- Album folders under Artists.
- Tracks under Albums.
- For each track, follow the format
INDEX - TRACK_TITLE.FORMAT - To set cover for the album, put a
cover.*file inside the album folder. - To set cover for the artist, put a
cover.*file inside the artist folder. - To use multi-disc albums, you can both use CD directories or just tracks with CD indexes.
- Artist folders can be empty.
- Album folders can be empty.
On each restart of the server, artists and albums with no covers will be found and covers for them will be retrieved. If you want to use your own cover file for an artist or an album, just place the cover file as cover.* (cover.jpg, cover.png, etc.) inside the folder respectively.
To use an external resource as a cover for an artist or an album, go to the Forte dashboard, find the item using the search bar, change the URL of the image and update.
You can access the forte dashboard by going to http://localhost:3000. The default login credentials are: forte and alternative.
While in dashboard, don't forget to change the genius_token, lastfm_api_key, lastfm_api_secret fields in the Config tab for genius and lastfm extensions.
Also, please change the default password from the Password tab.
- Audio: mp3, m4a, ogg, flac, wav, aac
- Image: jpg, jpeg, png, gif, bmp, tiff, svg
Distributed under the GPL-3.0 License. See LICENSE for more information.
Kaan Giray Buzluk - @kaangiray26 - kaangiray26 (at) protonmail.com
- Project Link: https://github.com/kaangiray26/forte
- Docker Image: https://hub.docker.com/r/kaangiray26/forte
Check out the following list of resources that I've used to build forte.