

![]()


Languages:
- عن المكتبة
- التركيب
- بناء تطبيق العداد 🔢
- The Three pillars
- Utils
- Breaking changes from 2.0
- Why Getx?
- Community
-
GetXمكتبه خفيفه وقوية لفلاتر , توفر المكتبه السرعه العاليه في التحكم في الحاله , نظام حقنDdependency injectionذكي , والتحكم في التنقل بين الصفحات بسرعه وسهوله -
GetX -
تعتمد علي 3 نقاط اساسية . الانتاجية والسرعه والتنظيم
-
السرعه:
GetXتركز علي السرعه واقل استخدام للموارد,GetXلا تستخدمStreamsاوChangeNotifier. -
الانتاجية:
GetXتستخدم طريقه سهله ومريحة في كتابة الكود , لا يهم ماذا تريد انت تبني , يوجد دائما طريقه اسهل لبناء باستخدامGetX, ستوفر ساعات من العمل وتوفر لك اعلي سرعه يمكن الوصل لها في تطبيقاتك عموما , يجب ان يهتم المطور بالتخلص من الموارد الغير مستخدمه من الذاكرة , معGetXهذا غير ضروري لانه يتم التخلص من الموارد الغير مستخدمه من الذاكره تلقائيا, اذا اردت تركهم دائما في الذاكرة يمكنك ذلك لكن يجب عليك ان تستخدمpermanent: trueبالاضافه الي توفير الوقت تم تقليل امكانية ترك الموارد في الذاكره بدون التخلص منها , يتم حقن المواردlazyافتراضيا -
التنظيم:
GetXتسمح لك بفصل الـviewعن الـpresentation logicوbusiness logicباكامل, بالنسبة للحقنdependency injectionو التنقل بين الشاشات لا تحتاج فيهمcontextللتنقل بين الصفحات , ولا تحتاكcontextللوصول للموارد عن طريق widget tree, لذلك يتم الفصل بالكامل بينpresentation logicوbusiness logicلا تحتاج لحقن الControllers/Models/Blocsداخل شجره العناصرWidget TreeخلالMultiProviders. لان ,GetXتستخدم نظام حقن خاص بها ويمكنك من فصل الـDIعن الوجهات بالكامل .
-
-
مع
Getxتعرف ايه يكون الكود الخاص ب كل جزء في التطبيق , تساعدك في كتابة كود نظيف , بالاضافه الي سهوله التطوير مستقبلا , وهذا يمكنك من مشاركه الاجزاءmodulesامر صعب ليصبح سهل جدا .BLOCكان نقطه البداية لهذا الامر وتظيم الكود بهذه الطريقه في فلاتر , عن طريق فصل كود البزنس عن الواجهات ,GetXهي التطور لذلك الامر , وذلك عن طريق الاضافه الي ذلك فصل حقن الموارد وفصل التنقل بين الشاشات ايضا , وطبقه البيانات بالكامل ايضا , تعلم اين يكون كل شي في المشروع -
Getxتوفر لك السهوله في بناء المشروع والاستقرار كلما كبر حجم المشروع واقصي سرعه ممكن , توفر لك ايضا نظام كامل يعمل في تجانس تام , سهل للمبتدئين , ومنظم للخبراء , امن , مستقر , ومحدث باستمرار ويوفر لك موجموعه من الادوات لتسهل عليك -
GetXليست ضخمه , تمتلك المكتبة العديد من المميزات تجعلك تبدا في البرمجه بدون القلق عن اي شي كل ميزه منهم منقسمه عن الاخري ولا يبداو الا عندما تستخدمهم , اذا استخدمت جزء التحكم في الحاله فقط لن يتم استخدام جزء التنقل بين الشاشات في تطبيقك الاCompiledوالعكس صحيح ! .
-Getx لديها نظام شامل , ومجتمع كبير , وعداد كبير من المطورين , وسوف يتم تحديثها باستمرار , تعمل المكتبة علي كل الانظمه بنفس الكود دون تغيير Android, iOS, Web, Mac, Linux, Windows حتي علي الخادم يمكنك استخدام Getx لبناء تطبيقات الويب
Get Server.
بالاضافه الي ذلك يمكن محاكاه الامر اكثر في فلاتر والخادم عن طريق Get CLI.
وللمزيد من الانتاجية يمكنك استخدام اضافه للـ
استخدم المكتبة في ملف pubspec.yaml
dependencies:
get:import 'package:get/get.dart';تطبيق العداد الذي يتم انشاء مع كل مشروع جديد يتعدي ال 100 سطر (بالتعليقات) ولكي اريك مدي قوه GetX
ساوضح لك كيفيه بناء التطبيق مع تغير قيمه العداد مع كل ضغطه زر والتقل بين الشاشات ومشاركه الحاله كل ذلك بطريقه منذمه وفصل تام لكود البزنس عن الواجهات فقط ب 26 سطر من ضمنهم التعليقات 🔥
- الخطوه الاولي :
اكتب
GetامامMaterialAppلتصبحGetMaterialApp
void main() => runApp(GetMaterialApp(home: Home()));-
ملحوظه : هذا لا يعتبر تعديل علي
MaterialAppلان ,GetMaterialAppعباره عن عنصر معد مسبقا ويستخدمMaterialAppتحت الغطاء , يمكن تغير الاعدادات يدوين لكن هذا غير ضروري لان ``سيقوم بعمل المسارات و حقن العناصر والترجمه وكل شي تحتاجه ولكن اذا كنت تنوي لاستخدام المكتبة فقط للتحكم في الحالهState managmentفهذه الخطوه غير ضرورية تكون هذه الخطوه ضرورية عندما تريد التنقل بين الشاشات او عرض`snackbars`والترجمه و اي شي يعتمد علي`context`وتقوم`getx` بتوفيره -
الخطوه الثانية قم بكتابة الكود داخل
classوكتابة المتغيرات والدوال , يمكنك جعل المتغير قابلع لاعاده بناء الواجها عند تغير قيمته باستخدام الgetter.obs.
class Controller extends GetxController{
  var count = 0.obs;
  increment() => count++;
}- الخطوه الثالثه
ابني الواجهه واستخدم
StatelessWidgetلتوفير الموارد , معGetxيمكنك الاستغناء عنStatefulWidget.
class Home extends StatelessWidget {

  @override
  Widget build(context) {

    // Instantiate your class using Get.put() to make it available for all "child" routes there.
    final  c = Get.put(Controller());

    return Scaffold(
      // Use Obx(()=> to update Text() whenever count is changed.
      appBar: AppBar(title: Obx(() => Text("Clicks: ${c.count}"))),

      // Replace the 8 lines Navigator.push by a simple Get.to(). You don't need context
      body: Center(child: ElevatedButton(
              child: Text("Go to Other"), onPressed: () => Get.to(Other()))),
      floatingActionButton:
          FloatingActionButton(child: Icon(Icons.add), onPressed: c.increment));
  }
}

class Other extends StatelessWidget {
  // You can ask Get to find a Controller that is being used by another page and redirect you to it.
  final Controller c = Get.find();

  @override
  Widget build(context){
     // Access the updated count variable
     return Scaffold(body: Center(child: Text("${c.count}")));
  }
}
Result:

This is a simple project but it already makes clear how powerful Get is. As your project grows, this difference will become more significant.
Get was designed to work with teams, but it makes the job of an individual developer simple.
Improve your deadlines, deliver everything on time without losing performance. Get is not for everyone, but if you identified with that phrase, Get is for you!
Get has two different state managers: the simple state manager (we'll call it GetBuilder) and the reactive state manager (GetX/Obx)
Reactive programming can alienate many people because it is said to be complicated. GetX turns reactive programming into something quite simple:
- You won't need to create StreamControllers.
- You won't need to create a StreamBuilder for each variable
- You will not need to create a class for each state.
- You will not need to create a get for an initial value.
- You will not need to use code generators
Reactive programming with Get is as easy as using setState.
Let's imagine that you have a name variable and want that every time you change it, all widgets that use it are automatically changed.
This is your count variable:
var name = 'Jonatas Borges';To make it observable, you just need to add ".obs" to the end of it:
var name = 'Jonatas Borges'.obs;And in the UI, when you want to show that value and update the screen whenever the values changes, simply do this:
Obx(() => Text("${controller.name}"));That's all. It's that simple.
See an more in-depth explanation of state management here. There you will see more examples and also the difference between the simple state manager and the reactive state manager
You will get a good idea of GetX power.
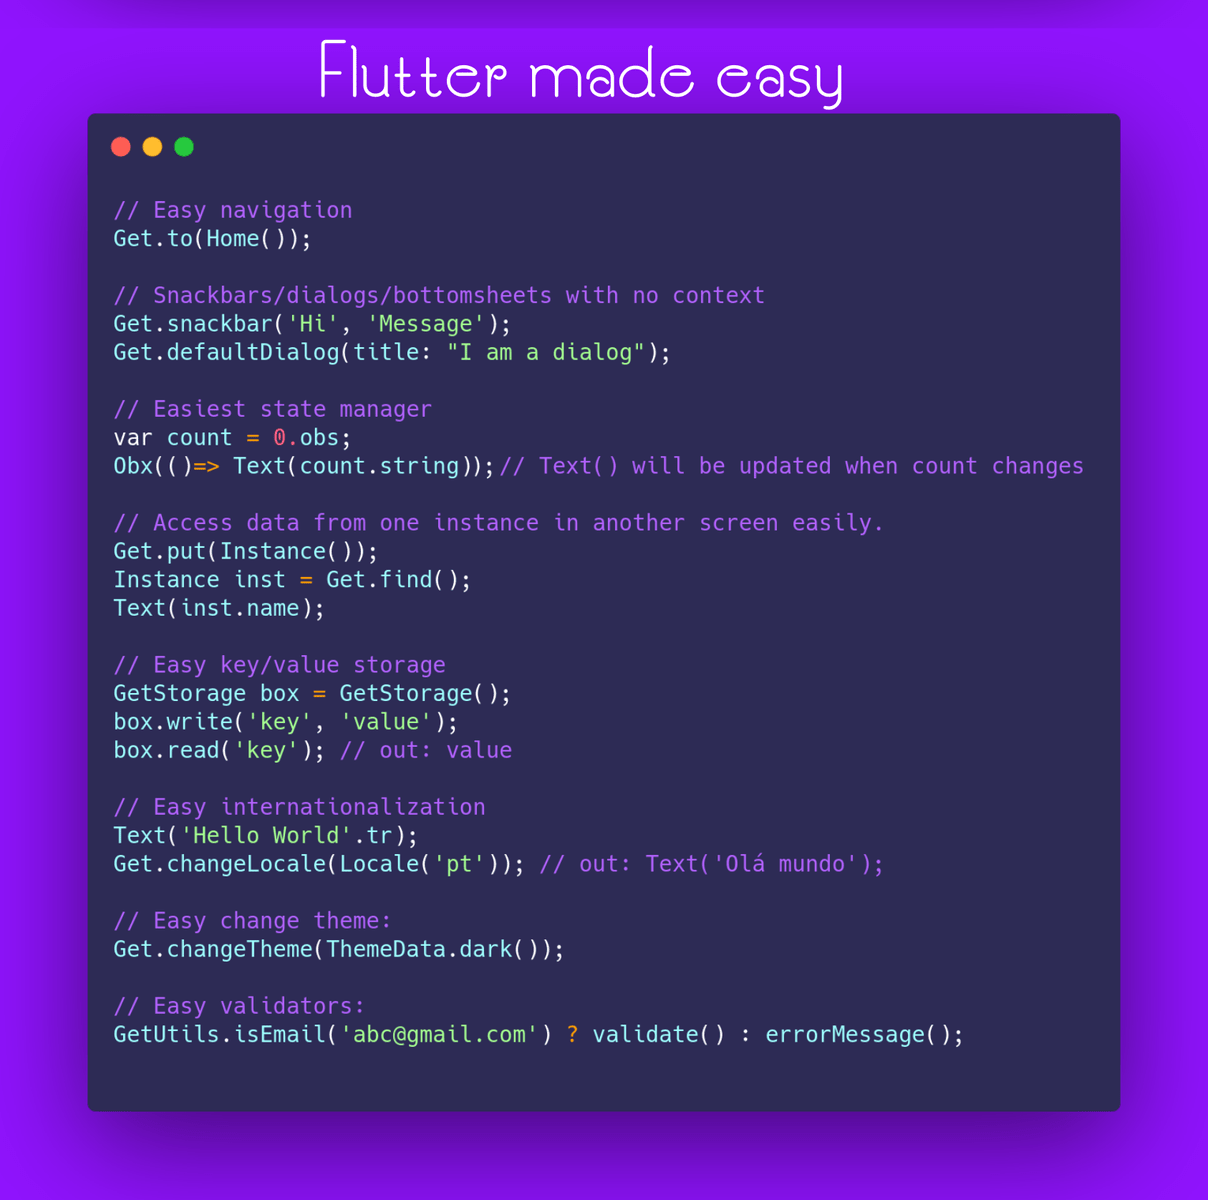
If you are going to use routes/snackbars/dialogs/bottomsheets without context, GetX is excellent for you too, just see it:
Add "Get" before your MaterialApp, turning it into GetMaterialApp
GetMaterialApp( // Before: MaterialApp(
  home: MyHome(),
)
Navigate to a new screen:
Get.to(NextScreen());Navigate to new screen with name. See more details on named routes here
Get.toNamed('/details');To close snackbars, dialogs, bottomsheets, or anything you would normally close with Navigator.pop(context);
Get.back();To go to the next screen and no option to go back to the previous screen (for use in SplashScreens, login screens, etc.)
Get.off(NextScreen());To go to the next screen and cancel all previous routes (useful in shopping carts, polls, and tests)
Get.offAll(NextScreen());Noticed that you didn't have to use context to do any of these things? That's one of the biggest advantages of using Get route management. With this, you can execute all these methods from within your controller class, without worries.
Get works with named routes and also offers lower-level control over your routes! There is in-depth documentation here
Get has a simple and powerful dependency manager that allows you to retrieve the same class as your Bloc or Controller with just 1 lines of code, no Provider context, no inheritedWidget:
Controller controller = Get.put(Controller()); // Rather Controller controller = Controller();- Note: If you are using Get's State Manager, pay more attention to the bindings API, which will make it easier to connect your view to your controller.
Instead of instantiating your class within the class you are using, you are instantiating it within the Get instance, which will make it available throughout your App. So you can use your controller (or class Bloc) normally
Tip: Get dependency management is decoupled from other parts of the package, so if for example, your app is already using a state manager (any one, it doesn't matter), you don't need to rewrite it all, you can use this dependency injection with no problems at all
controller.fetchApi();Imagine that you have navigated through numerous routes, and you need data that was left behind in your controller, you would need a state manager combined with the Provider or Get_it, correct? Not with Get. You just need to ask Get to "find" for your controller, you don't need any additional dependencies:
Controller controller = Get.find();
//Yes, it looks like Magic, Get will find your controller, and will deliver it to you. You can have 1 million controllers instantiated, Get will always give you the right controller.
And then you will be able to recover your controller data that was obtained back there:
Text(controller.textFromApi);See a more in-depth explanation of dependency management here
Translations are kept as a simple key-value dictionary map.
To add custom translations, create a class and extend Translations.
import 'package:get/get.dart';

class Messages extends Translations {
  @override
  Map<String, Map<String, String>> get keys => {
        'en_US': {
          'hello': 'Hello World',
        },
        'de_DE': {
          'hello': 'Hallo Welt',
        }
      };
}Just append .tr to the specified key and it will be translated, using the current value of Get.locale and Get.fallbackLocale.
Text('title'.tr);var products = [];
Text('singularKey'.trPlural('pluralKey', products.length, Args));import 'package:get/get.dart';
Map<String, Map<String, String>> get keys => {
'en_US': {
'logged_in': 'logged in as @name with email @email',
},
'es_ES': {
'logged_in': 'iniciado sesión como @name con e-mail @email',
}
};
Text('logged_in'.trParams({
'name': 'Jhon',
'email': '[email protected]'
}));Pass parameters to GetMaterialApp to define the locale and translations.
return GetMaterialApp(
    translations: Messages(), // your translations
    locale: Locale('en', 'US'), // translations will be displayed in that locale
    fallbackLocale: Locale('en', 'UK'), // specify the fallback locale in case an invalid locale is selected.
);Call Get.updateLocale(locale) to update the locale. Translations then automatically use the new locale.
var locale = Locale('en', 'US');
Get.updateLocale(locale);To read the system locale, you could use Get.deviceLocale.
return GetMaterialApp(
    locale: Get.deviceLocale,
);Please do not use any higher level widget than GetMaterialApp in order to update it. This can trigger duplicate keys. A lot of people are used to the prehistoric approach of creating a "ThemeProvider" widget just to change the theme of your app, and this is definitely NOT necessary with GetX™.
You can create your custom theme and simply add it within Get.changeTheme without any boilerplate for that:
Get.changeTheme(ThemeData.light());If you want to create something like a button that changes the Theme in onTap, you can combine two GetX™ APIs for that:
- The api that checks if the dark
Themeis being used. - And the
ThemeChange API, you can just put this within anonPressed:
Get.changeTheme(Get.isDarkMode? ThemeData.light(): ThemeData.dark());When .darkmode is activated, it will switch to the light theme, and when the light theme becomes active, it will change to dark theme.
GetConnect is an easy way to communicate from your back to your front with http or websockets
You can simply extend GetConnect and use the GET/POST/PUT/DELETE/SOCKET methods to communicate with your Rest API or websockets.
class UserProvider extends GetConnect {
  // Get request
  Future<Response> getUser(int id) => get('http://youapi/users/$id');
  // Post request
  Future<Response> postUser(Map data) => post('http://youapi/users', body: data);
  // Post request with File
  Future<Response<CasesModel>> postCases(List<int> image) {
    final form = FormData({
      'file': MultipartFile(image, filename: 'avatar.png'),
      'otherFile': MultipartFile(image, filename: 'cover.png'),
    });
    return post('http://youapi/users/upload', form);
  }

  GetSocket userMessages() {
    return socket('https://yourapi/users/socket');
  }
}GetConnect is highly customizable You can define base Url, as answer modifiers, as Requests modifiers, define an authenticator, and even the number of attempts in which it will try to authenticate itself, in addition to giving the possibility to define a standard decoder that will transform all your requests into your Models without any additional configuration.
class HomeProvider extends GetConnect {
  @override
  void onInit() {
    // All request will pass to jsonEncode so CasesModel.fromJson()
    httpClient.defaultDecoder = CasesModel.fromJson;
    httpClient.baseUrl = 'https://api.covid19api.com';
    // baseUrl = 'https://api.covid19api.com'; // It define baseUrl to
    // Http and websockets if used with no [httpClient] instance

    // It's will attach 'apikey' property on header from all requests
    httpClient.addRequestModifier((request) {
      request.headers['apikey'] = '12345678';
      return request;
    });

    // Even if the server sends data from the country "Brazil",
    // it will never be displayed to users, because you remove
    // that data from the response, even before the response is delivered
    httpClient.addResponseModifier<CasesModel>((request, response) {
      CasesModel model = response.body;
      if (model.countries.contains('Brazil')) {
        model.countries.remove('Brazilll');
      }
    });

    httpClient.addAuthenticator((request) async {
      final response = await get("http://yourapi/token");
      final token = response.body['token'];
      // Set the header
      request.headers['Authorization'] = "$token";
      return request;
    });

    //Autenticator will be called 3 times if HttpStatus is
    //HttpStatus.unauthorized
    httpClient.maxAuthRetries = 3;
  }

  @override
  Future<Response<CasesModel>> getCases(String path) => get(path);
}The GetPage has now new property that takes a list of GetMiddleWare and run them in the specific order.
Note: When GetPage has a Middlewares, all the children of this page will have the same middlewares automatically.
The Order of the Middlewares to run can be set by the priority in the GetMiddleware.
final middlewares = [
  GetMiddleware(priority: 2),
  GetMiddleware(priority: 5),
  GetMiddleware(priority: 4),
  GetMiddleware(priority: -8),
];
those middlewares will be run in this order -8 => 2 => 4 => 5
This function will be called when the page of the called route is being searched for. It takes RouteSettings as a result to redirect to. Or give it null and there will be no redirecting.
RouteSettings redirect(String route) {
  final authService = Get.find<AuthService>();
  return authService.authed.value ? null : RouteSettings(name: '/login')
}This function will be called when this Page is called before anything created you can use it to change something about the page or give it new page
GetPage onPageCalled(GetPage page) {
  final authService = Get.find<AuthService>();
  return page.copyWith(title: 'Welcome ${authService.UserName}');
}This function will be called right before the Bindings are initialize. Here you can change Bindings for this page.
List<Bindings> onBindingsStart(List<Bindings> bindings) {
  final authService = Get.find<AuthService>();
  if (authService.isAdmin) {
    bindings.add(AdminBinding());
  }
  return bindings;
}This function will be called right after the Bindings are initialize. Here you can do something after that you created the bindings and before creating the page widget.
GetPageBuilder onPageBuildStart(GetPageBuilder page) {
  print('bindings are ready');
  return page;
}This function will be called right after the GetPage.page function is called and will give you the result of the function. and take the widget that will be showed.
This function will be called right after disposing all the related objects (Controllers, views, ...) of the page.
// give the current args from currentScreen
Get.arguments

// give name of previous route
Get.previousRoute

// give the raw route to access for example, rawRoute.isFirst()
Get.rawRoute

// give access to Routing API from GetObserver
Get.routing

// check if snackbar is open
Get.isSnackbarOpen

// check if dialog is open
Get.isDialogOpen

// check if bottomsheet is open
Get.isBottomSheetOpen

// remove one route.
Get.removeRoute()

// back repeatedly until the predicate returns true.
Get.until()

// go to next route and remove all the previous routes until the predicate returns true.
Get.offUntil()

// go to next named route and remove all the previous routes until the predicate returns true.
Get.offNamedUntil()

//Check in what platform the app is running
GetPlatform.isAndroid
GetPlatform.isIOS
GetPlatform.isMacOS
GetPlatform.isWindows
GetPlatform.isLinux
GetPlatform.isFuchsia

//Check the device type
GetPlatform.isMobile
GetPlatform.isDesktop
//All platforms are supported independently in web!
//You can tell if you are running inside a browser
//on Windows, iOS, OSX, Android, etc.
GetPlatform.isWeb


// Equivalent to : MediaQuery.of(context).size.height,
// but immutable.
Get.height
Get.width

// Gives the current context of the Navigator.
Get.context

// Gives the context of the snackbar/dialog/bottomsheet in the foreground, anywhere in your code.
Get.contextOverlay

// Note: the following methods are extensions on context. Since you
// have access to context in any place of your UI, you can use it anywhere in the UI code

// If you need a changeable height/width (like Desktop or browser windows that can be scaled) you will need to use context.
context.width
context.height

// Gives you the power to define half the screen, a third of it and so on.
// Useful for responsive applications.
// param dividedBy (double) optional - default: 1
// param reducedBy (double) optional - default: 0
context.heightTransformer()
context.widthTransformer()

/// Similar to MediaQuery.of(context).size
context.mediaQuerySize()

/// Similar to MediaQuery.of(context).padding
context.mediaQueryPadding()

/// Similar to MediaQuery.of(context).viewPadding
context.mediaQueryViewPadding()

/// Similar to MediaQuery.of(context).viewInsets;
context.mediaQueryViewInsets()

/// Similar to MediaQuery.of(context).orientation;
context.orientation()

/// Check if device is on landscape mode
context.isLandscape()

/// Check if device is on portrait mode
context.isPortrait()

/// Similar to MediaQuery.of(context).devicePixelRatio;
context.devicePixelRatio()

/// Similar to MediaQuery.of(context).textScaleFactor;
context.textScaleFactor()

/// Get the shortestSide from screen
context.mediaQueryShortestSide()

/// True if width be larger than 800
context.showNavbar()

/// True if the shortestSide is smaller than 600p
context.isPhone()

/// True if the shortestSide is largest than 600p
context.isSmallTablet()

/// True if the shortestSide is largest than 720p
context.isLargeTablet()

/// True if the current device is Tablet
context.isTablet()

/// Returns a value<T> according to the screen size
/// can give value for:
/// watch: if the shortestSide is smaller than 300
/// mobile: if the shortestSide is smaller than 600
/// tablet: if the shortestSide is smaller than 1200
/// desktop: if width is largest than 1200
context.responsiveValue<T>()GetMaterialApp configures everything for you, but if you want to configure Get manually.
MaterialApp(
  navigatorKey: Get.key,
  navigatorObservers: [GetObserver()],
);
You will also be able to use your own Middleware within GetObserver, this will not influence anything.
MaterialApp(
  navigatorKey: Get.key,
  navigatorObservers: [
    GetObserver(MiddleWare.observer) // Here
  ],
);
You can create Global Settings for Get. Just add Get.config to your code before pushing any route.
Or do it directly in your GetMaterialApp
GetMaterialApp(
  enableLog: true,
  defaultTransition: Transition.fade,
  opaqueRoute: Get.isOpaqueRouteDefault,
  popGesture: Get.isPopGestureEnable,
  transitionDuration: Get.defaultDurationTransition,
  defaultGlobalState: Get.defaultGlobalState,
);

Get.config(
  enableLog = true,
  defaultPopGesture = true,
  defaultTransition = Transitions.cupertino
)
You can optionally redirect all the logging messages from Get.
If you want to use your own, favourite logging package,
and want to capture the logs there:
GetMaterialApp(
  enableLog: true,
  logWriterCallback: localLogWriter,
);

void localLogWriter(String text, {bool isError = false}) {
  // pass the message to your favourite logging package here
  // please note that even if enableLog: false log messages will be pushed in this callback
  // you get check the flag if you want through GetConfig.isLogEnable
}
These Widgets allows you to manage a single value, and keep the state ephemeral and locally.
We have flavours for Reactive and Simple.
For instance, you might use them to toggle obscureText in a TextField, maybe create a custom
Expandable Panel, or maybe modify the current index in BottomNavigationBar while changing the content
of the body in a Scaffold.
A simplification of StatefulWidget that works with a .setState callback that takes the updated value.
ValueBuilder<bool>(
  initialValue: false,
  builder: (value, updateFn) => Switch(
    value: value,
    onChanged: updateFn, // same signature! you could use ( newValue ) => updateFn( newValue )
  ),
  // if you need to call something outside the builder method.
  onUpdate: (value) => print("Value updated: $value"),
  onDispose: () => print("Widget unmounted"),
),Similar to ValueBuilder, but this is the Reactive version, you pass a Rx instance (remember the magical .obs?) and
updates automatically... isn't it awesome?
ObxValue((data) => Switch(
        value: data.value,
        onChanged: data, // Rx has a _callable_ function! You could use (flag) => data.value = flag,
    ),
    false.obs,
),.observables (also known as Rx Types) have a wide variety of internal methods and operators.
Is very common to believe that a property with
.obsIS the actual value... but make no mistake! We avoid the Type declaration of the variable, because Dart's compiler is smart enough, and the code looks cleaner, but:
var message = 'Hello world'.obs;
print( 'Message "$message" has Type ${message.runtimeType}');
Even if message prints the actual String value, the Type is RxString!
So, you can't do message.substring( 0, 4 ).
You have to access the real value inside the observable:
The most "used way" is .value, but, did you know that you can also use...
final name = 'GetX'.obs;
// only "updates" the stream, if the value is different from the current one.
name.value = 'Hey';

// All Rx properties are "callable" and returns the new value.
// but this approach does not accepts `null`, the UI will not rebuild.
name('Hello');

// is like a getter, prints 'Hello'.
name() ;

/// numbers:

final count = 0.obs;

// You can use all non mutable operations from num primitives!
count + 1;

// Watch out! this is only valid if `count` is not final, but var
count += 1;

// You can also compare against values:
count > 2;

/// booleans:

final flag = false.obs;

// switches the value between true/false
flag.toggle();


/// all types:

// Sets the `value` to null.
flag.nil();

// All toString(), toJson() operations are passed down to the `value`
print( count ); // calls `toString()` inside  for RxInt

final abc = [0,1,2].obs;
// Converts the value to a json Array, prints RxList
// Json is supported by all Rx types!
print('json: ${jsonEncode(abc)}, type: ${abc.runtimeType}');

// RxMap, RxList and RxSet are special Rx types, that extends their native types.
// but you can work with a List as a regular list, although is reactive!
abc.add(12); // pushes 12 to the list, and UPDATES the stream.
abc[3]; // like Lists, reads the index 3.


// equality works with the Rx and the value, but hashCode is always taken from the value
final number = 12.obs;
print( number == 12 ); // prints > true

/// Custom Rx Models:

// toJson(), toString() are deferred to the child, so you can implement override on them, and print() the observable directly.

class User {
    String name, last;
    int age;
    User({this.name, this.last, this.age});

    @override
    String toString() => '$name $last, $age years old';
}

final user = User(name: 'John', last: 'Doe', age: 33).obs;

// `user` is "reactive", but the properties inside ARE NOT!
// So, if we change some variable inside of it...
user.value.name = 'Roi';
// The widget will not rebuild!,
// `Rx` don't have any clue when you change something inside user.
// So, for custom classes, we need to manually "notify" the change.
user.refresh();

// or we can use the `update()` method!
user.update((value){
  value.name='Roi';
});

print( user );Another way to handle your UI state is use the StateMixin<T> .
To implement it, use the with to add the StateMixin<T>
to your controller which allows a T model.
class Controller extends GetController with StateMixin<User>{}The change() method change the State whenever we want.
Just pass the data and the status in this way:
change(data, status: RxStatus.success());RxStatus allow these status:
RxStatus.loading();
RxStatus.success();
RxStatus.empty();
RxStatus.error('message');
To represent it in the UI, use:
class OtherClass extends GetView<Controller> {
  @override
  Widget build(BuildContext context) {
    return Scaffold(

      body: controller.obx(
        (state)=>Text(state.name),

        // here you can put your custom loading indicator, but
        // by default would be Center(child:CircularProgressIndicator())
        onLoading: CustomLoadingIndicator(),
        onEmpty: Text('No data found'),

        // here also you can set your own error widget, but by
        // default will be an Center(child:Text(error))
        onError: (error)=>Text(error),
      ),
    );
}I love this Widget, is so simple, yet, so useful!
Is a const Stateless Widget that has a getter controller for a registered Controller, that's all.
 class AwesomeController extends GetController {
   final String title = 'My Awesome View';
 }

  // ALWAYS remember to pass the `Type` you used to register your controller!
 class AwesomeView extends GetView<AwesomeController> {
   @override
   Widget build(BuildContext context) {
     return Container(
       padding: EdgeInsets.all(20),
       child: Text(controller.title), // just call `controller.something`
     );
   }
}Extend this widget to build responsive view.
this widget contains the screen property that have all
information about the screen size and type.
You have two options to build it.
- with
buildermethod you return the widget to build. - with methods
desktop,tablet,phone,watch. the specific method will be built when the screen type matches the method when the screen is [ScreenType.Tablet] thetabletmethod will be exuded and so on. Note: If you use this method please set the propertyalwaysUseBuildertofalse
With settings property you can set the width limit for the screen types.
 Code to this screen
code
Code to this screen
code
Most people have no idea about this Widget, or totally confuse the usage of it.
The use case is very rare, but very specific: It caches a Controller.
Because of the cache, can't be a const Stateless.
So, when do you need to "cache" a Controller?
If you use, another "not so common" feature of GetX: Get.create().
Get.create(()=>Controller()) will generate a new Controller each time you call
Get.find<Controller>(),
That's where GetWidget shines... as you can use it, for example,
to keep a list of Todo items. So, if the widget gets "rebuilt", it will keep the same controller instance.
This class is like a GetxController, it shares the same lifecycle ( onInit(), onReady(), onClose()).
But has no "logic" inside of it. It just notifies GetX Dependency Injection system, that this subclass
can not be removed from memory.
So is super useful to keep your "Services" always reachable and active with Get.find(). Like:
ApiService, StorageService, CacheService.
Future<void> main() async {
  await initServices(); /// AWAIT SERVICES INITIALIZATION.
  runApp(SomeApp());
}

/// Is a smart move to make your Services intiialize before you run the Flutter app.
/// as you can control the execution flow (maybe you need to load some Theme configuration,
/// apiKey, language defined by the User... so load SettingService before running ApiService.
/// so GetMaterialApp() doesnt have to rebuild, and takes the values directly.
void initServices() async {
  print('starting services ...');
  /// Here is where you put get_storage, hive, shared_pref initialization.
  /// or moor connection, or whatever that's async.
  await Get.putAsync(() => DbService().init());
  await Get.putAsync(SettingsService()).init();
  print('All services started...');
}

class DbService extends GetxService {
  Future<DbService> init() async {
    print('$runtimeType delays 2 sec');
    await 2.delay();
    print('$runtimeType ready!');
    return this;
  }
}

class SettingsService extends GetxService {
  void init() async {
    print('$runtimeType delays 1 sec');
    await 1.delay();
    print('$runtimeType ready!');
  }
}
The only way to actually delete a GetxService, is with Get.reset() which is like a
"Hot Reboot" of your app. So remember, if you need absolute persistence of a class instance during the
lifetime of your app, use GetxService.
You can test your controllers like any other class, including their lifecycles:
class Controller extends GetxController {
  @override
  void onInit() {
    super.onInit();
    //Change value to name2
    name.value = 'name2';
  }

  @override
  void onClose() {
    name.value = '';
    super.onClose();
  }

  final name = 'name1'.obs;

  void changeName() => name.value = 'name3';
}

void main() {
  test('''
Test the state of the reactive variable "name" across all of its lifecycles''',
      () {
    /// You can test the controller without the lifecycle,
    /// but it's not recommended unless you're not using
    ///  GetX dependency injection
    final controller = Controller();
    expect(controller.name.value, 'name1');

    /// If you are using it, you can test everything,
    /// including the state of the application after each lifecycle.
    Get.put(controller); // onInit was called
    expect(controller.name.value, 'name2');

    /// Test your functions
    controller.changeName();
    expect(controller.name.value, 'name3');

    /// onClose was called
    Get.delete<Controller>();

    expect(controller.name.value, '');
  });
}If you need to mock your GetxController/GetxService, you should extend GetxController, and mixin it with Mock, that way
class NotificationServiceMock extends GetxService with Mock implements NotificationService {}If you are testing widgets, or test groups, use Get.reset at the end of your test or in tearDown to reset all settings from your previous test.
if you are using your navigation in your controllers, use Get.testMode = true at the beginning of your main.
1- Rx types:
| Before | After |
|---|---|
| StringX | RxString |
| IntX | RxInt |
| MapX | RxMap |
| ListX | RxList |
| NumX | RxNum |
| DoubleX | RxDouble |
RxController and GetBuilder now have merged, you no longer need to memorize which controller you want to use, just use GetxController, it will work for simple state management and for reactive as well.
2- NamedRoutes Before:
GetMaterialApp(
  namedRoutes: {
    '/': GetRoute(page: Home()),
  }
)
Now:
GetMaterialApp(
  getPages: [
    GetPage(name: '/', page: () => Home()),
  ]
)
Why this change? Often, it may be necessary to decide which page will be displayed from a parameter, or a login token, the previous approach was inflexible, as it did not allow this. Inserting the page into a function has significantly reduced the RAM consumption, since the routes will not be allocated in memory since the app was started, and it also allowed to do this type of approach:
GetStorage box = GetStorage();

GetMaterialApp(
  getPages: [
    GetPage(name: '/', page:(){
      return box.hasData('token') ? Home() : Login();
    })
  ]
)1- Many times after a Flutter update, many of your packages will break. Sometimes compilation errors happen, errors often appear that there are still no answers about, and the developer needs to know where the error came from, track the error, only then try to open an issue in the corresponding repository, and see its problem solved. Get centralizes the main resources for development (State, dependency and route management), allowing you to add a single package to your pubspec, and start working. After a Flutter update, the only thing you need to do is update the Get dependency, and get to work. Get also resolves compatibility issues. How many times a version of a package is not compatible with the version of another, because one uses a dependency in one version, and the other in another version? This is also not a concern using Get, as everything is in the same package and is fully compatible.
2- Flutter is easy, Flutter is incredible, but Flutter still has some boilerplate that may be unwanted for most developers, such as Navigator.of(context).push (context, builder [...]. Get simplifies development. Instead of writing 8 lines of code to just call a route, you can just do it: Get.to(Home()) and you're done, you'll go to the next page. Dynamic web urls are a really painful thing to do with Flutter currently, and that with GetX is stupidly simple. Managing states in Flutter, and managing dependencies is also something that generates a lot of discussion, as there are hundreds of patterns in the pub. But there is nothing as easy as adding a ".obs" at the end of your variable, and place your widget inside an Obx, and that's it, all updates to that variable will be automatically updated on the screen.
3- Ease without worrying about performance. Flutter's performance is already amazing, but imagine that you use a state manager, and a locator to distribute your blocs/stores/controllers/ etc. classes. You will have to manually call the exclusion of that dependency when you don't need it. But have you ever thought of simply using your controller, and when it was no longer being used by anyone, it would simply be deleted from memory? That's what GetX does. With SmartManagement, everything that is not being used is deleted from memory, and you shouldn't have to worry about anything but programming. You will be assured that you are consuming the minimum necessary resources, without even having created a logic for this.
4- Actual decoupling. You may have heard the concept "separate the view from the business logic". This is not a peculiarity of BLoC, MVC, MVVM, and any other standard on the market has this concept. However, this concept can often be mitigated in Flutter due to the use of context. If you need context to find an InheritedWidget, you need it in the view, or pass the context by parameter. I particularly find this solution very ugly, and to work in teams we will always have a dependence on View's business logic. Getx is unorthodox with the standard approach, and while it does not completely ban the use of StatefulWidgets, InitState, etc., it always has a similar approach that can be cleaner. Controllers have life cycles, and when you need to make an APIREST request for example, you don't depend on anything in the view. You can use onInit to initiate the http call, and when the data arrives, the variables will be populated. As GetX is fully reactive (really, and works under streams), once the items are filled, all widgets that use that variable will be automatically updated in the view. This allows people with UI expertise to work only with widgets, and not have to send anything to business logic other than user events (like clicking a button), while people working with business logic will be free to create and test the business logic separately.
This library will always be updated and implementing new features. Feel free to offer PRs and contribute to them.
GetX has a highly active and helpful community. If you have questions, or would like any assistance regarding the use of this framework, please join our community channels, your question will be answered more quickly, and it will be the most suitable place. This repository is exclusive for opening issues, and requesting resources, but feel free to be part of GetX Community.
| Slack | Discord | Telegram |
|---|---|---|
|
Want to contribute to the project? We will be proud to highlight you as one of our collaborators. Here are some points where you can contribute and make Get (and Flutter) even better.
- Helping to translate the readme into other languages.
- Adding documentation to the readme (a lot of Get's functions haven't been documented yet).
- Write articles or make videos teaching how to use Get (they will be inserted in the Readme and in the future in our Wiki).
- Offering PRs for code/tests.
- Including new functions.
Any contribution is welcome!
- Flutter Getx EcoSystem package for arabic people - Tutorial by Pesa Coder.
- Dynamic Themes in 3 lines using GetX™ - Tutorial by Rod Brown.
- Complete GetX™ Navigation - Route management video by Amateur Coder.
- Complete GetX State Management - State management video by Amateur Coder.
- GetX™ Other Features - Utils, storage, bindings and other features video by Amateur Coder.
- Firestore User with GetX | Todo App - Video by Amateur Coder.
- Firebase Auth with GetX | Todo App - Video by Amateur Coder.
- The Flutter GetX™ Ecosystem ~ State Management - State management by Aachman Garg.
- The Flutter GetX™ Ecosystem ~ Dependency Injection - Dependency Injection by Aachman Garg.
- GetX, the all-in-one Flutter package - A brief tutorial covering State Management and Navigation by Thad Carnevalli.
- Build a To-do List App from scratch using Flutter and GetX - UI + State Management + Storage video by Thad Carnevalli.
- GetX Flutter Firebase Auth Example - Article by Jeff McMorris.
- Flutter State Management with GetX – Complete App - by App With Flutter.
- Flutter Routing with Animation using Get Package - by App With Flutter.
- A minimal example on dartpad - by Roi Peker