- A slave-library built-in support
- Pre-configured environment:
- Vite
- TypeScript
- Husky + lint-staged
- ESLint
- Prettier
- Included and pre-configured
- Vue Router
- Pinia
- Vue I18n
- Tailwind CSS
A part of the master-slave blueprint-setup for a quick Vue application kickstart.
Useful in cases where a Vue application depends on a shared library developed by the same team as the application itself.
This is the master part of the setup.
Imagine you have an application called Todo App. The application has a dependency - a shared component and general-purpose (util) library that's also developed by you (or your team) and is also intended to be used not only in the Todo App, but in some other applications as well. Let's call the library Todo UI.
In such a case it makes the most sense to develop the library as a standalone application and share it using NPM (either globally, or even within a private registry) or by any other known means.
Thus, you can later include the library in any other project where it makes sense to use it.
The only issue with such an approach is that you still need some place to test the library, and you also need to configure both the master-app and the slave-lib to properly work together. And if for the 1st problem there exist a lot of various solutions, the last one normally becomes a real culprit.
This master-slave template-pair solves both issues. It provides you with a ready-to use lib-demo slave-solution and a sanely-preconfigured master-app, both of which know how to work one with another. Moreover, the slave-lib can also be used without the master application, i.e. as a standalone self-contained library.
Paradoxically, in this master-slave setup, the completely independent and optionally-standalone part is slave, rather than master. In other words, you don't necessarily need the master part for the slave part to work, but you absolutely do need a slave-lib for the master template to work.
There are 4 different patterns which are supported out of the box by design:
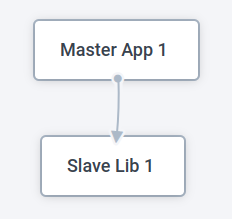
Doesn't make much sense, but is still relevant in cases when you just want to separate a (potentially) re-usable part of your application.
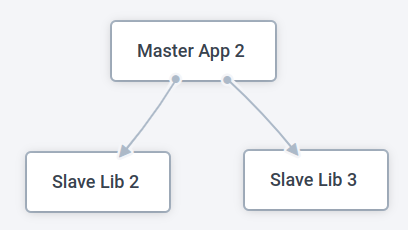
Probably the most widespread case. A single application consists of many small libraries, each of which is generic enough to be (potentially) shared with other applications.
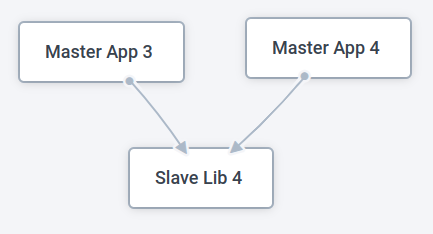
Common enough pattern, when many independent applications partially share the same codebase.
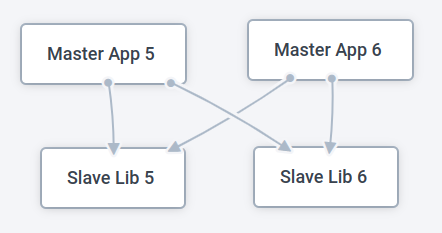
Basically, the last two patterns combined.
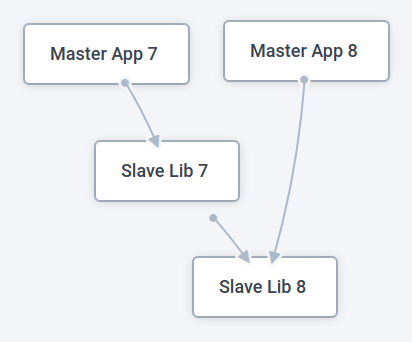
When there's an application that depends on library 1, that also depends on library 2. But The library 2 is independent enough to be used as a separate "building-block" for another application.
An example of such a scenario might be an application that uses a map-component (lib 1), that for some of its inner purposes relies on Lodash (lib 2). The lib 2 - Lodash - can still be used separately by any other application.
Here also go all the possible variations in relationships between the libraries and master apps (more masters / less masers, more slaves / less slaves, different connections between them and so on).
Start with the slave-library's README. Getting all the slaves up and running is the number zero step. In case where there takes place sub-slaving, start with the deepest dependency there is.
- Clone the repo
- Rename the folder to reflect your application's name. Rename the application in
package.jsonrespectively rm -rf .git && git initto re-initialize the.gitfolder in order to detach the library from this repository- List all the direct slaves in the
package.json'sdependencies - list all the direct slaves' names in the
package.json'senv:prepscript like this:npm link vite-vue-starter-slave1 vite-vue-starter-slave2 vite-vue-starter-slave3 - Satisfy all the
TODOs invite.config.tsandtailwind.config.cjs - Run
npm install - Run
npm run env:prep - Clear the .github folder's contents
- Keep developing the application with all the slave-libs being available
WebStorm 2022.2 with enabled auto-linting and Prettier-based auto-formatting.