A demo of best practices for open-source Ada/SPARK development.
The goal of this repository is to show the best practices for Ada/SPARK open-source development. We will do our best to keep it updated with the latest technologies and services from Alire and GitHub. Don’t hesitate to suggest enhancements in case we missed something interesting.
In this project we use:
Alirefor dependency management and release publicationSPARKandGNATprovefor formal verificationGNATbuilt-in checks for static analysisAUnitfor unit-testingGNATcoveragefor source code coverage analysisGitHub Actionsfor Continuous Integration
Automatic formal verification of the SPARK code in this project is done by the GNATprove tool. This tool is run as the Continuous Integration process to ensure that contributions do not break the proof.
The GNAT compiler comes with a lot of static analysis checks built-in. When
using the validation build profile, Alire enables all the
static analysis checks of GNAT. This provides detection of dead code, unused
variables, or uninitialised data for instance.
A local Alire crate in the tests/ folder is used to separate the test
code/framework from the main project. Using a local crate also means that we
can have extra dependencies only for testing:
- Unit test framework
- Libraries to read test data (TOML, JSON, etc.)
- GNATcoverage for code coverage analysis
- Etc.
This project uses AUnit as the unit testing
framework. The tests/ crate is both built and run as part of the Continuous
Integration process.
GNATcov is used for code coverage analysis on execution of the tests. As part of the Continuous Integration process, the coverage analysis is automatically produced and uploaded to an online service called codecov.io.
With Codecovio you can also have a nice "badge" to display the latest coverage
analysis result in your GitHub readme.md file:
For this project we use GitHub Actions for Continuous Integration (CI). GitHub actions provides virtual machines to build and test the project when new code is added, as well as automated validation of contributions through pull-request checks, or code coverage report with codecovio.
The only thing needed for CI to work is a "workflow" file in the .github/workflows/ directory.
We extensively commented the workflow file of this repository so if you want to know more about how it works please have a look here.
This section provides a quick overview of the different parts of the projects.
The root directory contains the main library:
alire.tomlmanifest fileada_spark_workflow.gprGPRbuild project file (the name matches the Alire crate name)srcdirectory that contains the source code for the libraryREADME.mdfile in markdown format displayed on the GitHub front page
This sub-directory contains the test-suite for the library. It is an Alire project itself, with a local dependency to the main crate in the root directory, as well as other dependencies that are only required for testing (e.g. aunit and gnatcov). In this directory we also find an alire.toml manifest, a GPRbuild project file and a source directory.
The .github directory contains files specific to GitHub features and services. For this project we use GitHub Actions for the Continuous Integration (see GitHub Actions section). But there are more to explore, like templates for opening issues and pull-requests, contributions or code-of-conduct guidelines.
This sub-directory contains data files to be installed with the projects. See Resources section.
This sections provides a list of steps to create a library project with a similar workflow:
For this step you should follow the instruction from GitHub.
We recommend to use a repository name that matches the Alire crate name.
For the example below we will use the name: my_crate.
For this step we are going to list a few commands to run on the console. Please note that we first export variables for the name of the Alire crate a GitHub user login to make the commands more readable.
If you want to make an application project instead of a library, you just have to replace --lib by --bin in the first alr init command.
$ export CRATE_NAME=my_crate
$ export GITHUB_USER_NAME=mygithub
$ git clone https://github.com/${GITHUB_USER_NAME}/${CRATE_NAME}
$ cd ${CRATE_NAME}
$ alr init –-in-place –-lib ${CRATE_NAME}
$ mkdir tests
$ cd tests
$ alr init –-in-place --bin tests
$ alr with ${CRATE_NAME} -–use=..
$ alr with aunit
$ alr with gnatcovFor this step we create a folder for the GitHub Action workflow files and copy the workflow from this repository:
$ mkdir -p .github/workflows/
$ curl https://raw.githubusercontent.com/alire-project/ada_spark_workflow/main/.github/workflows/main.yml > .github/workflows/main.ymlTo see the code coverage reports in GitHub pull-requests and have a dedicated page for coverage status, you have to setup the repository in codecovio.
- First create and account and log-in: https://about.codecov.io/
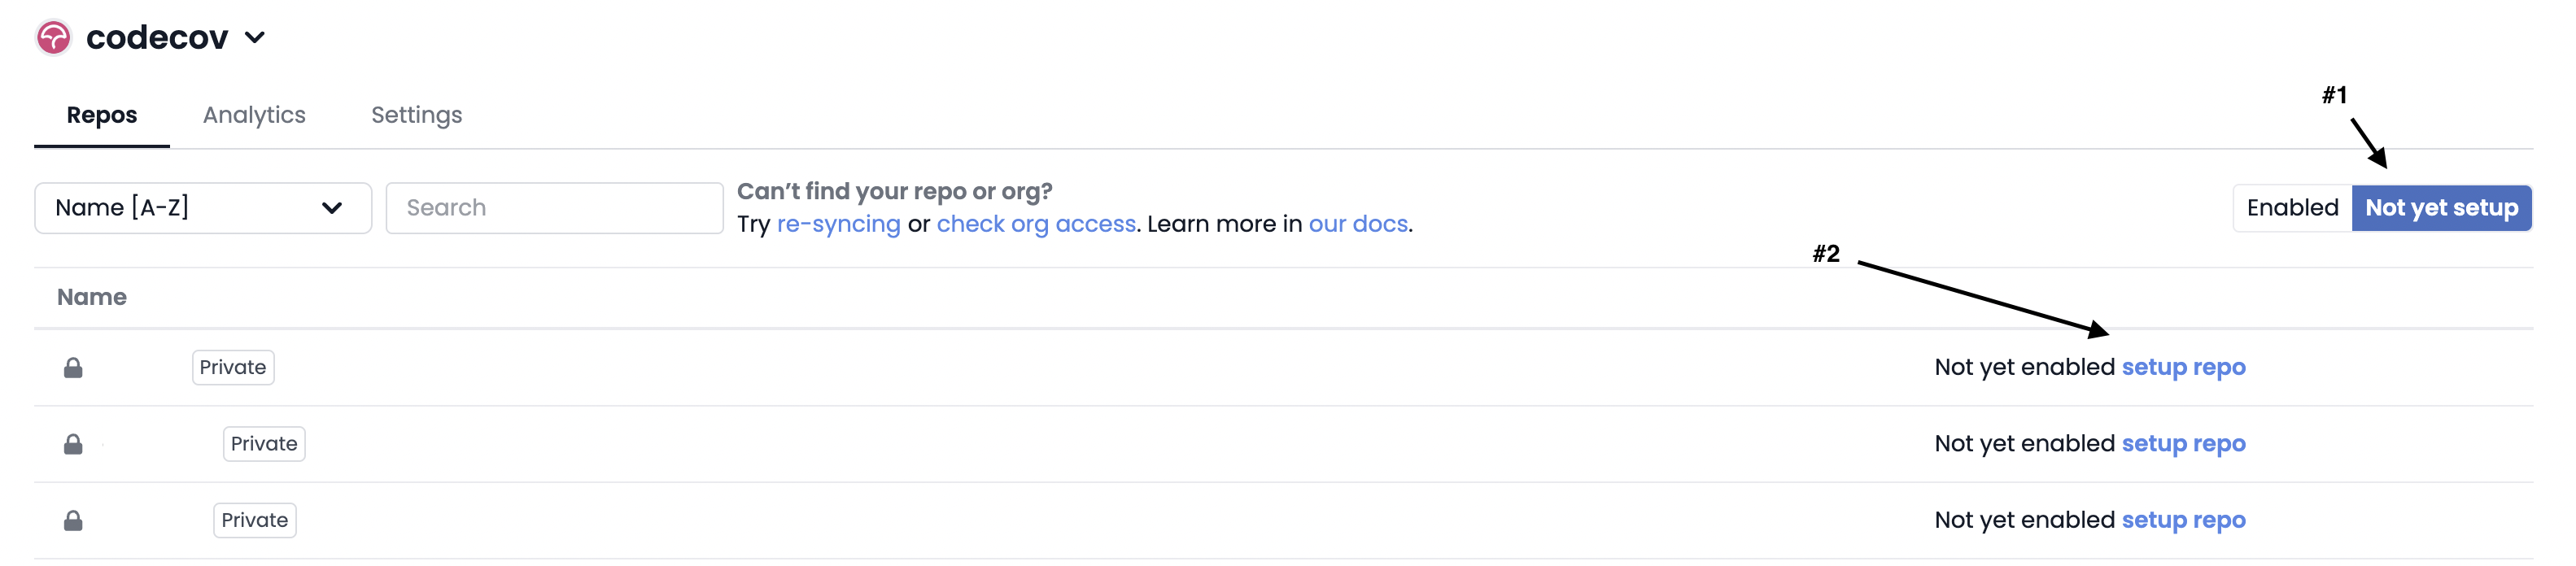
- Click on "Not Yet Setup" (#1 below) to show the list of repositories available.
- Click on "setup repo" (#2 below) to enable codecovio on the new repository
- If the GitHub repository is public, you don't have to do anything more
Don't forget to add a coverage status badge to your README.md file.
Some projects require non-code data files to be provided alongside the library or application executable. It can be images, databases, templates, etc. This is what we call "resources" in the Alire vocabulary.
For this demo project, we have a text file that contains a list of words, a dictionary.
Resources should be placed in the share/<CRATE_NAME>/ directory of the repository. In addition, the following lines in the GPRbuild project file will make sure resources are installed with the library/application:
   package Install is
      for Artifacts (".") use ("share");
   end Install;
To be able to read the resource files, one needs to get a path to the resource folder. However the location of the resources will not always be the same depending on installation path for instance. The Alire crate resources provides an easy way to solve this problem. Here's how to use it:
- Add
resourcesin the dependencies of you crate:
$ alr with resources- Instantiate the
Resourcesgeneric package in your code. For examples:
with Resources;
with Ada_Spark_Workflow_Config;

package Ada_SPARK_Workflow.Resources
is new Standard.Resources (Ada_Spark_Workflow_Config.Crate_Name);
Note that you should replace Ada_Spark_Workflow with you crate name here.
- Get path to resources using this new package:
Path : constant String := Ada_SPARK_Workflow.Resources.Resource_Path & "/unixdict.txt";
Alire provides an automatic handling of compiler switches. It is based on 3 profiles:
- Development
- Validation
- Release
For each profile a standard set of recommended compiler switches is produced by
Alire and added to the crate configuration project. You can see the crate
configuration project by building a crate ($ alr build) and then looking for
a .gpr file in the config/ folder.
By default, the root crate is built with the Development profile and the
dependencies are built with the Release profile.
There are two ways to override this default:
-
Command line: Use
alr build --releaseoralr build --validationto change the build profile of the root crate. We usealr build --validationin the Continuous Integration process to make sure that the code doesn't trigger any errors/warnings and passes the coding style standard. -
Alire manifest (
alire.toml): To change the build profile of dependencies, add abuild-profilessections to the root crate manifest. For instance in the local tests crate of this project we force use of the development profile for the main library:[build-profiles] ada_spark_workflow = "development"
Alire uses the Semantic Versioning system for dependency resolution. It is very important to understand the basics of this system when releasing new versions of your crate.
Semantic Versioning provides a rule for version numbers:
Given a version number MAJOR.MINOR.PATCH, increment the:

    MAJOR version when you make incompatible API changes,
    MINOR version when you add functionality in a backwards compatible manner, and
    PATCH version when you make backwards compatible bug fixes.
The point is that a given crate A made to depend on version 1.2.3 of
another crate B, can safely be compiled with version any of B between
1.0.0 and 2.0.0. Alire uses this system to find releases that satisfy all
the dependency requirements of the different crates used.
Let's look at some examples given a current version at 1.2.4-dev:
-
If we change the prototype of a subprogram in a package specification. For instance:
procedure Print (Str : String);
becomes:
procedure Print (Str : String; Indentation : Natural);
This is an incompatible API change, we must increase the MAJOR version number. Therefore the new release number will be
2.0.0. -
If we change the prototype of a subprogram in a package specification, but provide a default value. For instance:
procedure Print (Str : String; Indentation : Natural := 0);
This is a new feature but compatible with the existing API, we must increase the MINOR version number. Therefore the new release number will be
1.3.0. -
If we fix a bug in the body (
.adb) of a package. The API doesn't change, no new features are introduced, we must increase the PATCH version number. Therefore the new release will be1.2.5.
We recommend using the -dev suffix for the version number of the development
branch. For instance: 1.2.4-dev. This communicates that the crate the code is
not in a release state, API might change, documentation might be lacking, etc.
First, determine if this is a MAJOR, MINOR, or PATCH release (see
above).
The procedure is different for MAJOR/MINOR releases and PATCH releases.
We recommended using a separate branch for each MAJOR/MINOR release, i.e.
when the MINOR or MAJOR version number is increased:
- release/1.0
- release/1.1
- release/2.0
- release/2.1
- etc.
The procedure is:
- From the development branch
- Create a new branch:
$ git co -b release/X.Y - Update the version number in
alire.toml - Push the branch to the repo:
$ git push - Create a release from the GitHub web interface
- Make sure the continuous integration checks are ok
- Take the release manifest automatically produced in the GitHub release and contribute it to the Alire index.
- Update the version number in
alire.tomlon the development branch
Push bug fixes to the MINOR release branch and only update the PATCH number
For PATCH release (e.g 1.2.3) use the corresponding release branch
(release/1.2).
The procedure is:
- Check-out the release branch:
$ git co -b release/1.2 origin/release/1.2 - Commit corrective patches or cherry-pick from the development branch
- Update the
PATCHversion number inalire.toml - Push the branch to the repo:
$ git push - Create a release from the GitHub web interface
- Make sure the continuous integration checks are ok
- Take the release manifest automatically produced in the GitHub release and contribute it to the Alire index.