RLBotGUI is a streamlined user interface that helps you run custom Rocket League bots for offline entertainment. It relies on the RLBot project to work its magic: https://github.com/RLBot/RLBot
Works on Windows and partially works on Linux.
--debug: Tricks JavaScript into think that the GUI was compiled in debug mode (won't check for updates on launch)--console: (Windows only) will spawn a console window that will output all text, and will inherit console if available--no-pipe: Auto-enables--console, on Windows; Won't use the in-GUI console for RLBot-related things, but instead directly to a real console (work-around for some print flushing issues in Python & allowing for maximum print-spam)
You can download, update or create bots

In Story Mode, you can take over cities by beating challenges and can also recruit teammates and purchase upgrades for your car!

- Add new bots into their proper place in the bot list instead of the end
- Deferred bundle logo loading and missing python package checking
- Better error messages when downloading or upgrading the botpack
- Letting the user close Rocket League in between matches without restarting the GUI
- Full self-updating of the GUI: Implemented for Windows and Ubuntu users & reserved spot on AUR
- Prints get dumped asynchronously to log.txt in content folder
- "Upload GUI log for help" button in Menu (top right) which uploads the log.txt file to HasteBin
- DotNet runtime detection for C# bots to display warning message
- The selected bot tab persists between launches
- Launching of the GUI without Python
- Managing Python from within the GUI
- Running RLBot with a custom Python executable
- Easy Python pip fixing if something breaks; top right -> menu -> "Edit/Repair Python Settings"
- Real-time non-blocking subprocess stdout & stderr capture redirected to built-in GUI console for debugging purposes
- In-GUI completely isolated Python installation for Windows users
- Mini-console for quick & easy user status updates (installing packages, etc.)
Download the installer from the latest release in this repo.
It will put "RLBotGUI" in your Windows start menu and desktop.
- Add the public GPG key of the ppa to your system:
wget -O- https://virxec.github.io/rlbot_gui_rust_apt/apt-repo/pgp-key.public | sudo gpg --dearmor -o /etc/apt/trusted.gpg.d/rl-bot-gui.gpg- NOTE: You might not see the prompt, but you may need to enter in your sudo password.
- Deprecated method:
wget -O- https://virxec.github.io/rlbot_gui_rust_apt/apt-repo/pgp-key.public | sudo apt-key add -
- Add the repository to your system:
echo "deb [arch=amd64] https://virxec.github.io/rlbot_gui_rust_apt/apt-repo/ stable main" | sudo tee /etc/apt/sources.list.d/rl-bot-gui.list > /dev/null- Deprecated method:
sudo add-apt-repository 'deb [arch=amd64] https://virxec.github.io/rlbot_gui_rust_apt/apt-repo/ stable main'
- Deprecated method:
- Refresh app list:
sudo apt update - Install the GUI:
sudo apt install rl-bot-gui
NOTE: If you wish to compile the GUI on your own system, replace rlbotgui-rust-bin with rlbotgui-rust-git!
Using yay: yay -S rlbotgui-rust-bin
Using paru: paru -S rlbotgui-rust-bin
Without using an AUR helper:
- Setup:
sudo pacman -S --needed base-devel - Clone PKGBUILD:
git clone https://aur.archlinux.org/rlbotgui-rust-bin.git - Navigate to the folder:
cd rlbotgui-rust-bin - Install using PKGBUILD:
makepkg -si
We have a pre-compiled binary, icon, and .desktop for you! Get the linux-basics.tar.gz from here.
If you want to have a script that checks for updates, you could:
- Download this JSON
- Compare the
tag_namefrom when you last download the binary to the currenttag_name - Download the
assetwith the namelinux-basics.tar.gzusingbrowser_download_url - Unzip the
.tar.gzand put the files in their proper places on your system
Warning: RLBot (not the GUI, the underlying RLBot project) is currently broken on MacOS.
You're going to have to compile the GUI yourself:
- Follow the Tauri prerequisites guide.
- A system with at least 8GB of RAM is required. 4GB will not work.
- Clone this repository into your home directory:
git clone https://github.com/VirxEC/rlbot_gui_rust.git - Navigate to the right folder:
cd rlbot_gui_rust/src-tauri - Build the GUI:
cargo build --release - The compiled binary is
target/release/rl-bot-gui - To check for updates, run
git fetchthengit pullin the project directory - if there's updates re-runcargo build --releaseto compile the new binary.
- 16gb of RAM (minimum 8gb required, might not be able to have other apps open while compiling)
- 64gb+ free space (assuming fresh Windows install with no build tools, Rocket League, git, IDE, etc)
- For non-Windows: SSD (debug binary is around 500mb on Linux)
Windows
- Download the
rustuptool - Run the exe, and Rust will be installed on your system. If you're prompted to
Automatically install Visual Studio 2022 Community edition, you must typey. You should then be prompted to install the required C++ Build Tools and Windows SDK as seen here: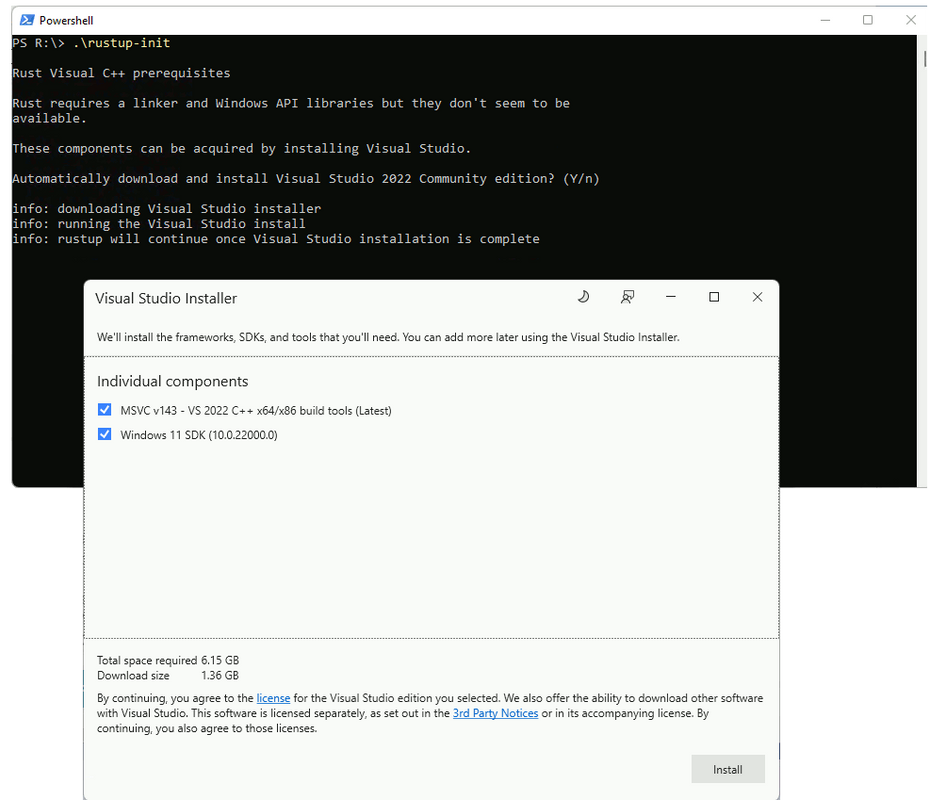
- To update the
rustuptool, runrustup self updatein your terminal - To update Rust, run
rustup update stablein your terminal
Other
Follow the Tauri prerequisites guide.
- Clone this repository
- Navigate to the
src-taurifolder - Running via:
cargo run- the GUI will compile and launch.cargo run --release- the GUI will compile with optimizations (like production) and launch.
- Install Tauri's CLI:
cargo install tauri-cli --version "^1.0.0"- NOTE: This will download the CLI source and compile it. If you have yarn and don't wish to compile from source, you can:
- In the project directory, run
yarn add -D @tauri-apps/cli - And then replace
cargowithyarn. The generatedpackage.jsonandyarn.lockwill be auto-ignored.
- Host the
assetsfolder onlocalhostport5500- the Live Server extension for VS Code can do this:- Open the
assetsfolder in a new VS Code window - In VS Code's
settings.json, add the following:{ "liveServer.settings.host": "localhost", "liveServer.settings.ignoreFiles": [ "src-tauri/**", ".vscode/**", ] } - Run the
Open with Live Servercommand
- Open the
- In the
src-taurifolder, runcargo tauri dev. The GUI will now:- Auto-reload when something changes in the
assetsfolder - Auto-recompile when your code changes in the
src-tauri/srcfolder - You should also now have two windows, one with the
assetsfolder open for HTML/CSS/JS dev work and the other for Rust dev work
- Auto-reload when something changes in the
Taken from the Tauri guide:
Note that for Linux, you should build on the oldest version of Ubuntu possible. Ubuntu 18.04 is recommended for the best compatibility.
Method 1: 100% compile from source
This will not only compile the GUI from source, but also the Tauri CLI. Once the CLI is compiled, you don't need to do it again.
- Navigate to the
src-taurifolder - Run
cargo install tauri-cli --version "^1.0.0" - In the project directory, run
cargo tauri build
Method 2: Do it quickly with yarn
This will download a pre-compiled version of the Tauri CLI.
- Run
yarn add -D @tauri-apps/cli - In the project directory, run
yarn tauri build
- Install and run BakkesMod
- In Rocket League, press F6 to open the BakkesMod console, and enter the
dumpitemscommand - Find the output
items.csvin the folder where yourRocketLeague.exeis, usuallyC:/Program Files (x86)/Steam/steamapps/common/rocketleague/Binaries/Win64 - Replace
assets/csv/items.csvwith the new file - Change encoding of the new file to UTF-8. Here's how to do that in VS Code:
- use the Change File Encoding command (or click the UTF-8 button in the bottom right)
- select Reopen with Encoding, select the one with Guessed from content (probably Windows 1252)
- now do that again, but Save with Encoding and UTF-8
- Don't forget to bump the version number in
src-tauri/Cargo.toml