![]()
![]()
Firmware for Digispark Arduino compatible module (any probably other AVR parts capable runninng V-USB) to control Livolo RF 433 Mhz light switches via USB.
Once flashed, this firmware turns DigiSpark module into USB HID device. Which should have drivers shipped with most modern OSes. I.e. no driver will be required.
Device accepts commands from USB Host with Livolo Remote ID & keycode and sends it on radio with some kind of 433 MHz dumb OOK/ASK transmitter, like cheap SYN115 modules.
Firmware are located inside firmware directory. It's supposed to be built with
PlatformIO. VSCode with PlatformIO plugin
are used for development. VSCode workspace file DigiLivolo.code-workspace are included and you can
open it with VSCode. Building project from VSCode are supported if you have PlatformIO plugin installed.
Can be built from ArduinoIDE as well, but it will take few more steps to prepare. See below for build instructions.
Firmware code has been developed for Digispark module by Digistump. This module already has everything for running V-USB. This firmware should also work on any other ATTiny85 based Arduino module or bare AVR hardware. Depending on the board/pin configuration, it might be required to adjust USB-related config headers. For other AVR-based boards firmware will require some changes in the code, mostly changing V-USB config header to adapt it to hardware. Partial support for other AVR hardware are in the code, but it's not complete and not tested at all as for now. Feel free to open an issue on Github project page to drop a support request for other Arduino board.
I've also included custom Digispark board config digispark-micronucleus-6586 which are based on the
default Digispark board, but I've tweaked flash size for recent Micronucleus bootloader. Binaries in the
Releases section has been build for that board config. But for now, the firmware compiles to a size which fits
into flash even with default 2Kb bootloader, so it should work along with it as well without rebuilding.
Because PlatformIO doesn't have the latest DigistumpArduino
framework, I've included one in firmware/packages/framework-arduino-avr-digistump. RF transmitter code
uses hardware Timer 1 to generate accurate waveforms, so I've changed framework configuration to use Timer 0
for millis() instead of defaults using Timer 1 for that. Thankfully that required to change 1 line in the
core_build_options.h file of the framework (set TIMER_TO_USE_FOR_MILLIS to 0 for ATtiny85 build options there).
Library DLUSB for the HID USB communications are based on DigiUSB library, included with
DigistumpArduino. Compared to original library it was improved slightly, mostly notable is to allow more than
1 byte bidirectional USB communication via USB HID Reports.
Download compiled firmware from releases page or build from sources (see below for instructions).
Software binaries for Windows x64, Linux x86_64 and ARM can be downloaded from releases page as well. Instructions for building from sources are provided below.
A more generic tool - hidapitester could be used to control device as well.
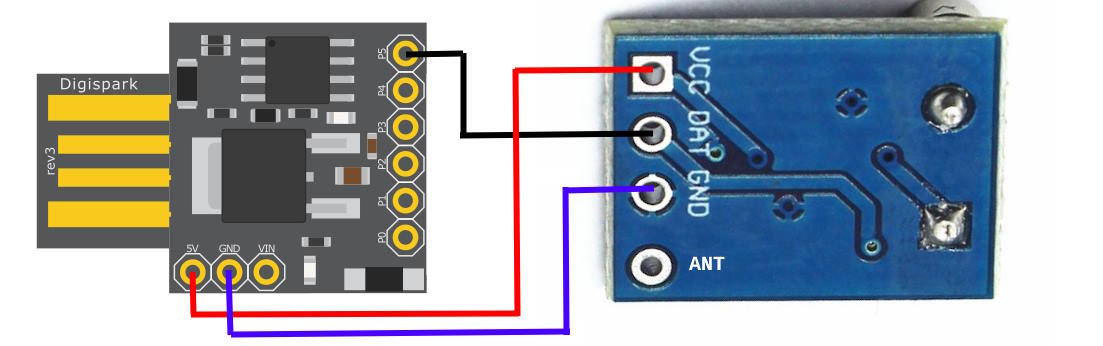
Upload firmware to your Digispark module (via PlatformIO / Arduino IDE / micronucleus tool). Connect DATA pin of 433 Mhz transmitter module (SYN115 based modules were used & confirmed to work by me) to P5 of Digispark module (this pin can be changed in main sketch code). Also connect VCC & GND of the module.
Once plugged to USB, the device should be recognized as USB HID device, not requiring any driver as every modern OS have this standard USB class driver built-in.
To send ON/OFF codes to Livolo switches with the digilivolo software you need to provide it with
Livolo Remote ID and key code as positional arguments:
Usage: digilivolo [OPTION...] REMOTE_ID KEY_ID

Software to control DigiLivolo devices.

 Positional arguments:
  KEY_CODE                   Livilo Key ID (1-255)
  REMOTE_ID                  Livilo Remote ID (1-65535)

 Options:
  -o, --old-alg              Use deperecated original transmit algorithm
  -v, --verbose              Produce verbose output

  -?, --help                 Give this help list
  -V, --version              Print program version
      --usage                Give a short usage message

Report bugs to https://github.com/N-Storm/DigiLivolo/
Copyright (c) 2024 GitHub user N-Storm.
License GPLv3+: GNU GPL version 3 or later <http://gnu.org/licenses/gpl.html>.
REMOTE_ID and KEY_ID can be specified either as deciman numbers or hex numbers if preceeded by '0x'.
Examples:
#  Remote ID 0x214d (8525) and key code 0x10 (16).
./digilivolo 0x214d 0x10

# Same in decimal numbers:
./digilivolo 8525 16You can use hidapitester to communicate with device instead. It's a generic tool for HID devices which allows to send or read feature reports which is the way to communicate with the device.
Example usage:
hidapitester --vidpid 16c0:05df -l 8 --open --send-feature 76,1,77,33,16This should send Livolo command as remote ID 0x214d (77,33) and key code 0x10 (16).
USB HID reports size set to 8 bytes. First are the HID REPORT ID, hardcoded to 76 (0x4C) in the USB descriptor.
Second byte are the CMD ID (command ID). Currently only one command 0x01 (send Livolo code) are suppored
for Host to Device reports. Next 2 bytes are the Livolo Remote ID, little-endian (means you have to reverse
byte order from "normal" representation). 5th byte are the Livolo Key code. Remaining 3 bytes are reserved and
not used, can be omitted in hidapitester invocation (will be sent as zeros).
Building with PlatformIO installed are simple. Just clone the repo & issue pio run from the firmware
directory.
git clone --recurse-submodules https://github.com/N-Storm/DigiLivolo
cd DigiLivolo/firmware
pio run
Or open VSCode workspace file DigiLivolo.code-workspace after cloning the repo if you want to build
it from there. Requires PlatformIO plugin installed.
- Download or clone git repo:
git clone --recurse-submodules https://github.com/N-Storm/DigiLivolo - Install DigistumpArduino core.
- Locate Digistump core install directory and replace
cores/tiny/core_build_options.hfile with version, included with this project:[firmware/packages/framework-arduino-avr-digistump/cores/dtiny/core_build_options.h](https://github.com/N-Storm/DigiLivolo/blob/main/firmware/packages/framework-arduino-avr-digistump/cores/dtiny/core_build_options.h) - Create new directory
DigiLivolo, copyfirmware/src/DigiLivolo.cppasDigiLivolo.inothere. - Copy
DLUSB,DLTransmitterandLivololibraries fromfirmware/libto your Arduino libraries directory. - Open
DigiLivolo.inowith Arduino IDE, set board to DigiSpark and compile/upload.
Clone git repo with submodules (these are the build requirements for software part):
git clone --recurse-submodules https://github.com/N-Storm/DigiLivoloBuild with CMake from the DigiLivolo/software directory:
cmake -DCMAKE_BUILD_TYPE=Release -Wno-dev -B ./build . && cmake --build ./buildOr simply run bash build.sh script from this directory.
For building on Windows MSYS2 UCRT64 has been tested to work.
Resulting binary should be compiled as build/digilivolo[.exe].
By default project compiles with hidapi library built from sources (linked as a git submodule) and
statically linked. If you wish to use system installed hidapi library and you have dev files (headers, etc)
installed, add -DUSE_SYSTEM_HIDAPI=true option to first cmake command on the example above.