This repository implements multiple YOLOv5 models on the RailSem19 dataset. These implementations are focussed on the person and person-group classes.
- The code is tested on Python 3.9.9 and PyTorch 1.10 with CUDA 11.3.
- Install PyTorch by following the instructions on their website.
- Clone the railsem19_yolov5 repository
- Clone the YOLOv5 repository inside the just created
./railsem19_yolov5folder. - Follow this StackOverflow answer if you are experiencing the following error:
The paging file is too small for this operation to complete.
Make sure YOLOv5 is located in the root of the railsem19_yolov5 folder.
Models can be downloaded on the release page of the railsem19_yolov5 repository. Place *.pt models in the ./railsem19_yolov5/models folder.
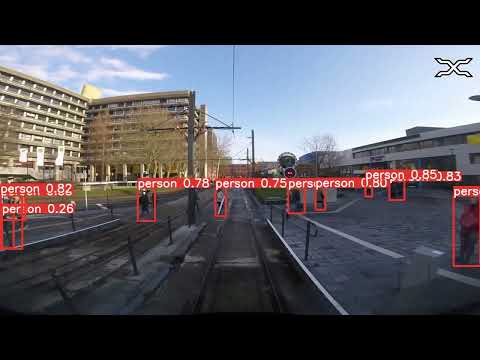

(Click on the tumbnails to watch on YouTube)
The following baselines are achieved on the YOLOv5 models with only the person class on the rs19_person_semseg dataset:


The following results are achieved on a trained YOLOv5 Small model. The model is trained on the rs19_person_semseg dataset. This dataset can be generated by running ./generate_subset_semseg.py.


Experiments can be run with ./generate_results.py. Plots are generated by running ./results/analyse_baselines.py or ./results/analyse_results.py.
The following are the column headers for the generated .CSV files:
| Model | Dataset | Precision | Recall | [email protected] | [email protected];0.05;0.95 | Pre-process time | Inference time | NMS time per image |
|---|
The following command starts the training of your model:
python ./yolov5/train.py --batch-size -1 --epochs 100 --data ./data/rs19_person.yaml --weights yolov5s.pt --single-cls --workers 1Use the following if you want to run hyperparameter optimalisation:
python ./yolov5/train.py --batch-size 4 --epochs 10 --data ./data/rs19_person.yaml --weights yolov5s.pt --single-cls --workers 1 --evolve 40See the ./train_rs19.ipynb notebook for a more detailed example.
The following command runs inference on the provided data:
python ./yolov5/detect.py --source "C:\Users\denbe\Desktop\U-OV Utrecht Tramlijn 22 Cabinerit Utrecht Centraal Centrumzijde - P R Science Park Uithoflijn_Trim.mp4" --weights "./models/yolov5s.pt" --classes 0The following command was used to check whether images without the class person really did not contain any persons:
python ./yolov5/detect.py --source "./data/rs19_no_human" --weights "./models/trained_best.pt" --classes 0 --iou-thres 0.6 --max-det 100 --conf-thres 0.6 --save-txt --save-confSee the ./inference_rs19.ipynb notebook for a more detailed example.
Validation can be done in two ways
python ./yolov5/val.py --data "./data/rs19_person.yaml" --weights "yolov5s.pt" --batch-size 1 --task val --single-clsRunning ./generate_results.py will do the same as above but saves the results to a .CSV file. This script will run the validation on the combination of train/val/test datasets and provided models.