
Gatsby starter with good, opinionated defaults.
It includes my favourite dependencies, configurations, and thinks i like.
A complete list of dependencies is in package.json. These are the primary ones:
- Gatsby
- React
- Webpack bundle analyser
- ESLint (linting)
- Prettier (code formatter)
-
xStyled (powerfull CSS-in-JS framework):
CSS-in-JS CSS-in-JS allows you to write CSS directly in JavaScript. Writing CSS-in-JS has several advantages:
- Local Scoping: In CSS-in-JS, classnames are auto-generated, it means you can't clash with other libraries. Encapsulation: Style is defined directly in components. Two benefits from this: maintenance is easier and it ensures the separation of concern, your style is private to your component.
- Portability: Since components have their own styled, they can easily be shared or reused in other projects.
- Dynamic: JavaScript makes your CSS dynamic, you can apply complex color transformations, interact with user, creates complex animation on the fly... It is really a game changer. Emotion and styled-components are the two main CSS-in-JS library for React. xstyled is built on top of them, the library is the core of xstyled, but you don't have to know specifity, just pick one and start coding.
-
PurgeCSS (removes unused CSS)
-
Dark Mode
-
GlobasStyle
-
Theme:
- xstyled includes a
defaultTheme, recommended to start a project, it includes colors, type scale, fonts, breakpoints, border radii, and more. It is very easy to extends thanks to object spread operator. - more in
src\utils\theme.js
colors: { ...defaultTheme.colors, text: "#000", background: "#fff", primary: "#07c", scroll: "rgba(0, 0, 0, 0.4)", barr: "rgba(0, 0, 0, 0.1)", button: "rgba(255, 255, 255, 0.4)", modes: { dark: { text: "#fff", background: "#000", primary: "#0cf", scroll: "rgba(255, 255, 255, 0.4)", barr: "rgba(255, 255, 255, 0.1)", button: "rgba(0, 0, 0, 0.4)", }, }, }, - xstyled includes a
-
Tailwind colors
-
Styled components / Magic Styled Components
-
Webfont loader (config in
gatsby-config.js){ resolve: `gatsby-plugin-webfonts`, options: { fonts: { google: [ { family: "Montserrat", variants: ["300", "400", "500", "600", "700", "800", "900"], subsets: ["latin"], fontDisplay: "swap", strategy: "base64", }, { family: "Material Icons", strategy: "base64", }, ], }, useMinify: true, usePreload: true, usePreconnect: false, }, },
-
Dynamic Icons Just import :
import Icon from "@atoms/Icon"
and just type the name of icon from Material Design in icon prop from Material Design - Google Fonts
// props: size="2rem" / spin / className=""
<Icon icon="name of icon" />
- Preloader
- SmoothScroll
- Custom Scrollbar (css) with
scroll-behavior: smooth; - Atomic design with organised directory tree
-
Create a Gatsby site.
Use the Gatsby CLI to create a new site, specifying this starter.
# create a new Gatsby site using this starter 😘 gatsby new my-extra-starter https://github.com/Borcioo/gatsby-starter-darkmode-xstyle-atomic -
Start developing.
Navigate into your new site’s directory and start it up.
cd my-extra-starter/ gatsby develop -
Open the source code and start editing!
Your site is now running at
http://localhost:8000!Note: You'll also see a second link:
http://localhost:8000/___graphql. This is a tool you can use to experiment with querying your data. Learn more about using this tool in the Gatsby tutorial.Open the
my-extra-starterdirectory in your code editor of choice and editsrc/pages/index.jsSave your changes and the browser will update in real time!
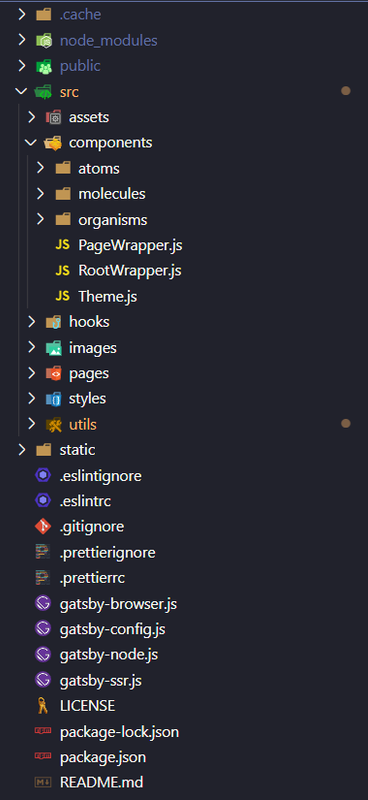
A quick look at the top-level files and directories you'll see in a Gatsby project.
-
/node_modules: This directory contains all of the modules of code that your project depends on (npm packages) are automatically installed. -
/src: This directory will contain all of the code related to what you will see on the front-end of your site (what you see in the browser) such as your site header or a page template.srcis a convention for “source code”. -
.gitignore: This file tells git which files it should not track / not maintain a version history for. -
.prettierrc: This is a configuration file for Prettier. Prettier is a tool to help keep the formatting of your code consistent. -
gatsby-browser.js: This file is where Gatsby expects to find any usage of the Gatsby browser APIs (if any). These allow customization/extension of default Gatsby settings affecting the browser. -
gatsby-config.js: This is the main configuration file for a Gatsby site. This is where you can specify information about your site (metadata) like the site title and description, which Gatsby plugins you’d like to include, etc. (Check out the config docs for more detail). -
gatsby-node.js: This file is where Gatsby expects to find any usage of the Gatsby Node APIs (if any). These allow customization/extension of default Gatsby settings affecting pieces of the site build process. -
gatsby-ssr.js: This file is where Gatsby expects to find any usage of the Gatsby server-side rendering APIs (if any). These allow customization of default Gatsby settings affecting server-side rendering. -
LICENSE: This Gatsby starter is licensed under the 0BSD license. This means that you can see this file as a placeholder and replace it with your own license. -
package-lock.json(Seepackage.jsonbelow, first). This is an automatically generated file based on the exact versions of your npm dependencies that were installed for your project. (You won’t change this file directly). -
package.json: A manifest file for Node.js projects, which includes things like metadata (the project’s name, author, etc). This manifest is how npm knows which packages to install for your project. -
README.md: A text file containing useful reference information about your project.
Looking for more guidance? Full documentation for Gatsby lives on the website. Here are some places to start:
-
For most developers, we recommend starting with our in-depth tutorial for creating a site with Gatsby. It starts with zero assumptions about your level of ability and walks through every step of the process.
-
To dive straight into code samples, head to our documentation. In particular, check out the Guides, API Reference, and Advanced Tutorials sections in the sidebar.
Build, Deploy, and Host On The Only Cloud Built For Gatsby
Gatsby Cloud is an end-to-end cloud platform specifically built for the Gatsby framework that combines a modern developer experience with an optimized, global edge network.
An intuitive Git-based workflow and powerful serverless platform to build, deploy, and collaborate on web apps