An introductory QuickStart project document on API automation testing with SuperTest.
- SuperTest API Automation Testing QuickStart Project
- Introduction
- Project dependencies
- Project Structure
- Build a SuperTest API automation test project from 0 to 1
- Advanced Usage
- CI/CD integration
- Common Assertions
- Data Driven
- Multiple Environment Support
- Create Multi-Environment Test Configuration File
- Edit Multi-Environment Test Configuration File
- Create Multi-Environment Test Data File
- Edit Multi-Environment Test Data File
- Update test cases to support multiple environments
- Update test scripts to support multiple environments
- Run the test case to check if the multi environment support is working.
This project is a quick start tutorial for API automation testing using SuperTest, and will use Jest or Mocha as the testing framework for demo demonstration.
We will introduce SuperTest, Jest and Mocha in turn, so that you can understand the basic usage of these tools in advance.
"Supertest" is a popular JavaScript library for testing Node.js applications. It is primarily used for end-to-end testing, also known as integration testing, to make sure that your application works properly across different components.Supertest is typically used in conjunction with testing frameworks such as Mocha, Jasmine or Jest to write and run test cases.
Here are some of the key features and uses of Supertest:
- Initiating HTTP requests: Supertest allows you to easily simulate HTTP requests such as GET, POST, PUT, DELETE, etc. to test your application's routing and endpoints.
- Chained Syntax: Supertest provides a chained syntax that allows you to build and execute multiple requests in a single test case, which helps simulate different user actions in your application.
- Assertions and Expectations: You can use Supertest in conjunction with assertion libraries such as Chai to examine the content of the response, status codes, headers, etc. to ensure the expected behavior of your application.
- Authentication Testing: Supertest can be used to test endpoints that require authentication to ensure that user login and authorization functions properly.
- Asynchronous support: Supertest can handle asynchronous operations, such as waiting for a response to return before executing further test code.
- Easy Integration: Supertest can be easily used with different Node.js frameworks (e.g. Express, Koa, Hapi, etc.), so you can test all types of applications.
Using Supertest can help you verify that your application is working as expected, as well as quickly catch potential problems when changes are made to your application. Typically, you need to install Supertest and the testing framework in your project, and then write test cases to simulate different requests and check responses. This helps improve code quality and maintainability and ensures that your application remains stable as it evolves.
Official documentation: https://github.com/ladjs/supertest
Note: Supertest can be used not only for API testing, but also for unit and integration testing.
code examples:
// import supertest
const request = require('supertest');

request({URL}) // request(url) or request(app)
.get() or .put() or.post() // http methods
.set() // http options
.send() // http body
.expect() // http assertions
.end() // end the requestJest is a popular JavaScript testing framework for writing and running unit, integration and end-to-end tests for JavaScript applications. Its goal is to provide simple, fast and easy-to-use testing tools for a wide variety of JavaScript applications, both front-end and back-end.
Here are some of the key features and uses of Jest:
- Built-in Assertion Library: Jest includes a powerful assertion library that makes it easy to write assertions to verify that code behaves as expected.
- Automated mocks: Jest automatically creates mocks that help you simulate functions, modules, and external dependencies, making testing easier and more manageable.
- Fast and Parallel: Jest saves time by intelligently selecting which tests to run and executing them in parallel, allowing you to run a large number of test cases quickly.
- Comprehensive Test Suite: Jest supports unit, integration and end-to-end testing and can test a wide range of application types such as JavaScript, TypeScript, React, Vue, Node.js and more.
- Snapshot testing: Jest has a snapshot testing feature that can be used to capture UI changes by checking if the rendering of a UI component matches a previous snapshot.
- Automatic Watch Mode: Jest has a watch mode that automatically re-runs tests as code changes are made, supporting developers in continuous testing.
- Rich Ecosystem: Jest has a rich set of plug-ins and extensions that can be used to extend its functionality, such as coverage reporting, test reporting, and integration with other tools.
- Community Support: Jest is a popular testing framework with a large community that provides extensive documentation, tutorials and support resources.
Jest is often used in conjunction with other tools such as Babel (for transcoding JavaScript), Enzyme (for React component testing), Supertest (for API testing), etc. to achieve comprehensive test coverage and ensure code quality. Whether you're writing front-end or back-end code, Jest is a powerful testing tool that can help you catch potential problems and improve code quality and maintainability.
Official Documentation: https://jestjs.io/docs/zh-Hans/getting-started
Code examples:
// import jest
const jest = require('jest');

describe(): // test scenarios

it(): // detailed test case, it() is in the describe()

before(): // this action is before all test cases

after(): // this action is after all test casesMocha is a popular JavaScript testing framework for writing and running a variety of tests for JavaScript applications, including unit tests, integration tests, and end-to-end tests.Mocha provides flexibility and extensibility, allowing developers to easily customize the test suite to meet the needs of their projects.
Here are some of the key features and uses of Mocha:
- Multiple Test Styles: Mocha supports multiple test styles including BDD (Behavior Driven Development) and TDD (Test Driven Development). This allows developers to write test cases according to their preferences.
- Rich Assertion Library: Mocha does not include an assertion library by itself, but it can be used in conjunction with a variety of assertion libraries (e.g., Chai, Should.js, Expect.js, etc.), allowing you to write tests using your favorite assertion style.
- Asynchronous Testing: Mocha has built-in support for asynchronous testing, allowing you to test asynchronous code, Promises, callback functions, etc. to ensure that your code is correct in asynchronous scenarios.
- Parallel Testing: Mocha allows you to run test cases in your test suite in parallel, improving the efficiency of test execution.
- Rich Plug-ins and Extensions: Mocha has a rich ecosystem of plug-ins that can be used to extend its functionality, such as test coverage reporting, test report generation, and so on.
- Easy to Integrate: Mocha can be used with various assertion libraries, test runners (such as Karma and Jest), browsers (using the browser test runner), etc. to suit different project and testing needs.
- Command Line Interface: Mocha provides an easy-to-use command line interface for running test suites, generating reports, and other test-related operations.
- Continuous Integration Support: Mocha can be easily integrated into Continuous Integration (CI) tools such as Jenkins, Travis CI, CircleCI, etc. to ensure that code is tested after every commit.
Mocha's flexibility and extensibility make it a popular testing framework for a variety of JavaScript projects, including front-end and back-end applications. Developers can choose the testing tools, assertion libraries, and other extensions to meet the requirements of their projects based on their needs and preferences. Whether you are writing browser-side code or server-side code, Mocha is a powerful testing tool to help you ensure code quality and reliability.
Official documentation: https://mochajs.org/
Code examples:
// import mocha
const mocha = require('mocha');

describe(): // test scenarios

it(): // detailed test case, it() is in the describe()

before(): // this action is before all test cases

after(): // this action is after all test casesChai is a JavaScript assertion library for assertion and expectation validation when writing and running test cases. It is a popular testing tool that is often used in conjunction with testing frameworks (e.g. Mocha, Jest, etc.) to help developers write and execute various types of tests, including unit tests and integration tests.
Here are some of the key features and uses of Chai:
- Readable Assertion Syntax: Chai provides an easy to read and write assertion syntax that makes test cases easier to understand. It supports natural language assertion styles such as expect(foo).to.be.a('string') or expect(bar).to.equal(42).
- Multiple Assertion Styles: Chai provides a number of different assertion styles to suit different developer preferences. The main styles include BDD (Behavior-Driven Development) style, TDD (Test-Driven Development) style and assert style.
- Plugin extensions: Chai can be extended with plugins to support more assertion types and features. This allows Chai to fulfill a variety of testing needs, including asynchronous testing, HTTP request testing, and more.
- Easy Integration: Chai can be easily integrated with various testing frameworks such as Mocha, Jest, Jasmine etc. This makes it a powerful tool for writing test cases.
- Chained Assertions Support: Chai allows you to chain calls to multiple assertions to make complex testing and validation easier.
Official documentation: https://www.chaijs.com/
Code examples:
// import chai
const chai = require('chai');
const expect = chai.expect;

// demo assertions
.expect(<actual result>).to.{assert}(<expected result>) // Asserts that the target is strictly equal to value.

.expect(‘hello').to.equal('hello'); // Asserts that the target is strictly equal to value.

.expect({ foo: 'bar' }).to.not.equal({ foo: 'bar' }); // Asserts that the target is not strictly equal to value.

.expect('foobar').to.contain('foo'); // Asserts that the target contains the given substring.

.expect(foo).to.exist; // Asserts that the target is neither null nor undefined.

.expect(5).to.be.at.most(5); // Asserts that the target is less than or equal to value.The following environments need to be installed in advance
- nodejs, demo version v21.1.0
The following is the file structure of a SuperTest Interface Automation Test project, which contains test configuration files, test case files, test tool files, and test report files. It can be used for reference.
SuperTest-Jest-demo
├── README.md
├── package.json
├── package-lock.json
├── Config // Test configuration
│   └── config.js
├── Specs // Test case
│   └── test.spec.js
├── Utils // Test tool
│   └── utils.js
├── Report // Test report
│   └── report.html
├── .gitignore
└── node_modules // Project dependencies
    ├── ...
    └── ...
The following is a demo of building a SuperTest interface automation test project from 0 to 1, using either Jest or Mocha as the test framework.
You can refer to the demo project at https://github.com/Automation-Test-Starter/SuperTest-Mocha-demo.
mkdir SuperTest-Mocha-demo// enter the project folder
cd SuperTest-Mocha-demo
// nodejs project initialization
npm init -y// install supertest library
npm install supertest --save-dev
// install mocha test framework
npm install mocha --save-dev
// install chai assertion library
npm install chai --save-dev// create test folder
mkdir Specs
// create test case file
cd Specs
touch test.spec.jsThe test API can be found in the demoAPI.md file in the project.
// Test: test.spec.js
const request = require('supertest'); // import supertest
const chai = require('chai'); // import chai
const expect = require('chai').expect; // import expect

// Test Suite
describe('Verify that the Get and POST API returns correctly', function(){
        // Test case 1
        it('Verify that the GET API returns correctly', function(done){
            request('https://jsonplaceholder.typicode.com') // Test endpoint
                .get('/posts/1') // API endpoint
                .expect(200) // expected response status code
                .expect(function (res) {
                    expect(res.body.id).to.equal(1  )
                    expect(res.body.userId).to.equal(1)
                    expect(res.body.title).to.equal("sunt aut facere repellat provident occaecati excepturi optio reprehenderit")
                    expect(res.body.body).to.equal("quia et suscipit\nsuscipit recusandae consequuntur expedita et cum\nreprehenderit molestiae ut ut quas totam\nnostrum rerum est autem sunt rem eveniet architecto")
                }) // expected response body
                .end(done) // end the test case

        });
        // Test case 2
        it('Verify that the POST API returns correctly', function(done){
            request('https://jsonplaceholder.typicode.com') // Test endpoint
                .post('/posts') // API endpoint
                .send({
                    "title": "foo",
                    "body": "bar",
                    "userId": 1
                }) // request body
                .expect(201) // expected response status code
                .expect(function (res) {
                    expect(res.body.id).to.equal(101  )
                    expect(res.body.userId).to.equal(1)
                    expect(res.body.title).to.equal("foo")
                    expect(res.body.body).to.equal("bar")
                }) // expected response body
                .end(done) // end the test case
        });
});- Create a new mocha configuration file
// create configuration file in the project root directory
touch .mocharc.js- Updating configuration files
// mocha config
module.exports = {
    timeout: 5000, // set the default timeout for test cases (milliseconds)
    spec: ['Specs/**/*.js'], // specify the location of the test file
};Add test scripts to the package.json file
"scripts": {
    "test": "mocha"
},// run test cases
npm run test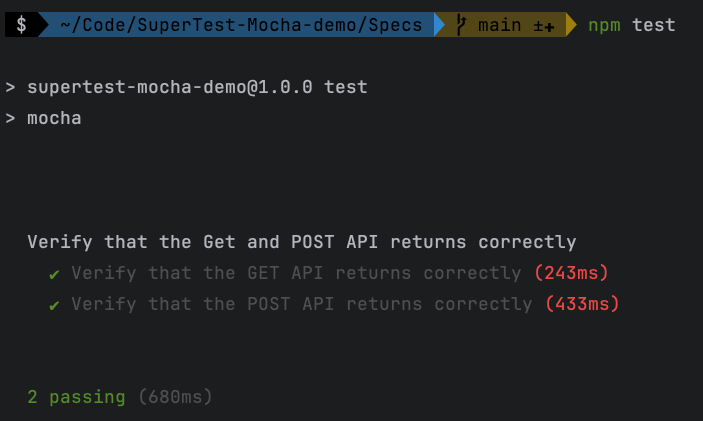
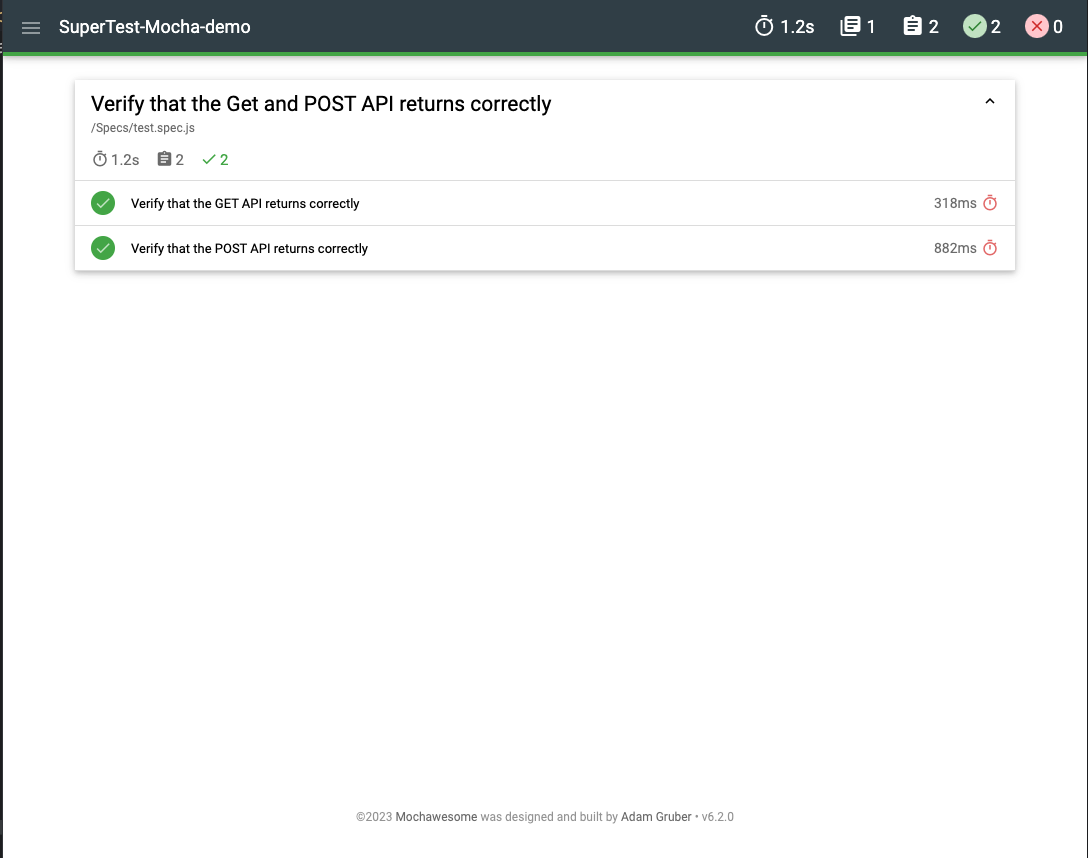
- Install mochawesome library
npm install --save-dev mochawesome- Updating mocha configuration files
You can refer to the demo project athttps://github.com/Automation-Test-Starter/SuperTest-Mocha-demo
// mocha config
module.exports = {
    timeout: 5000, // Set the default timeout for test cases (milliseconds)
    reporter: 'mochawesome', // Use mochawesome as the test report generator
    'reporter-option': [
        'reportDir=Report', // Report directory
        'reportFilename=[status]_[datetime]-[name]-report', //Report file name
        'html=true', // enable html report
        'json=false', // disable json report
        'overwrite=false', // disable report file overwrite
        'timestamp=longDate', // add timestamp to report file name

    ], // mochawesome report generator options
    spec: ['Specs/**/*.js'], // Specify the location of the test file
};- Running test cases
// Run test cases
npm run test- View test report
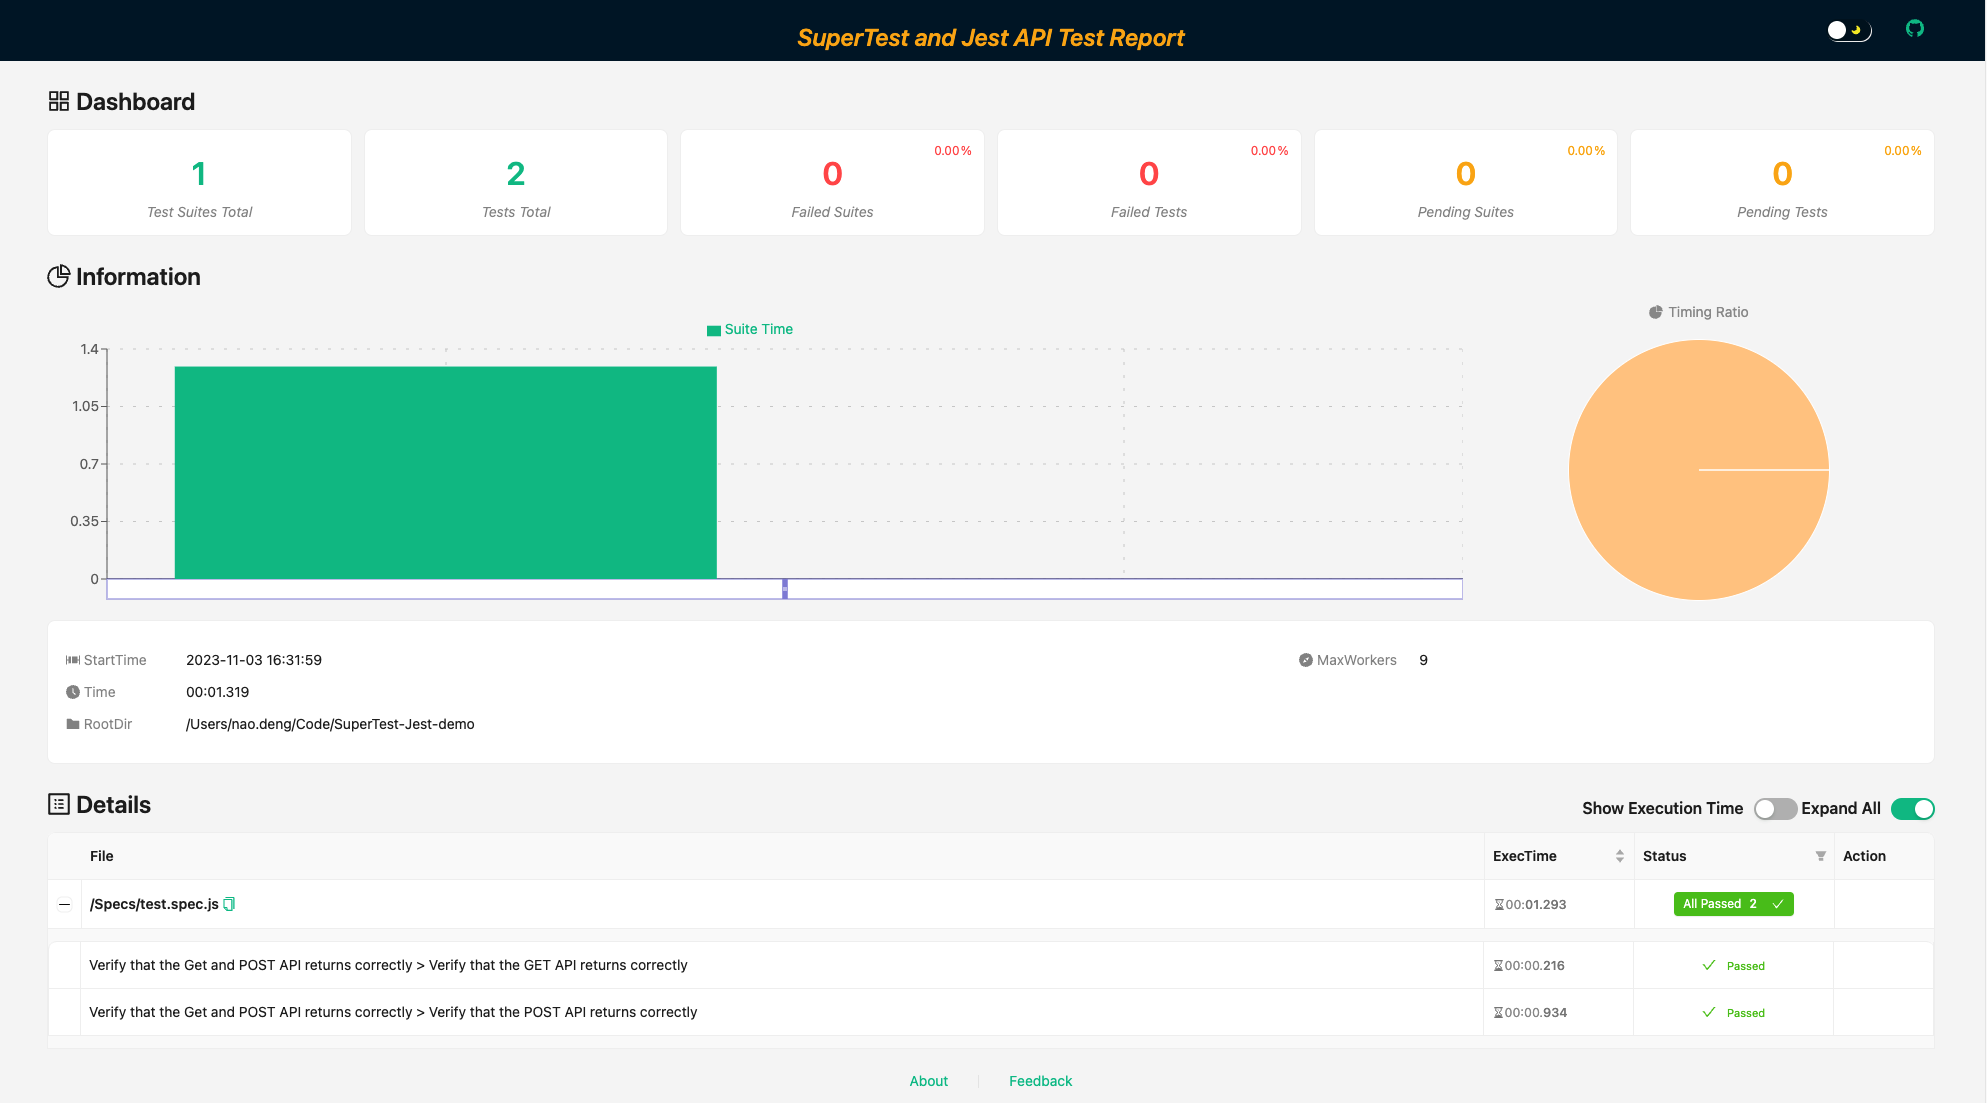
Test report folder: Report, click to open the latest html report file with your browser
You can refer to the demo project athttps://github.com/Automation-Test-Starter/SuperTest-Jest-demo
mkdir SuperTest-Jest-demo// enter the project folder
cd SuperTest-Mocha-demo
// nodejs project initialization
npm init -y// install supertest library
npm install supertest --save-dev
// install jest test framework
npm install jest --save-dev// create test folder
mkdir Specs
// enter test folder and create test case file
cd Specs
touch test.spec.jsThe test API can be found in the demoAPI.md file in the project.
const request = require('supertest');

// Test Suite
describe('Verify that the Get and POST API returns correctly', () => {
    // Test case 1
    it('Verify that the GET API returns correctly', async () => {
        const res = await request('https://jsonplaceholder.typicode.com') // Test endpoint
            .get('/posts/1') // API endpoint
            .send() // request body
            .expect(200); // use supertest's expect to verify that the status code is 200
        // user jest's expect to verify the response body
        expect(res.status).toBe(200); // Verify that the status code is 200
        expect(res.body.id).toEqual(1); // Verify that the id is 1
        expect(res.body.userId).toEqual(1); // Verify that the userId is 1
        expect(res.body.title).toEqual("sunt aut facere repellat provident occaecati excepturi optio reprehenderit");
        expect(res.body.body).toEqual("quia et suscipit\nsuscipit recusandae consequuntur expedita et cum\nreprehenderit molestiae ut ut quas totam\nnostrum rerum est autem sunt rem eveniet architecto");
    });

    // Test case 2
    it('Verify that the POST API returns correctly', async() =>{
        const res = await request('https://jsonplaceholder.typicode.com') // Test endpoint
            .post('/posts') // API endpoint
            .send({
                "title": "foo",
                "body": "bar",
                "userId": 1
            }) // request body
            .expect(201); // use supertest's expect to verify that the status code is 201
        // user jest's expect to verify the response body
        expect(res.statusCode).toBe(201);
        expect(res.body.id).toEqual(101);
        expect(res.body.userId).toEqual(1);
        expect(res.body.title).toEqual("foo");
        expect(res.body.body).toEqual("bar");
    });
}); - Creating a new configuration file
// Create a new configuration file in the project root directory
touch jest.config.js- Updating configuration files
// Desc: Jest configuration file
module.exports = {
    // Specify the location of the test file
    testMatch: ['**/Specs/*.spec.js'],
};Add the test script to the package.json file
"scripts": {
    "test": "jest"
},// run test case
npm run test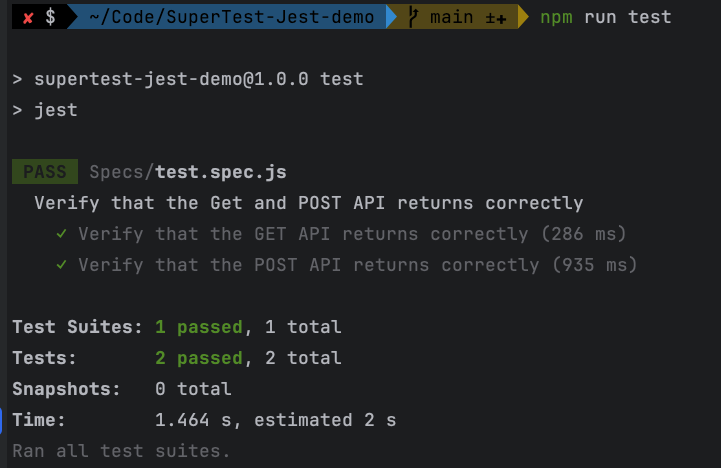
- Install jest-html-reporters library
npm install --save-dev jest-html-reporters- Updating jest configuration files
You can refer to the demo project atttps://github.com/Automation-Test-Starter/SuperTest-Jest-demo
// Desc: Jest configuration file
module.exports = {
// specify the location of the test file
testMatch: ['**/Specs/*.spec.js'],
// test report generator
reporters: [
'default',
[
'jest-html-reporters',
{
publicPath: './Report', // report directory
filename: 'report.html', // report file name
pageTitle: 'SuperTest and Jest API Test Report', // report title
overwrite: true, // enable report file overwrite
expand: true, // enable report file expansion
},
],
],
};- Running test cases
// run test case
npm run test- View test report
Test report folder: Report, click on the browser to open the latest html report file
Use github action as an example, and other CI tools similarly
See the demo at https://github.com/Automation-Test-Starter/SuperTest-Mocha-demo
-
Create the .github/workflows directory: In your GitHub repository, create a directory called .github/workflows. This will be where the GitHub Actions workflow files will be stored.
-
Create a workflow file: Create a YAML-formatted workflow file, such as mocha.yml, in the .github/workflows directory.
-
Edit the mocha.yml file: Copy the following into the file
name: RUN SuperTest API Test CI

on:
  push:
    branches: [ "main" ]
  pull_request:
    branches: [ "main" ]

jobs:
  RUN-SuperTest-API-Test:

    runs-on: ubuntu-latest

    strategy:
      matrix:
        node-version: [ 18.x]
        # See supported Node.js release schedule at https://nodejs.org/en/about/releases/

    steps:
    - uses: actions/checkout@v3
    - name: Use Node.js ${{ matrix.node-version }}
      uses: actions/setup-node@v3
      with:
        node-version: ${{ matrix.node-version }}
        cache: 'npm'

    - name: Installation of related packages
      run: npm ci

    - name: RUN SuperTest API Testing
      run: npm test

    - name: Archive SuperTest mochawesome test report
      uses: actions/upload-artifact@v3
      with:
        name: SuperTest-mochawesome-test-report
        path: Report

    - name: Upload SuperTest mochawesome report to GitHub
      uses: actions/upload-artifact@v3
      with:
        name: SuperTest-mochawesome-test-report
path: Report- Commit the code: Add the mocha.yml file to your repository and commit.
- View test reports: In GitHub, navigate to your repository. Click the Actions tab at the top and then click the RUN SuperTest API Test CI workflow on the left. You should see the workflow running, wait for the execution to complete and you can view the results.
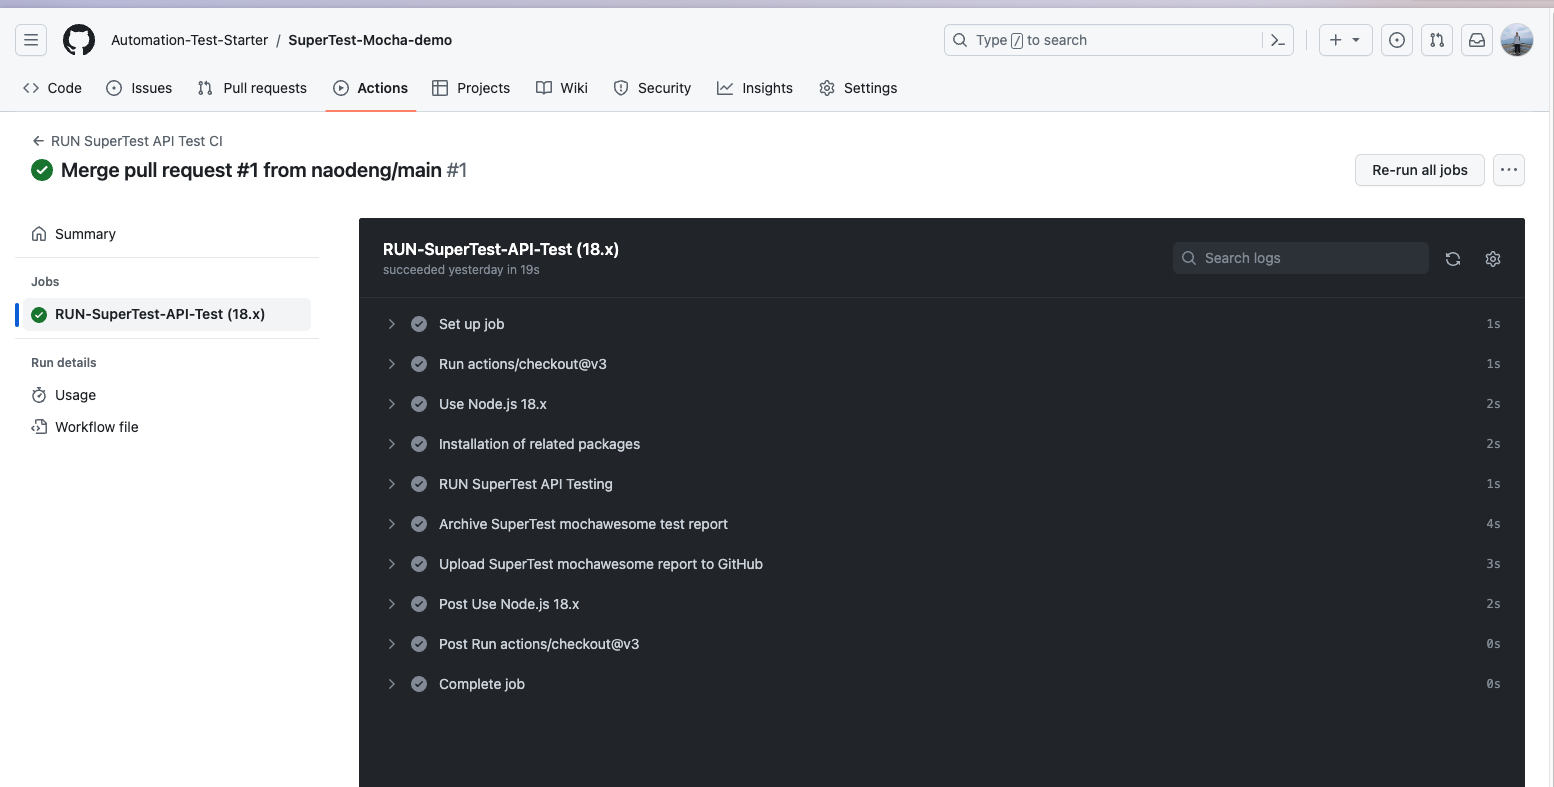
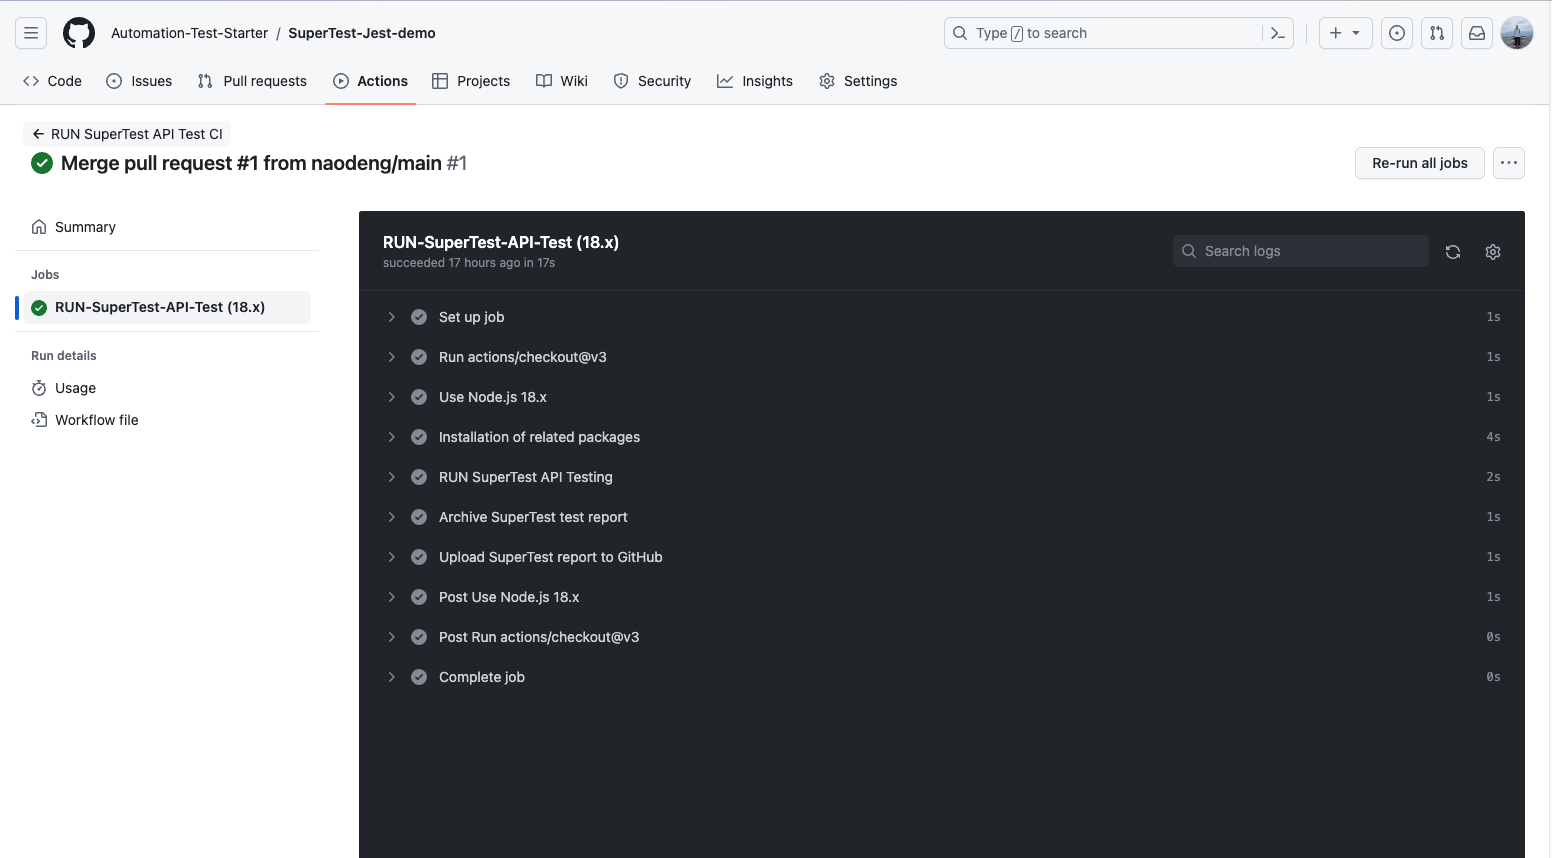
See the demo at https://github.com/Automation-Test-Starter/SuperTest-Jest-demo
-
Create the .github/workflows directory: In your GitHub repository, create a directory called .github/workflows. This will be where the GitHub Actions workflow files will be stored.
-
Create a workflow file: Create a YAML-formatted workflow file, such as jest.yml, in the .github/workflows directory.
-
Edit the jest.yml file: Copy the following into the file
name: RUN SuperTest API Test CI

on:
  push:
    branches: [ "main" ]
  pull_request:
    branches: [ "main" ]

jobs:
  RUN-SuperTest-API-Test:

    runs-on: ubuntu-latest

    strategy:
      matrix:
        node-version: [ 18.x]
        # See supported Node.js release schedule at https://nodejs.org/en/about/releases/

    steps:
      - uses: actions/checkout@v3
      - name: Use Node.js ${{ matrix.node-version }}
        uses: actions/setup-node@v3
        with:
          node-version: ${{ matrix.node-version }}
          cache: 'npm'

      - name: Installation of related packages
        run: npm ci

      - name: RUN SuperTest API Testing
        run: npm test

      - name: Archive SuperTest test report
        uses: actions/upload-artifact@v3
        with:
          name: SuperTest-test-report
          path: Report

      - name: Upload SuperTest  report to GitHub
        uses: actions/upload-artifact@v3
        with:
          name: SuperTest-test-report
path: Report- Commit the code: Add the jest.yml file to the repository and commit.
- View test reports: In GitHub, navigate to your repository. Click the Actions tab at the top and then click the RUN-SuperTest-API-Test workflow on the left. You should see the workflow running, wait for the execution to complete and you can view the results.
The following is an overview of common assertions used by SuperTest, CHAI and Jest.
Supertest is a more advanced library built on SuperAgent, so Supertest can easily use SuperAgent's HTTP assertions.
Examples are as follows:
.expect(status[, fn]) // Assert response status code.

.expect(status, body[, fn]) // Assert response status code and body.

.expect(body[, fn]) // Assert response body text with a string, regular expression, or parsed body object.

.expect(field, value[, fn]) // Assert header field value with a string or regular expression.

.expect(function(res) {}) // Pass a custom assertion function. It'll be given the response object to check. If the check fails, throw an error.- Equality Assertions
expect(actual).to.equal(expected) // Verify that the actual value is equal to the expected value.
expect(actual).to.deep.equal(expected) // Verify that the actual value is deeply equal to the expected value, for object and array comparisons.
expect(actual).to.eql(expected) // Same as deep.equal for deep-equal comparisons.- Inclusion Assertions
expect(array).to.include(value) // Verify that the array contains the specified value.
expect(string).to.include(substring) // Verify that the string contains the specified substring.
expect(object).to.include(key) // Verify that the object contains the specified key.- Type Assertions
expect(actual).to.be.a(type) // Verify that the type of the actual value is equal to the specified type.
expect(actual).to.be.an(type) // Same as to.be.a for type assertions.
expect(actual).to.be.an.instanceof(constructor) // Verify that the actual value is an instance of the specified constructor.- Truthiness Assertions
expect(value).to.be.true // Verify that the value is true.
expect(value).to.be.false // Verify that the value is false.
expect(value).to.exist // Verify that the value exists, is not null and is not undefined.- Length Assertions
expect(array).to.have.length(length) // Verify that the length of the array is equal to the specified length.
expect(string).to.have.lengthOf(length) // Verify that the length of the string is equal to the specified length.- Empty Assertions
expect(array).to.be.empty // Verify if the array is empty.
expect(string).to.be.empty // Verify that the string is empty.- Range Assertions
expect(value).to.be.within(min, max) // Verify that the value is within the specified range.
expect(value).to.be.above(min) // Verify that the value is greater than the specified value.
expect(value).to.be.below(max) // Verify that the value is less than the specified value.- Exception Assertions
expect(fn).to.throw(error) // Verify that the function throws an exception of the specified type.
expect(fn).to.throw(message) // Verify that the function throws an exception containing the specified message.- Existence Assertions
expect(object).to.have.property(key) // Verify that the object contains the specified property.
expect(array).to.have.members(subset) // Verify that the array contains the specified members.
For more chai assertions, see https://www.chaijs.com/api/assert/
- Equality Assertions
expect(actual).toBe(expected) // Verify that the actual value is strictly equal to the expected value.
expect(actual).toEqual(expected) // Verify that the actual value is deeply equal to the expected value, for object and array comparisons.- Inequality Assertions
expect(actual).not.toBe(expected) // Verify that the actual value is not equal to the expected value.- Inclusion Assertions
expect(array).toContain(value) // Verify that the array contains the specified value.- Type Assertions
expect(actual).toBeTypeOf(expected) // Verify that the type of the actual value is equal to the specified type.- Truthiness Assertions
expect(value).toBeTruthy() // Verify that the value is true.
expect(value).toBeFalsy() // Verify that the value is false.- Asynchronous Assertions
await expect(promise).resolves.toBe(expected) // Verify that the asynchronous operation completed successfully and return a result matching the expected value.- Exception Assertions
expect(fn).toThrow(error) // Verify that the function throws an exception of the specified type.
expect(fn).toThrow(message) // Verify that the function throws an exception containing the specified message.- Scope Assertions
expect(value).toBeGreaterThanOrEqual(min) // Verify that the value is greater than or equal to the specified minimum.
expect(value).toBeLessThanOrEqual(max) // Verify that the value is less than or equal to the specified maximum.- Object Property Assertions
expect(object).toHaveProperty(key, value) // Verify that the object contains the specified property and that the value of the property is equal to the specified value.For more Jest assertions, seehttps://jestjs.io/docs/expect
Data-driven for API testing is a testing methodology in which the input data and expected output data for test cases are stored in data files, and the testing framework executes multiple tests against these data files to validate various aspects of the API. Data-driven testing can help you effectively cover multiple scenarios and ensure that the API works properly with a variety of input data.
The Mocha version can be found in the demo project: https://github.com/Automation-Test-Starter/SuperTest-Mocha-demo.
The Jest version can be found in the demo project: https://github.com/Automation-Test-Starter/SuperTest-Jest-demo.
The mocha version is similar to the Jest version, so here is an example of the mocha version.
// create test configuration folder
mkdir Config
// create test configuration file
cd Config
touch config.js// Test config file
module.exports = {
host: 'https://jsonplaceholder.typicode.com', // Test endpoint
getAPI: '/posts/1', // Test GET API URL
postAPI: '/posts', // Test POST API URL
};// create test data folder
mkdir testData
// enter test data folder
cd testData
// create request data file
touch requestData.js
// create response data file
touch responseData.js- Edit request data files
// Test request data file
module.exports = {
    getAPI: '',  // request data for GET API
    postAPI:{
        "title": "foo",
        "body": "bar",
        "userId": 1
    },  // request data for POST API
};- Edit response data files
// Test response data file
module.exports = {
    getAPI: {
        "userId": 1,
        "id": 1,
        "title": "sunt aut facere repellat provident occaecati excepturi optio reprehenderit",
        "body": "quia et suscipit\nsuscipit recusandae consequuntur expedita et cum\nreprehenderit molestiae ut ut quas totam\nnostrum rerum est autem sunt rem eveniet architecto"
    },  // response data for GET API
    postAPI:{
        "title": "foo",
        "body": "bar",
        "userId": 1,
        "id": 101
    },  // response data for POST API
};To differentiate, create a new test case file named dataDrivingTest.spec.js.
// Test: dataDrivingTest.spec.js
const request = require('supertest'); // import supertest
require('chai');
// import chai
const expect = require('chai').expect; // import expect
const config = require('../Config/testConfig'); // import test config
const requestData = require('../TestData/requestData'); // import request data
const responseData = require('../TestData/responseData'); // import response data
// Test Suite
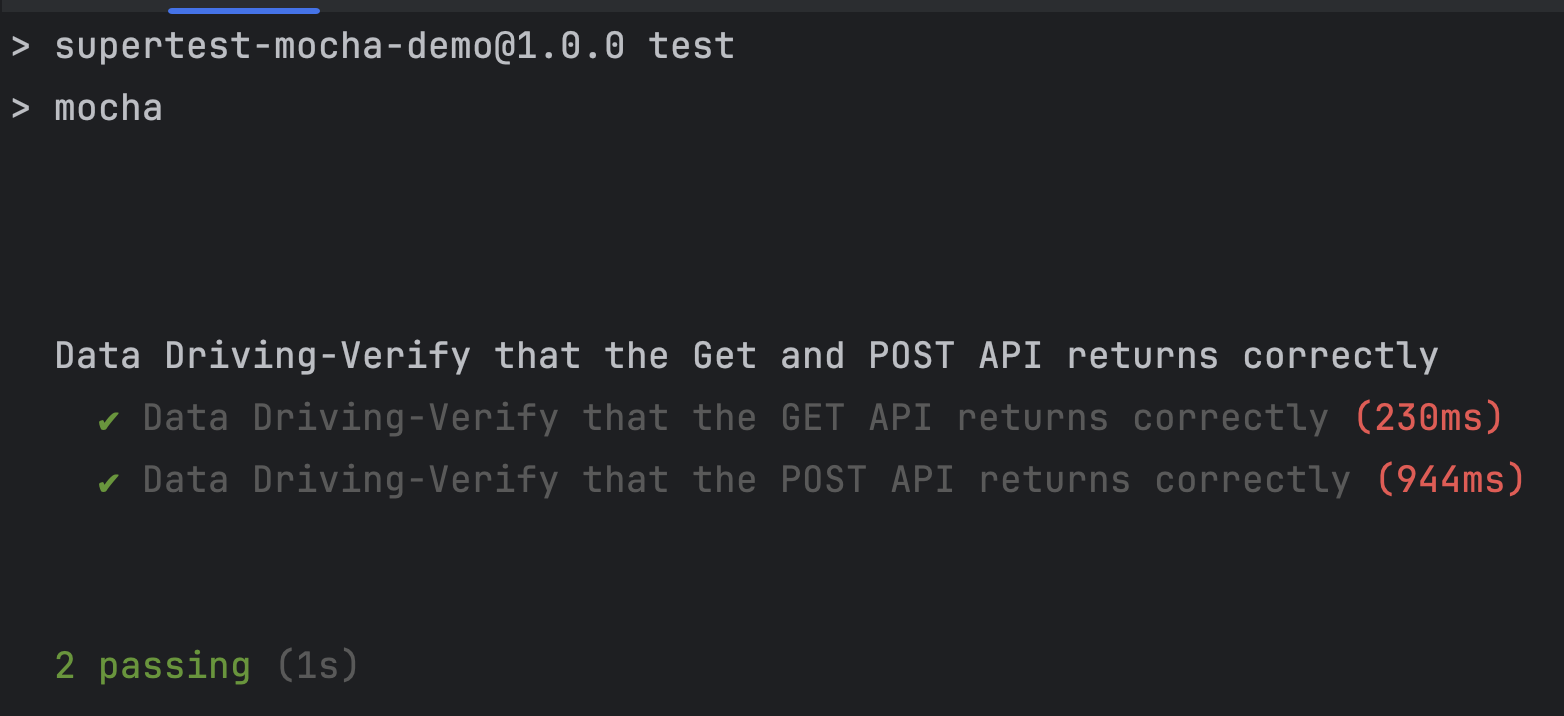
describe('Data Driving-Verify that the Get and POST API returns correctly', function(){
// Test case 1
it('Data Driving-Verify that the GET API returns correctly', function(done){
request(config.host) // Test endpoint
.get(config.getAPI) // API endpoint
.expect(200) // expected response status code
.expect(function (res) {
expect(res.body.id).to.equal(responseData.getAPI.id)
expect(res.body.userId).to.equal(responseData.getAPI.userId)
expect(res.body.title).to.equal(responseData.getAPI.title)
expect(res.body.body).to.equal(responseData.getAPI.body)
}) // expected response body
.end(done) // end the test case
});
// Test case 2
it('Data Driving-Verify that the POST API returns correctly', function(done){
request(config.host) // Test endpoint
.post(config.postAPI) // API endpoint
.send(requestData.postAPI) // request body
.expect(201) // expected response status code
.expect(function (res) {
expect(res.body.id).to.equal(responseData.postAPI.id )
expect(res.body.userId).to.equal(responseData.postAPI.userId )
expect(res.body.title).to.equal(responseData.postAPI.title )
expect(res.body.body).to.equal(responseData.postAPI.body )
}) // expected response body
.end(done) // end the test case
});
});If you run the data driver support test case: dataDrivingTest.spec.js with the demo project, it is recommended to skip the test.spec.js test case first, otherwise it will report an error.
When using Jest or Mocha for API testing, you may need to support testing different environments, such as development, test and production environments. This can be achieved by configuring different test scripts and environment variables.
The following is a brief description of how to configure multi-environment support in Jest and Mocha, with a demo demonstrating support for two environments.
Mocha version can be found in the demo project: https://github.com/Automation-Test-Starter/SuperTest-Mocha-demo.
The Jest version can be found in the demo project: https://github.com/Automation-Test-Starter/SuperTest-Jest-demo.
The mocha version is similar to the Jest version, so here is an example of the mocha version.
// create test configuration folder, if already exists, skip this step
mkdir Config
// create test configuration file for test environment
cd Config
touch testConfig-test.js
// create test configuration file for dev environment
touch testConfig-dev.js- edit test configuration file for test environment: testConfig-test.js
based on actual situation, edit test configuration file for test environment
// Test config file for test environment
module.exports = {
    host: 'https://jsonplaceholder.typicode.com',  // Test endpoint
    getAPI: '/posts/1',  // Test GET API URL
    postAPI: '/posts', // Test POST API URL
};- edit test configuration file for dev environment: testConfig-dev.js
based on actual situation, edit test configuration file for dev environment
// Test config file for dev environment
module.exports = {
    host: 'https://jsonplaceholder.typicode.com',  // Test endpoint
    getAPI: '/posts/1',  // Test GET API URL
    postAPI: '/posts', // Test POST API URL
};// create test data folder, if already exists, skip this step
mkdir testData
// enter test data folder
cd testData
// create request data file for test environment
touch requestData-test.js
// create response data file for test environment
touch responseData-test.js
// create request data file for dev environment
touch requestData-dev.js
// create response data file for dev environment
touch responseData-dev.js- edit request data file for test environment: requestData-test.js
based on actual situation, edit request data file for test environment
// Test request data file for test environment
module.exports = {
    getAPI: '',  // request data for GET API
    postAPI:{
        "title": "foo",
        "body": "bar",
        "userId": 1
    },  // request data for POST API
};- edit response data file for test environment: responseData-test.js
based on actual situation, edit response data file for test environment
// Test response data file for test environment
module.exports = {
    getAPI: {
        "userId": 1,
        "id": 1,
        "title": "sunt aut facere repellat provident occaecati excepturi optio reprehenderit",
        "body": "quia et suscipit\nsuscipit recusandae consequuntur expedita et cum\nreprehenderit molestiae ut ut quas totam\nnostrum rerum est autem sunt rem eveniet architecto"
    },  // response data for GET API
    postAPI:{
        "title": "foo",
        "body": "bar",
        "userId": 1,
        "id": 101
    },  // response data for POST API
};- edit request data file for dev environment: requestData-dev.js
based on actual situation, edit request data file for dev environment
// Test request data file for dev environment
module.exports = {
    getAPI: '',  // request data for GET API
    postAPI:{
        "title": "foo",
        "body": "bar",
        "userId": 1
    },  // request data for POST API
};- edit response data file for dev environment: responseData-dev.js
based on actual situation, edit response data file for dev environment
// Test response data file for dev environment
module.exports = {
    getAPI: {
        "userId": 1,
        "id": 1,
        "title": "sunt aut facere repellat provident occaecati excepturi optio reprehenderit",
        "body": "quia et suscipit\nsuscipit recusandae consequuntur expedita et cum\nreprehenderit molestiae ut ut quas totam\nnostrum rerum est autem sunt rem eveniet architecto"
    },  // response data for GET API
    postAPI:{
        "title": "foo",
        "body": "bar",
        "userId": 1,
        "id": 101
    },  // response data for POST API
};To differentiate, here is a new test case file named multiEnvTest.spec.js
// Test: multiEnvTest.spec.js
const request = require('supertest'); // import supertest
require('chai');
// import chai
const expect = require('chai').expect; // import expect

const config = process.env.NODE_ENV === 'test' ? require('../Config/testConfig-test') : require('../Config/testConfig-dev'); // import test config
const requestData = process.env.NODE_ENV === 'test' ? require('../TestData/requestData-test') : require('../TestData/requestData-dev'); // import request data
const responseData= process.env.NODE_ENV === 'test' ? require('../TestData/responseData-test') : require('../TestData/responseData-dev'); // import response data

// Test Suite
describe('multiEnv-Verify that the Get and POST API returns correctly', function(){
    // Test case 1
    it('multiEnv-Verify that the GET API returns correctly', function(done){
        request(config.host) // Test endpoint
            .get(config.getAPI) // API endpoint
            .expect(200) // expected response status code
            .expect(function (res) {
                expect(res.body.id).to.equal(responseData.getAPI.id)
                expect(res.body.userId).to.equal(responseData.getAPI.userId)
                expect(res.body.title).to.equal(responseData.getAPI.title)
                expect(res.body.body).to.equal(responseData.getAPI.body)
            }) // expected response body
            .end(done) // end the test case

    });
    // Test case 2
    it('multiEnv-Verify that the POST API returns correctly', function(done){
        request(config.host) // Test endpoint
            .post(config.postAPI) // API endpoint
            .send(requestData.postAPI) // request body
            .expect(201) // expected response status code
            .expect(function (res) {
                expect(res.body.id).to.equal(responseData.postAPI.id )
                expect(res.body.userId).to.equal(responseData.postAPI.userId )
                expect(res.body.title).to.equal(responseData.postAPI.title )
                expect(res.body.body).to.equal(responseData.postAPI.body )
            }) // expected response body
            .end(done) // end the test case
    });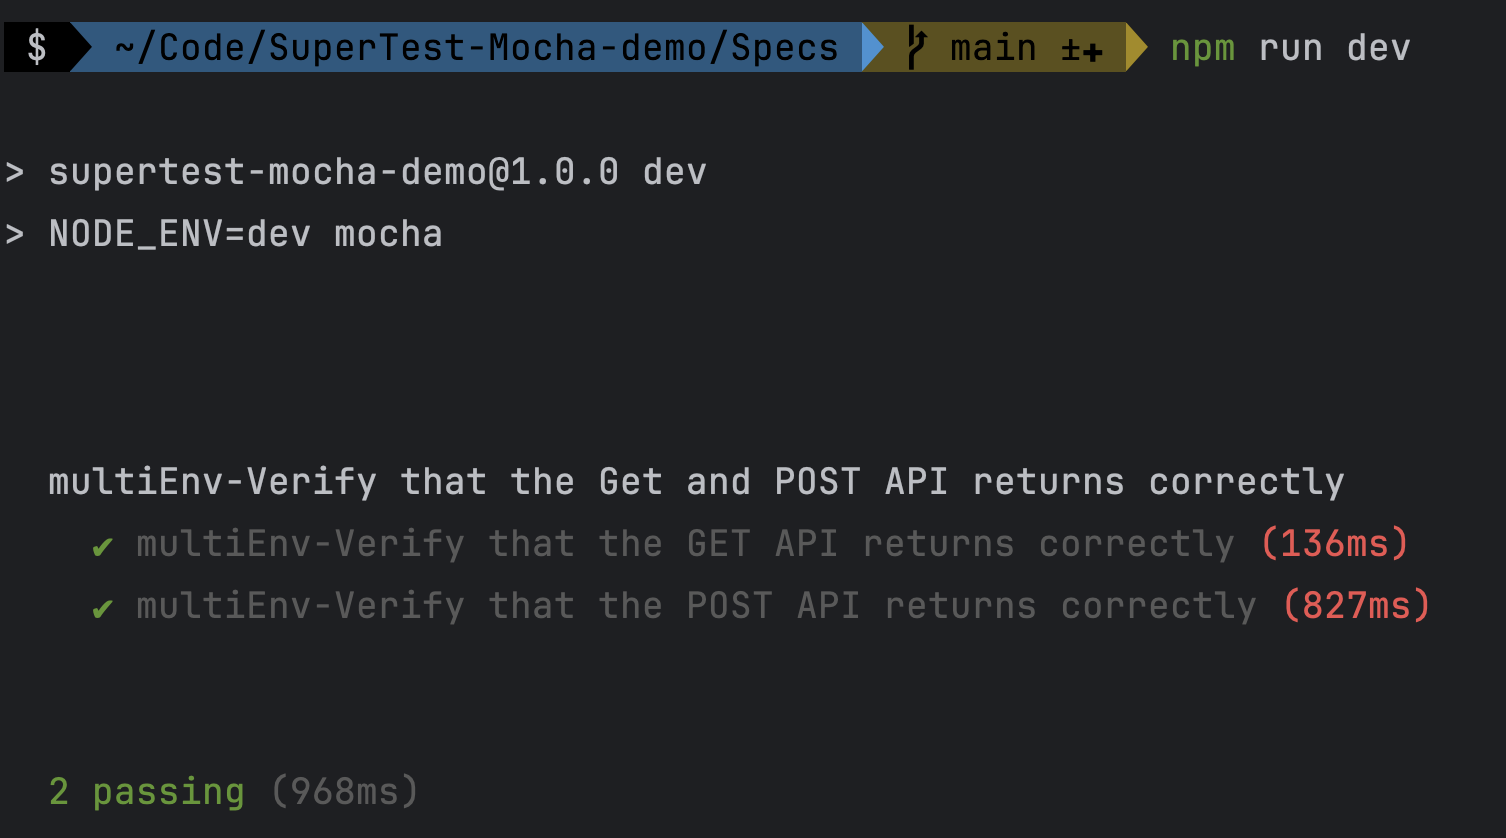
});'''json // package.json "scripts": { "test": "NODE_ENV=test mocha" // run test script for test environment "dev": "NODE_ENV=dev mocha" // run test script for dev environment }, '''
If you use demo project to run multi-environment support test case: multiEnvTest.spec.js, it is recommended to block dataDrivingTest.spec.js and test.spec.js test cases first, otherwise it will report an error.
- Run the test environment test script
npm run test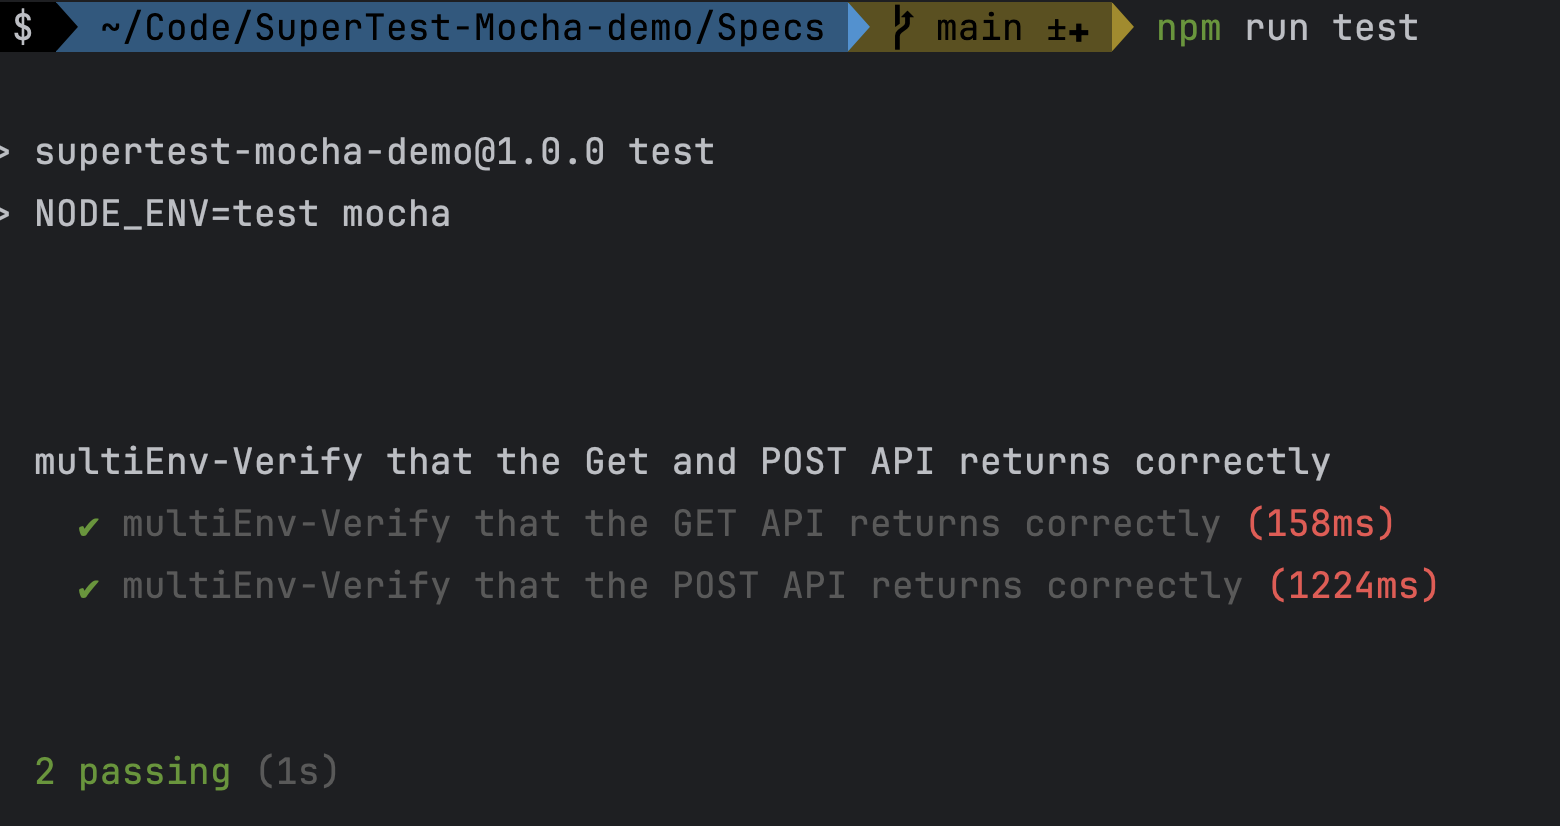
- Run the dev environment test script
npm run dev