Our application is an emergency room simulator which is highly configurable and can simulate a broad range of scenarios. It can be used by medical professionals/researchers to determine bottlenecks and areas in the emergency room which would benefit most from added resources.
We want to provide medical professionals and researchers with a way to visualize the impact of workflow changes in the emergency room. To do this, our emergency room simulator provides users with high-level views, as well as detailed statistics on their specified emergency room. For example, a user may find value from this when making informed decisions about resource allocation in their emergency room. In addition, our lightweight and easy-to-use application allows researchers to test the efficiency of hypothetical hospital workflows. This would not be feasible in a real working environment since it would require overwhelming amounts of hospital downtime in order to add and rearrange processes in the hospital.
In the waiting room of a hospital, each patient has an arrival time and a specific acuity (severity of condition). The user can specify the order of patients that leave the waiting queue based on each patient's acuity and arrival time. Our application uses multiple queue structures (e.g. stack, priority queue) in order to meet the user expectations. Our application also uses statistical distributions to simulate the random variations in the amount of time a patient requires to receive treatment, as opposed to simpler models which assume patients always take the same time. This allows our model to be more accurate and more effectively represent reality.
-
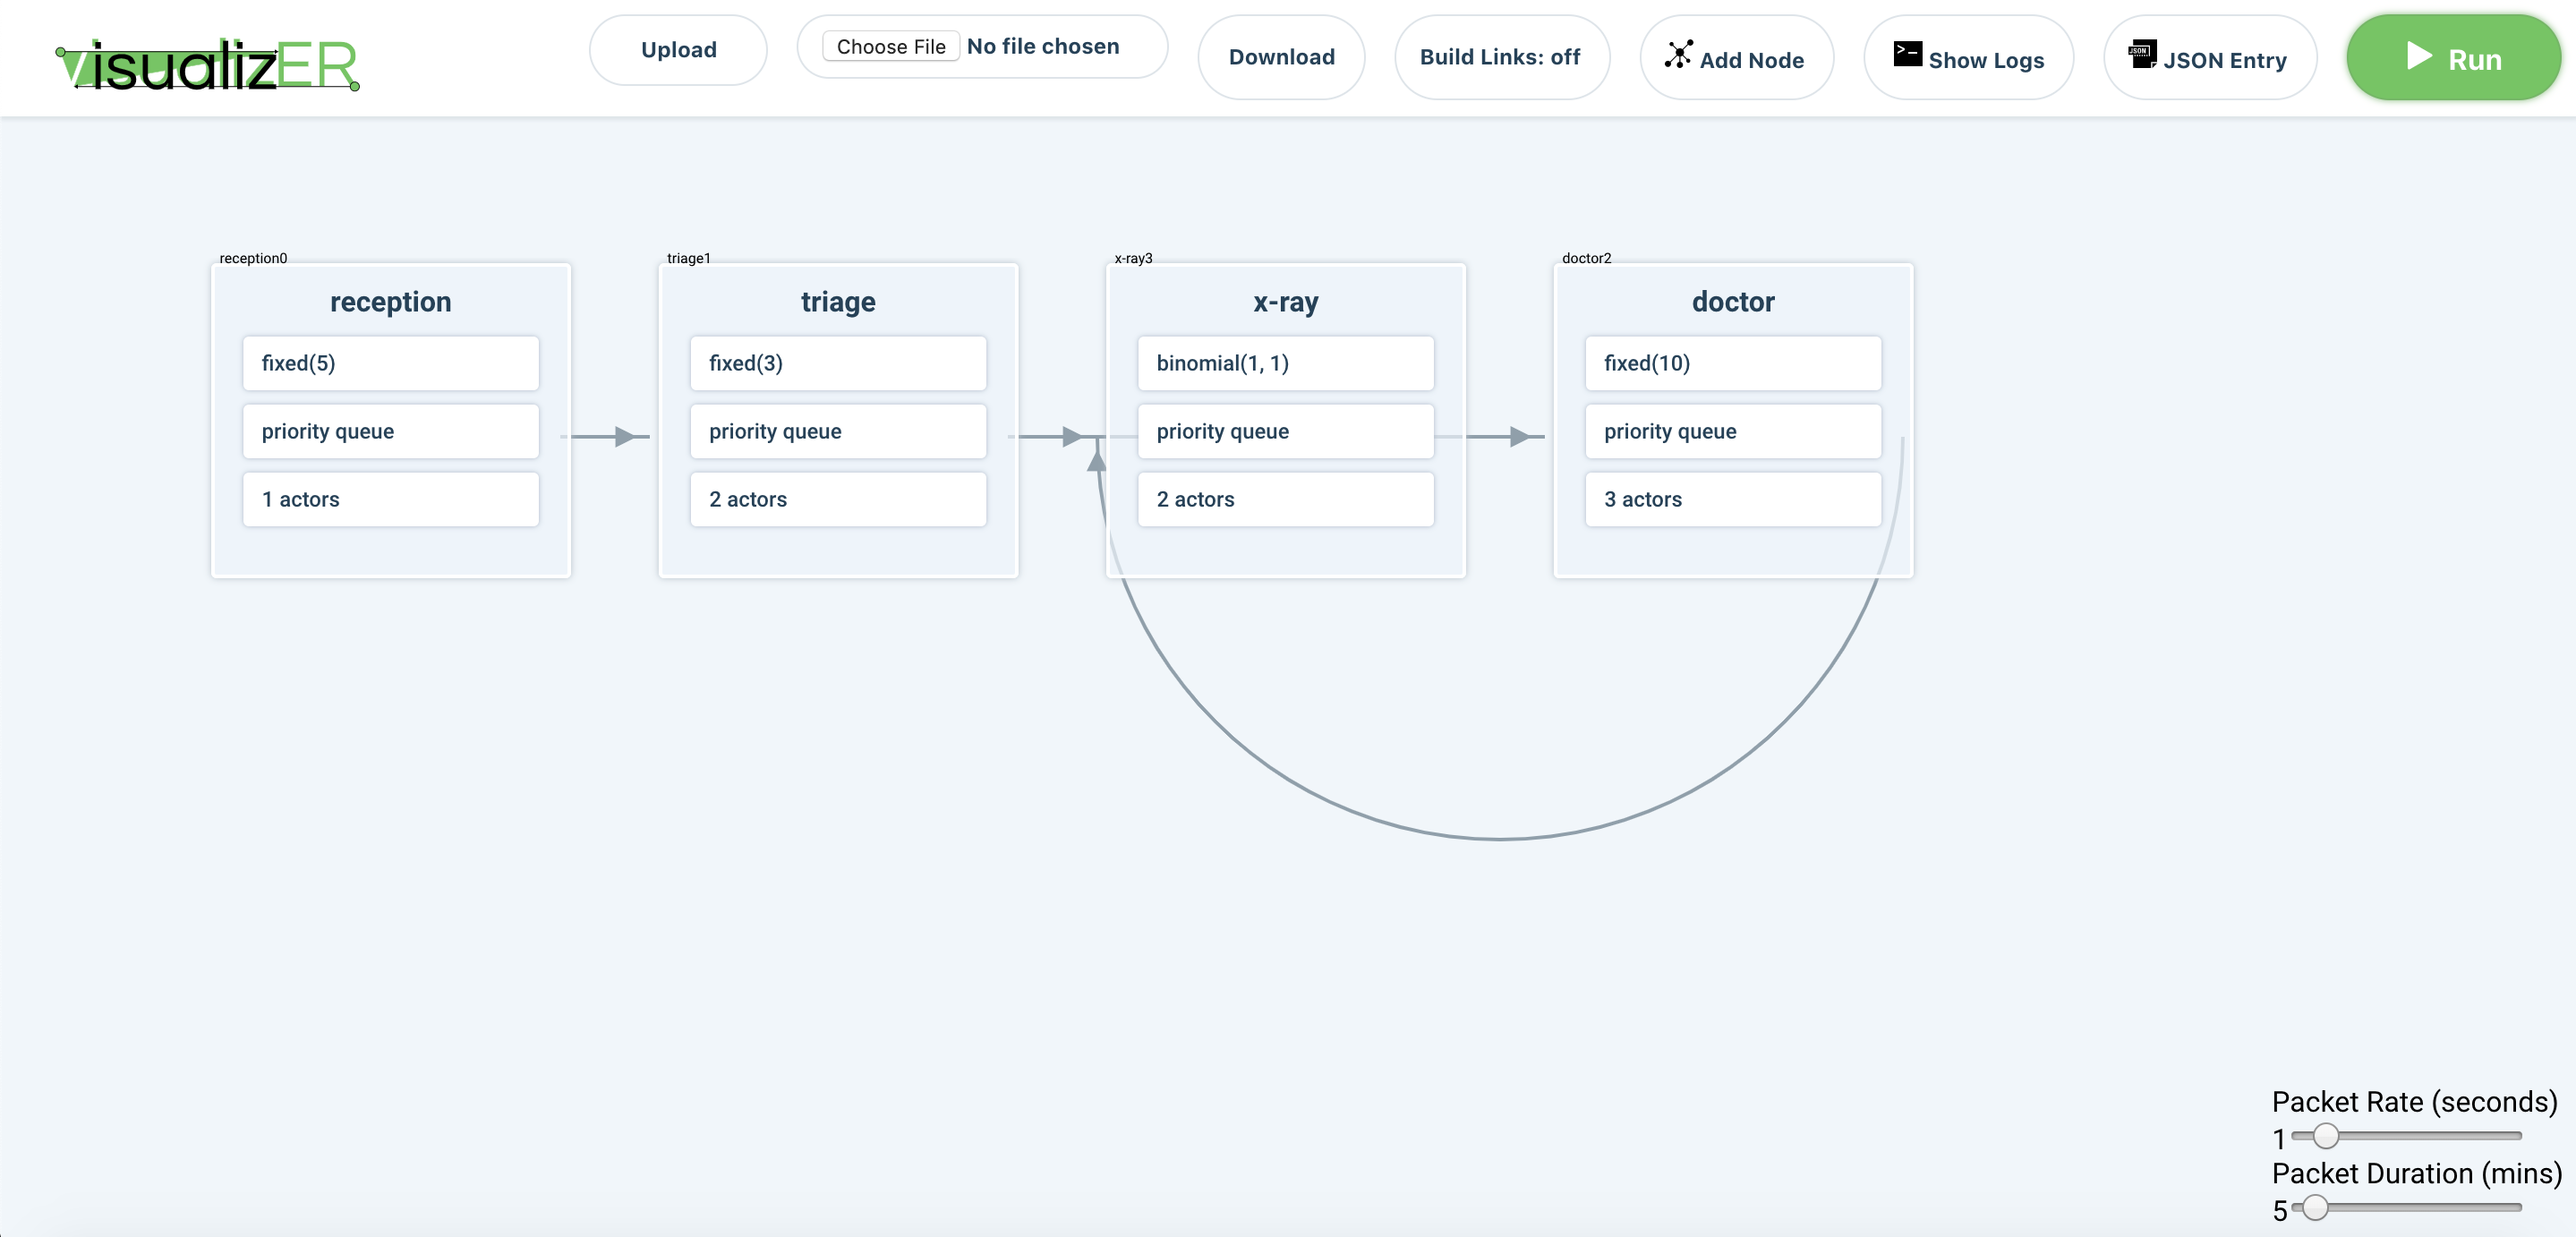
Visual Representation of the emergency room: Users can create nodes representing hospital stations(e.g. reception, triage, patient-doctor interaction, x-ray machine) and create paths between those nodes to represent the ability for patients to go between stations. The positions of patients are represented by queues(e.g. lineups) at each station.
-
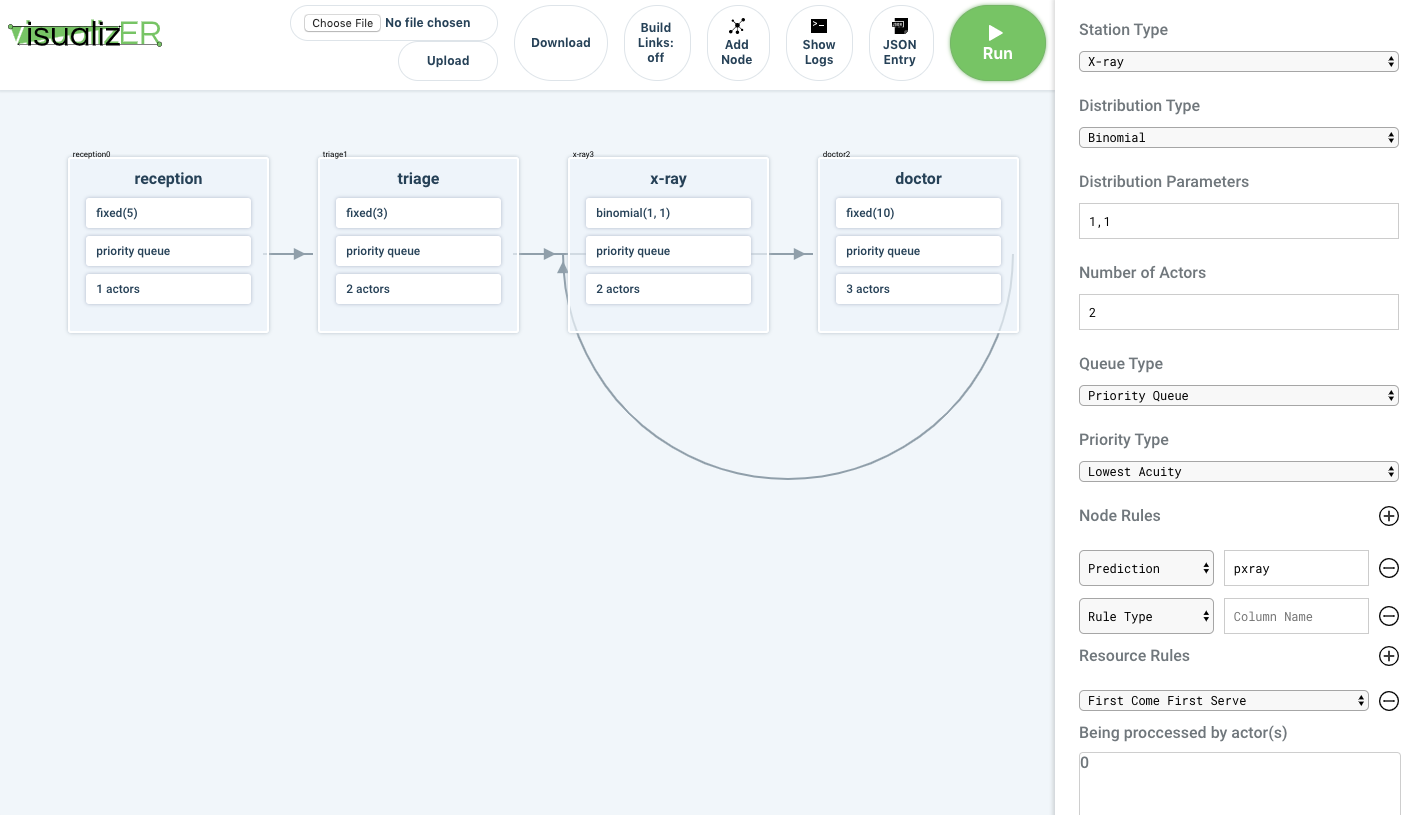
Data Input: Users input data regarding patients' medical state and required medical operations(e.g. a visit to the x-ray, or a talk with a doctor). Users also input the estimated wait times and number of "actors" (e.g. doctors) at each station, such that patients can queue for stations realistically. The behavior of the given patients, as well as their interactions with the hospital stations will be simulated. Another point of input is the rules by which patients are selected from the queue for a given station, e.g. one station may choose to select patients based on acuity, and another station may choose to select patients based on arrival time.
-
Data Output: Events in the emergency room (e.g. a patient going from the X-ray machine to a doctor), and other statistics (e.g. actual wait times) are all recorded and saved.
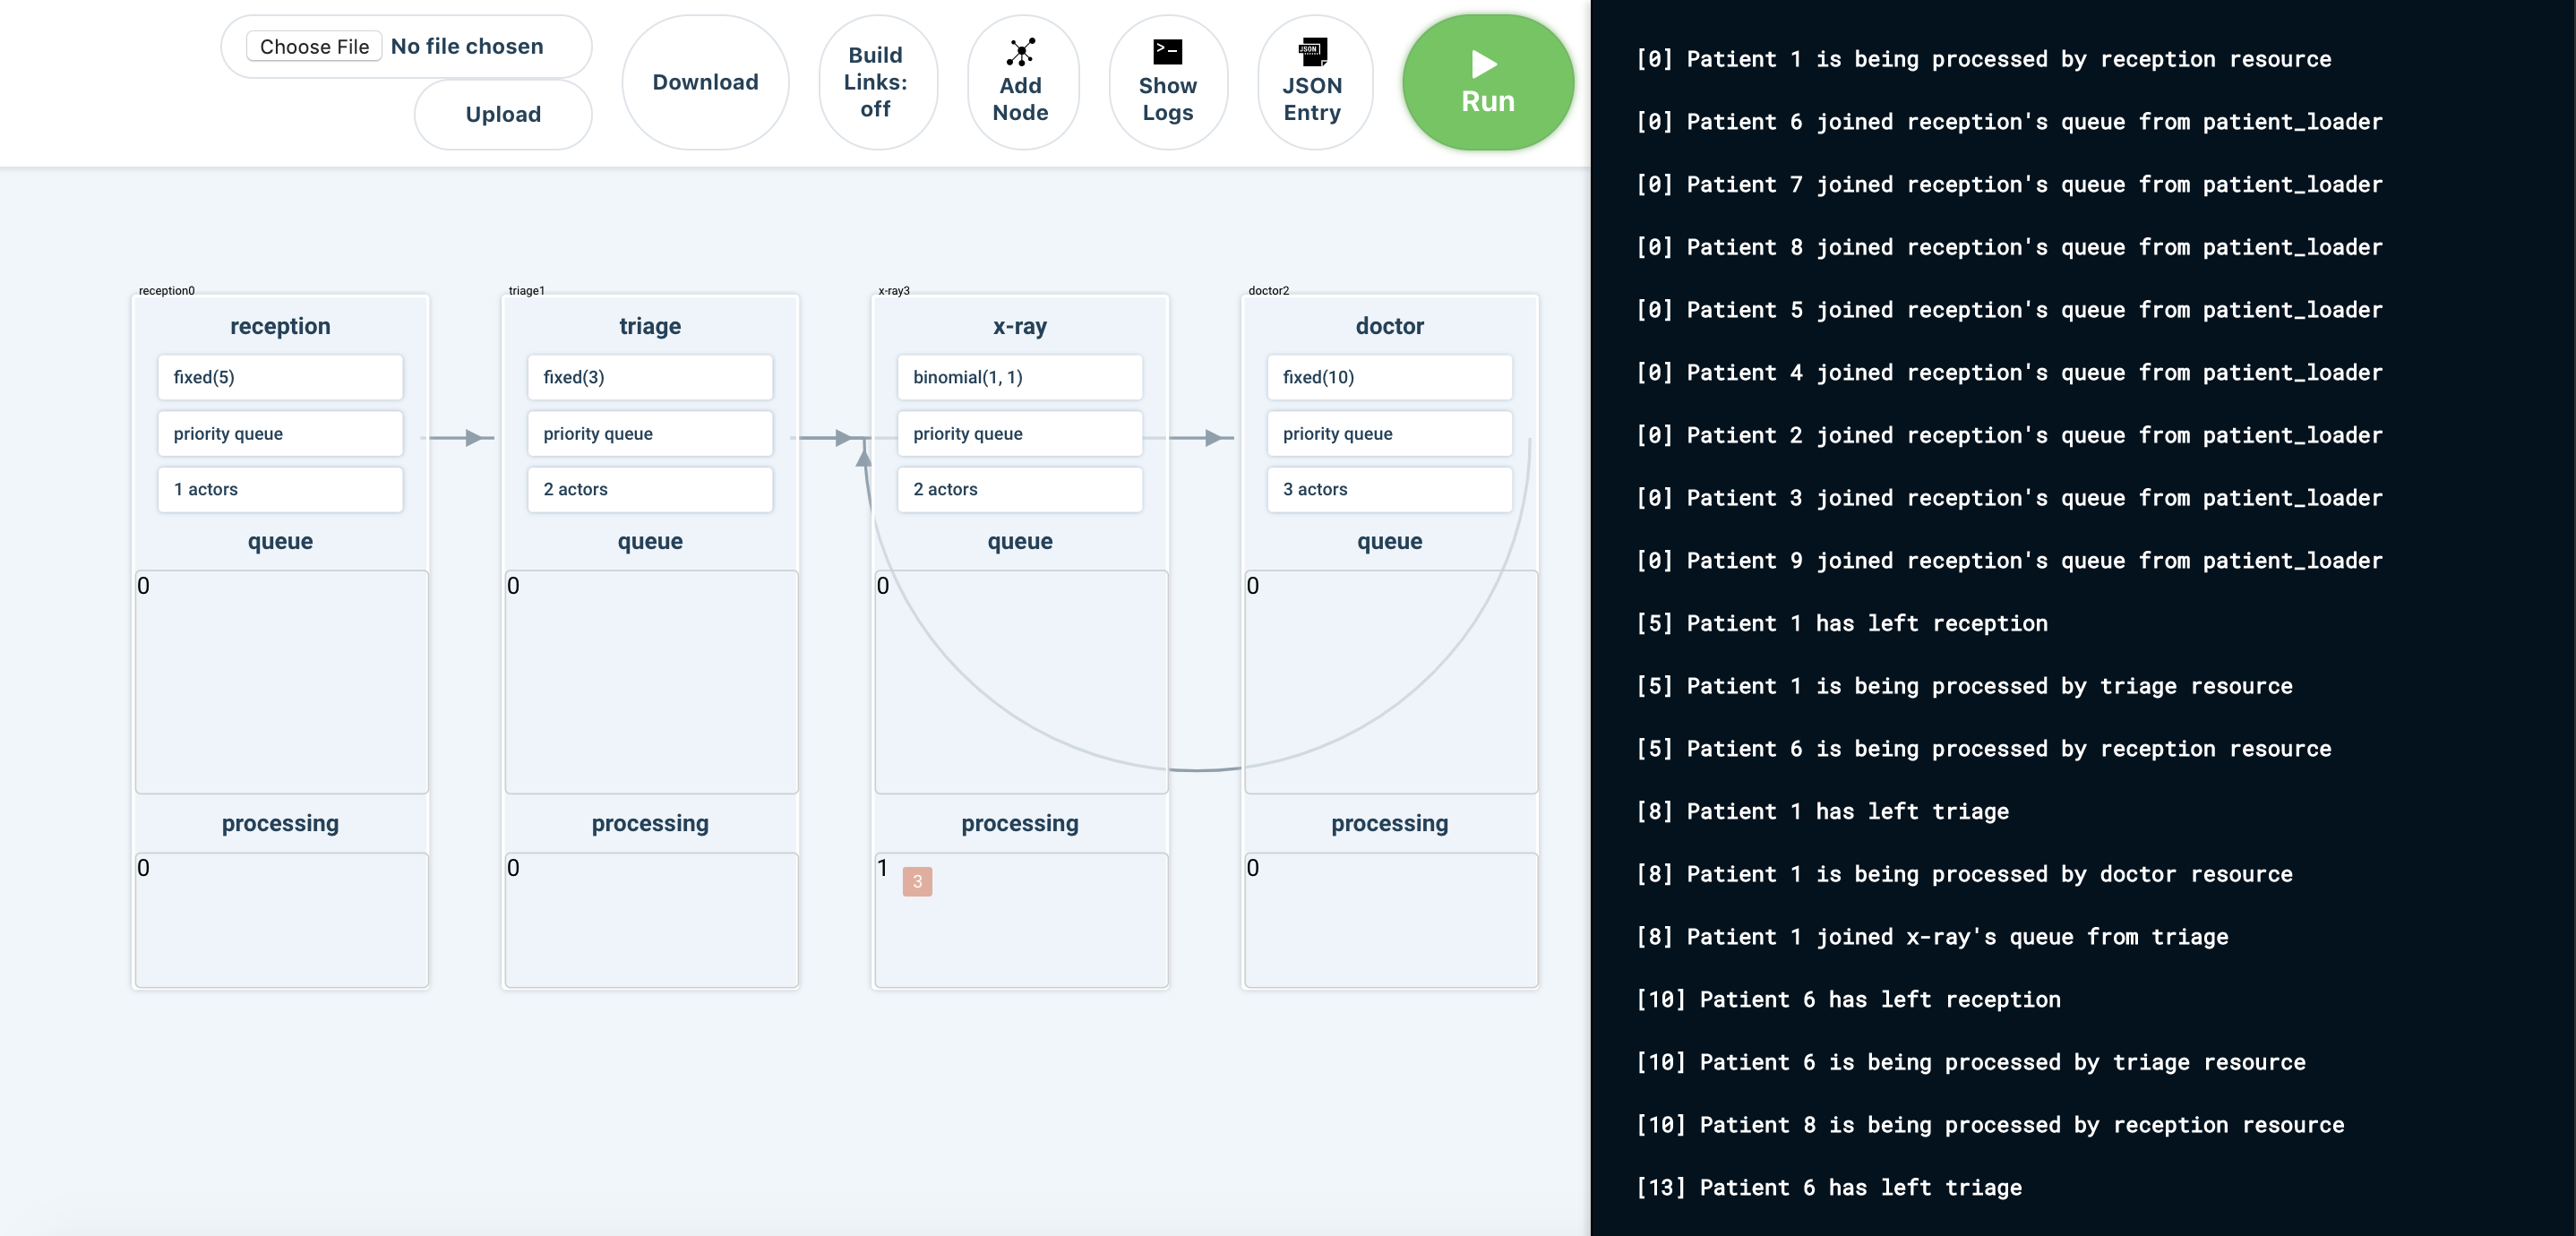
Snapshot of terminal after running
./run_prod.sh buildwhere the image has finished being built and the application is running: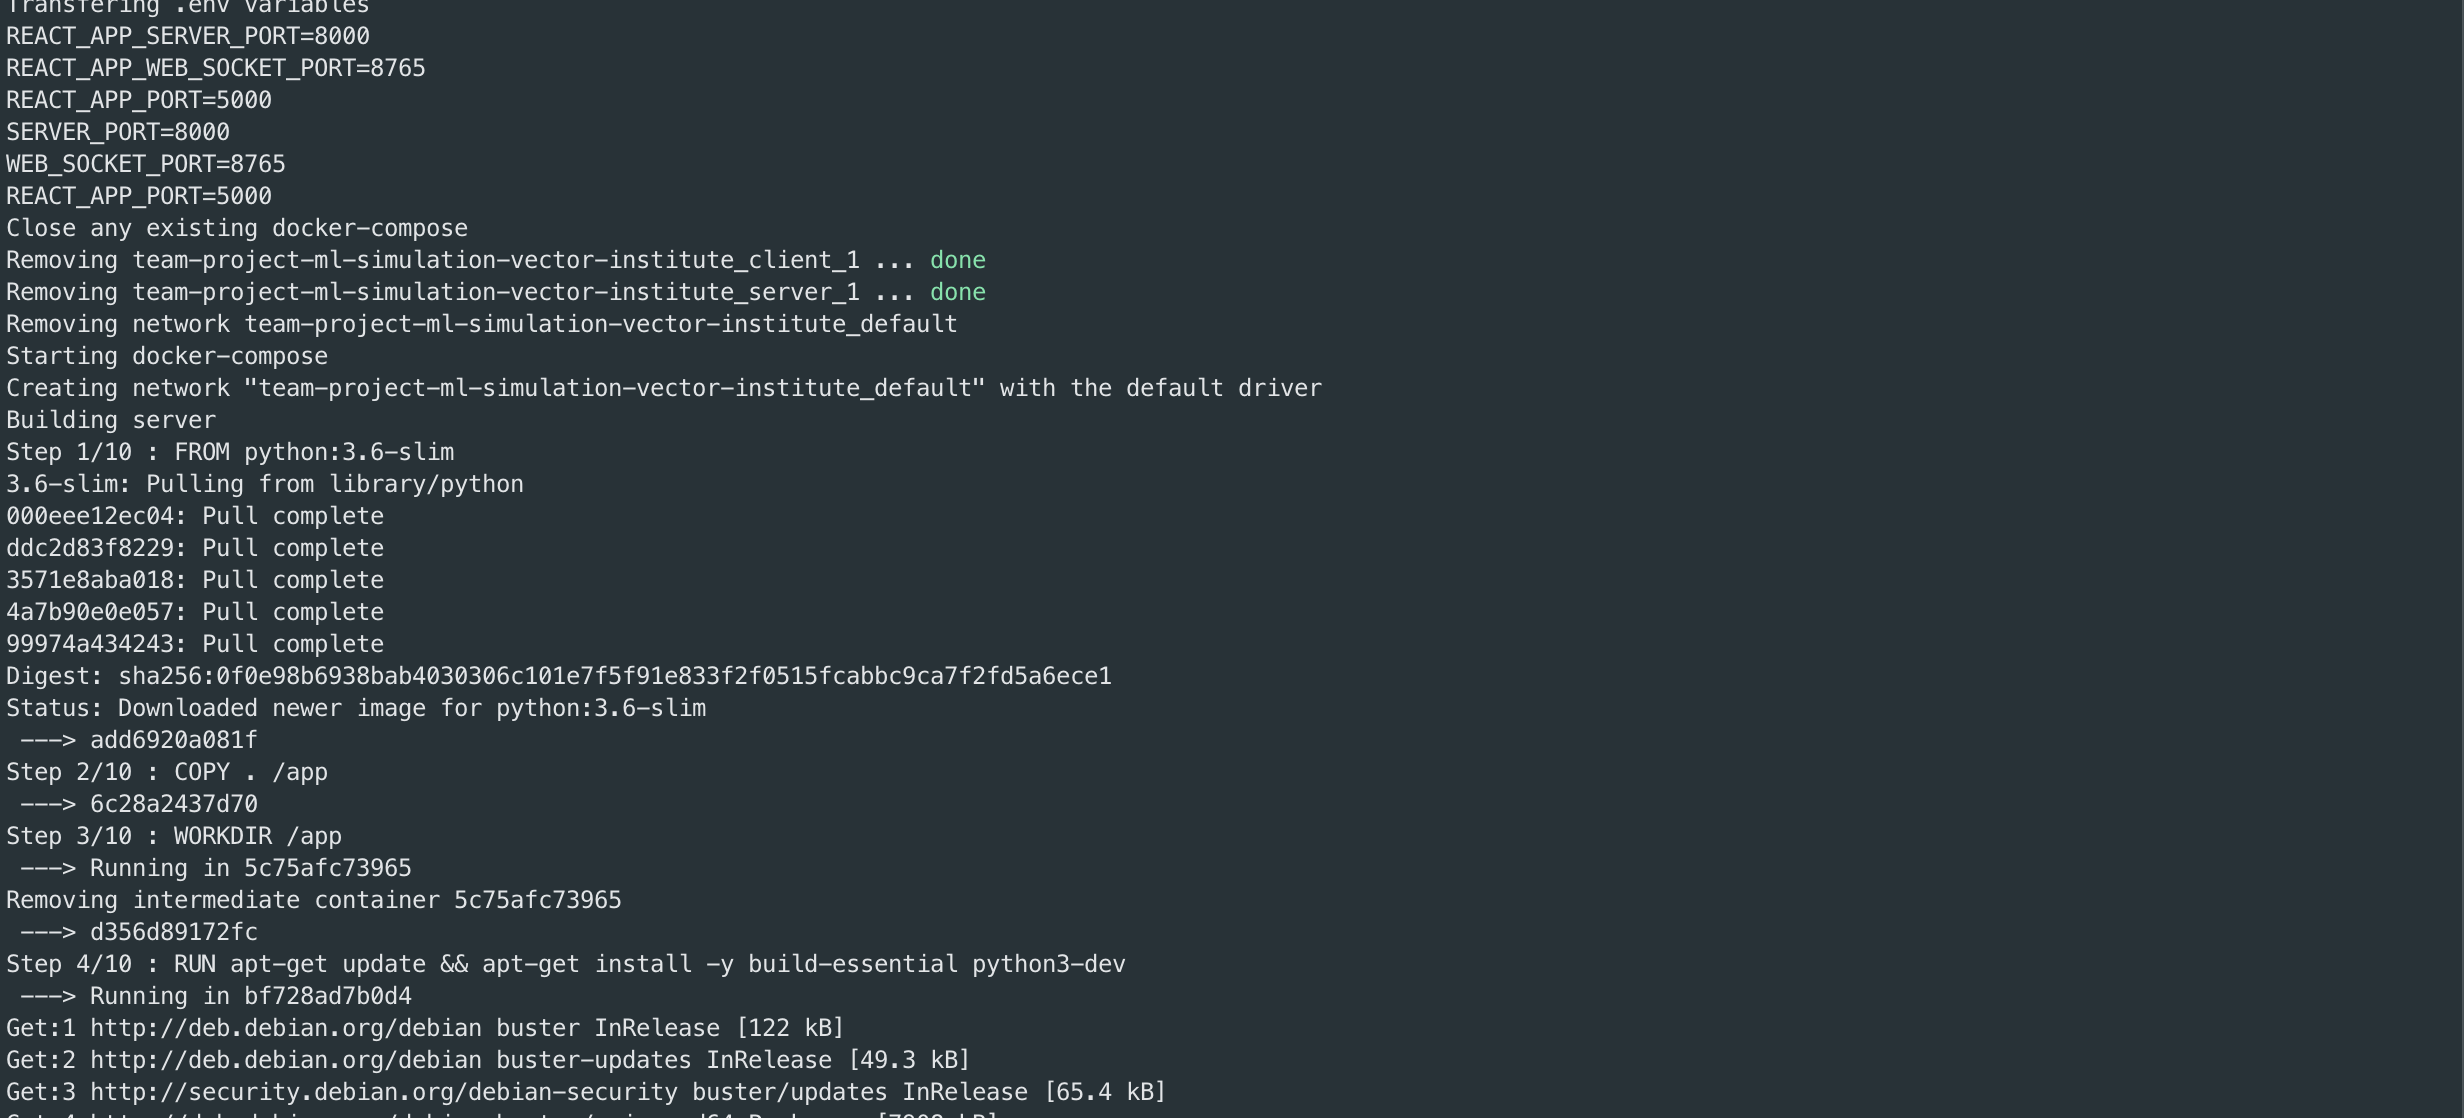

-
First ensure that your system satisfies the Development requirements listed in the section below , then start Docker by double clicking the docker icon in your Applications folder.
-
Navigate to the folder with the project codebase, in the event that you have not cloned it/do not have access to it, run ```git clone https://github.com/csc301-fall-2019/team-project-ml-simulation-vector-institute.git``, then change directories into the newly cloned folder
-
Run
./run_prod.sh build- to build the image/run the application- The file is located at the top-level directory in the repository so your terminal must be at that directory to run the above command.
- The client and server services will be instantiated with the ports indicated in the .env file.
- The client can be accessed at http://localhost:5000 by default.
Note: you do not have to worry about any other setup other than ensuring you have Docker on your device.
In the event that you have issues due to conflicting ports, you can change the values of the following port variables in the env file (located at the root of the repository).
APP_SERVER_PORT = {Backend port number - default 8000} REACT_APP_PORT = {Frontend port number - default 5000} DEV_ENV = development WEB_SOCKET_PORT = {WSS port number - default 8765} -
- Once the application begins (your terminal should look the same as the image above), go to http://localhost:5000. If you are using another port - based on REACT_APP_PORT that you have in your .env file. Then, a default canvas will be presented where the hospital workflow can be created using different click operations.
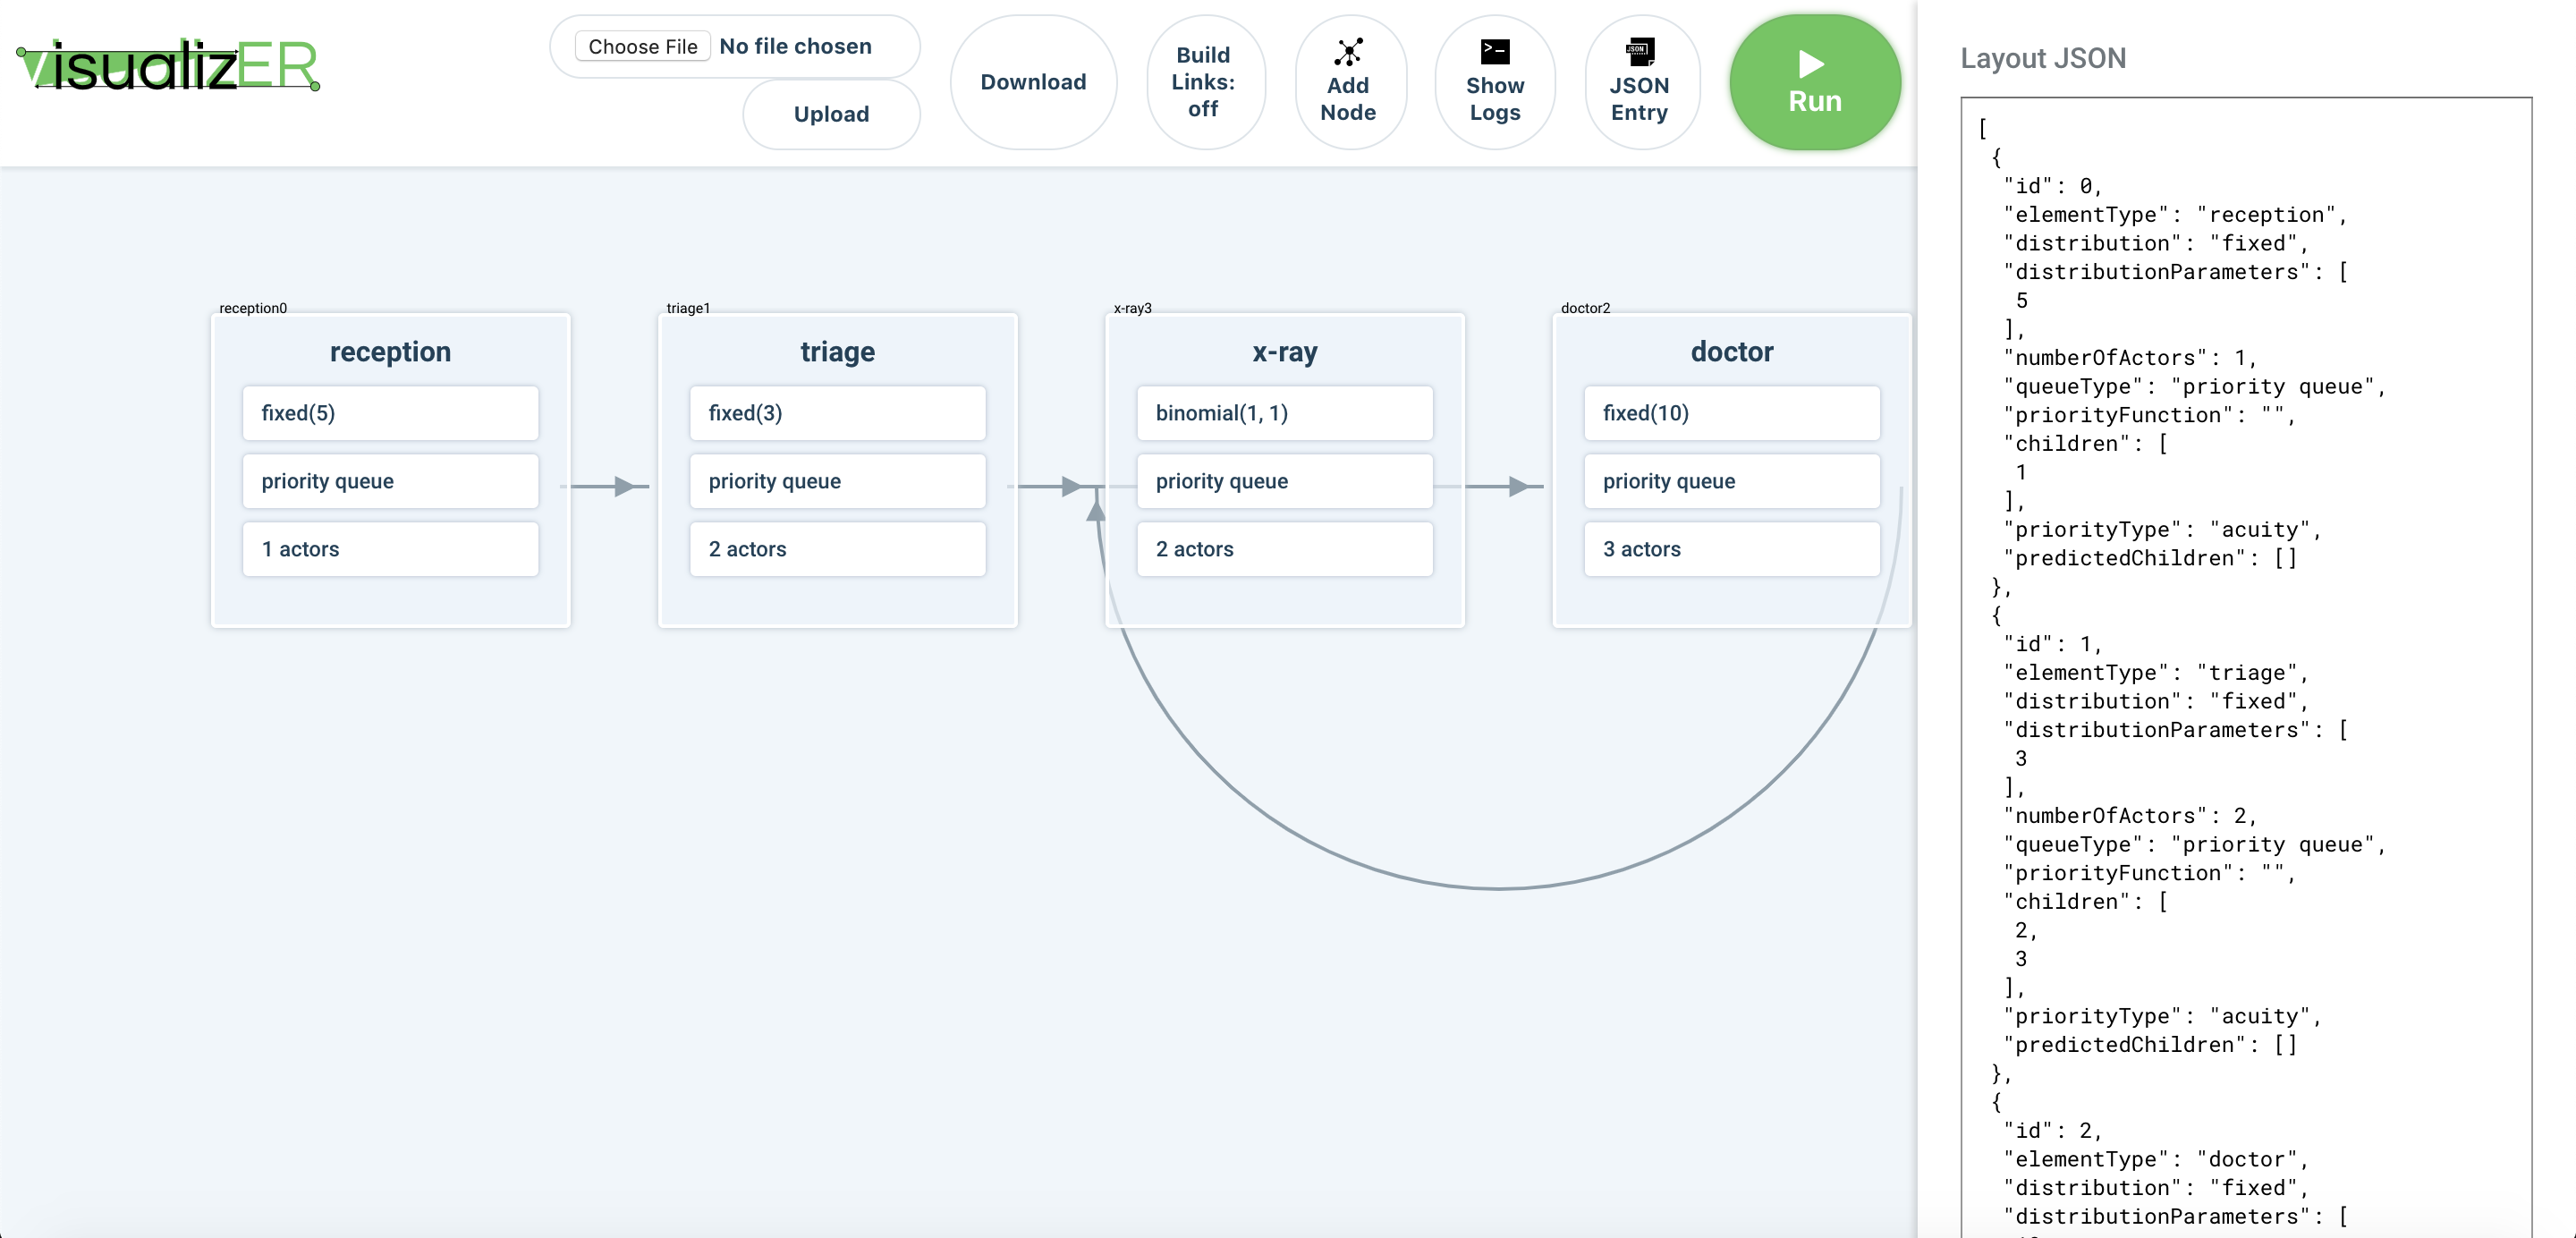
- Users who have used the application before may choose to upload or write a saved canvas JSON file to quickly load a previously used workflow.
- Hospital processes (e.g. reception, triage, scans) can be made by simply clicking on the "Add Node" button. The user will then be prompted to enter the necessary properties of the process.
- Clicking a process on the screen will allow the user to view and edit its properties.
- To specify the processes to which the patient will travel, click the Node Edges and click the outbound process followed by the inbound process.
- Once a user finishes creating the workflow, they can choose to save the layout into a file for future use by clicking the Download button inside the JSON Entry sidebar (not the Download button at the top), before uploading a csv file for the patient information.
- Before running the simulation, the user can change the speed of the simulation using the two sliders on the bottom right.
- Note that once the simulation starts, the speed of the simulation will remain the same until the simulation terminates.
- After the patient csv file is loaded, the simulation can be started by clicking the Run button on the top right.
- As the simulation runs, the user can see the number of patients in each node from the top left corner of each box listed queue and processing. Queue represents patients waiting in that station (i.e. waiting in reception or waiting for a doctor), processing represents patients being handled in that station (i.e. currently seeing a doctor).
- Colored boxes with an id representing each patient will also appear in each node throughout the simulation representing where the patient currently is. The color represents the patient’s acuity.
- If there are too many patients in a box, not all patients will be displayed. To see each node in more detail, users can click on a node, and the same boxes displaying patients in processing and queue appears on the side panel. They can then scroll through the boxes to see all the patients.
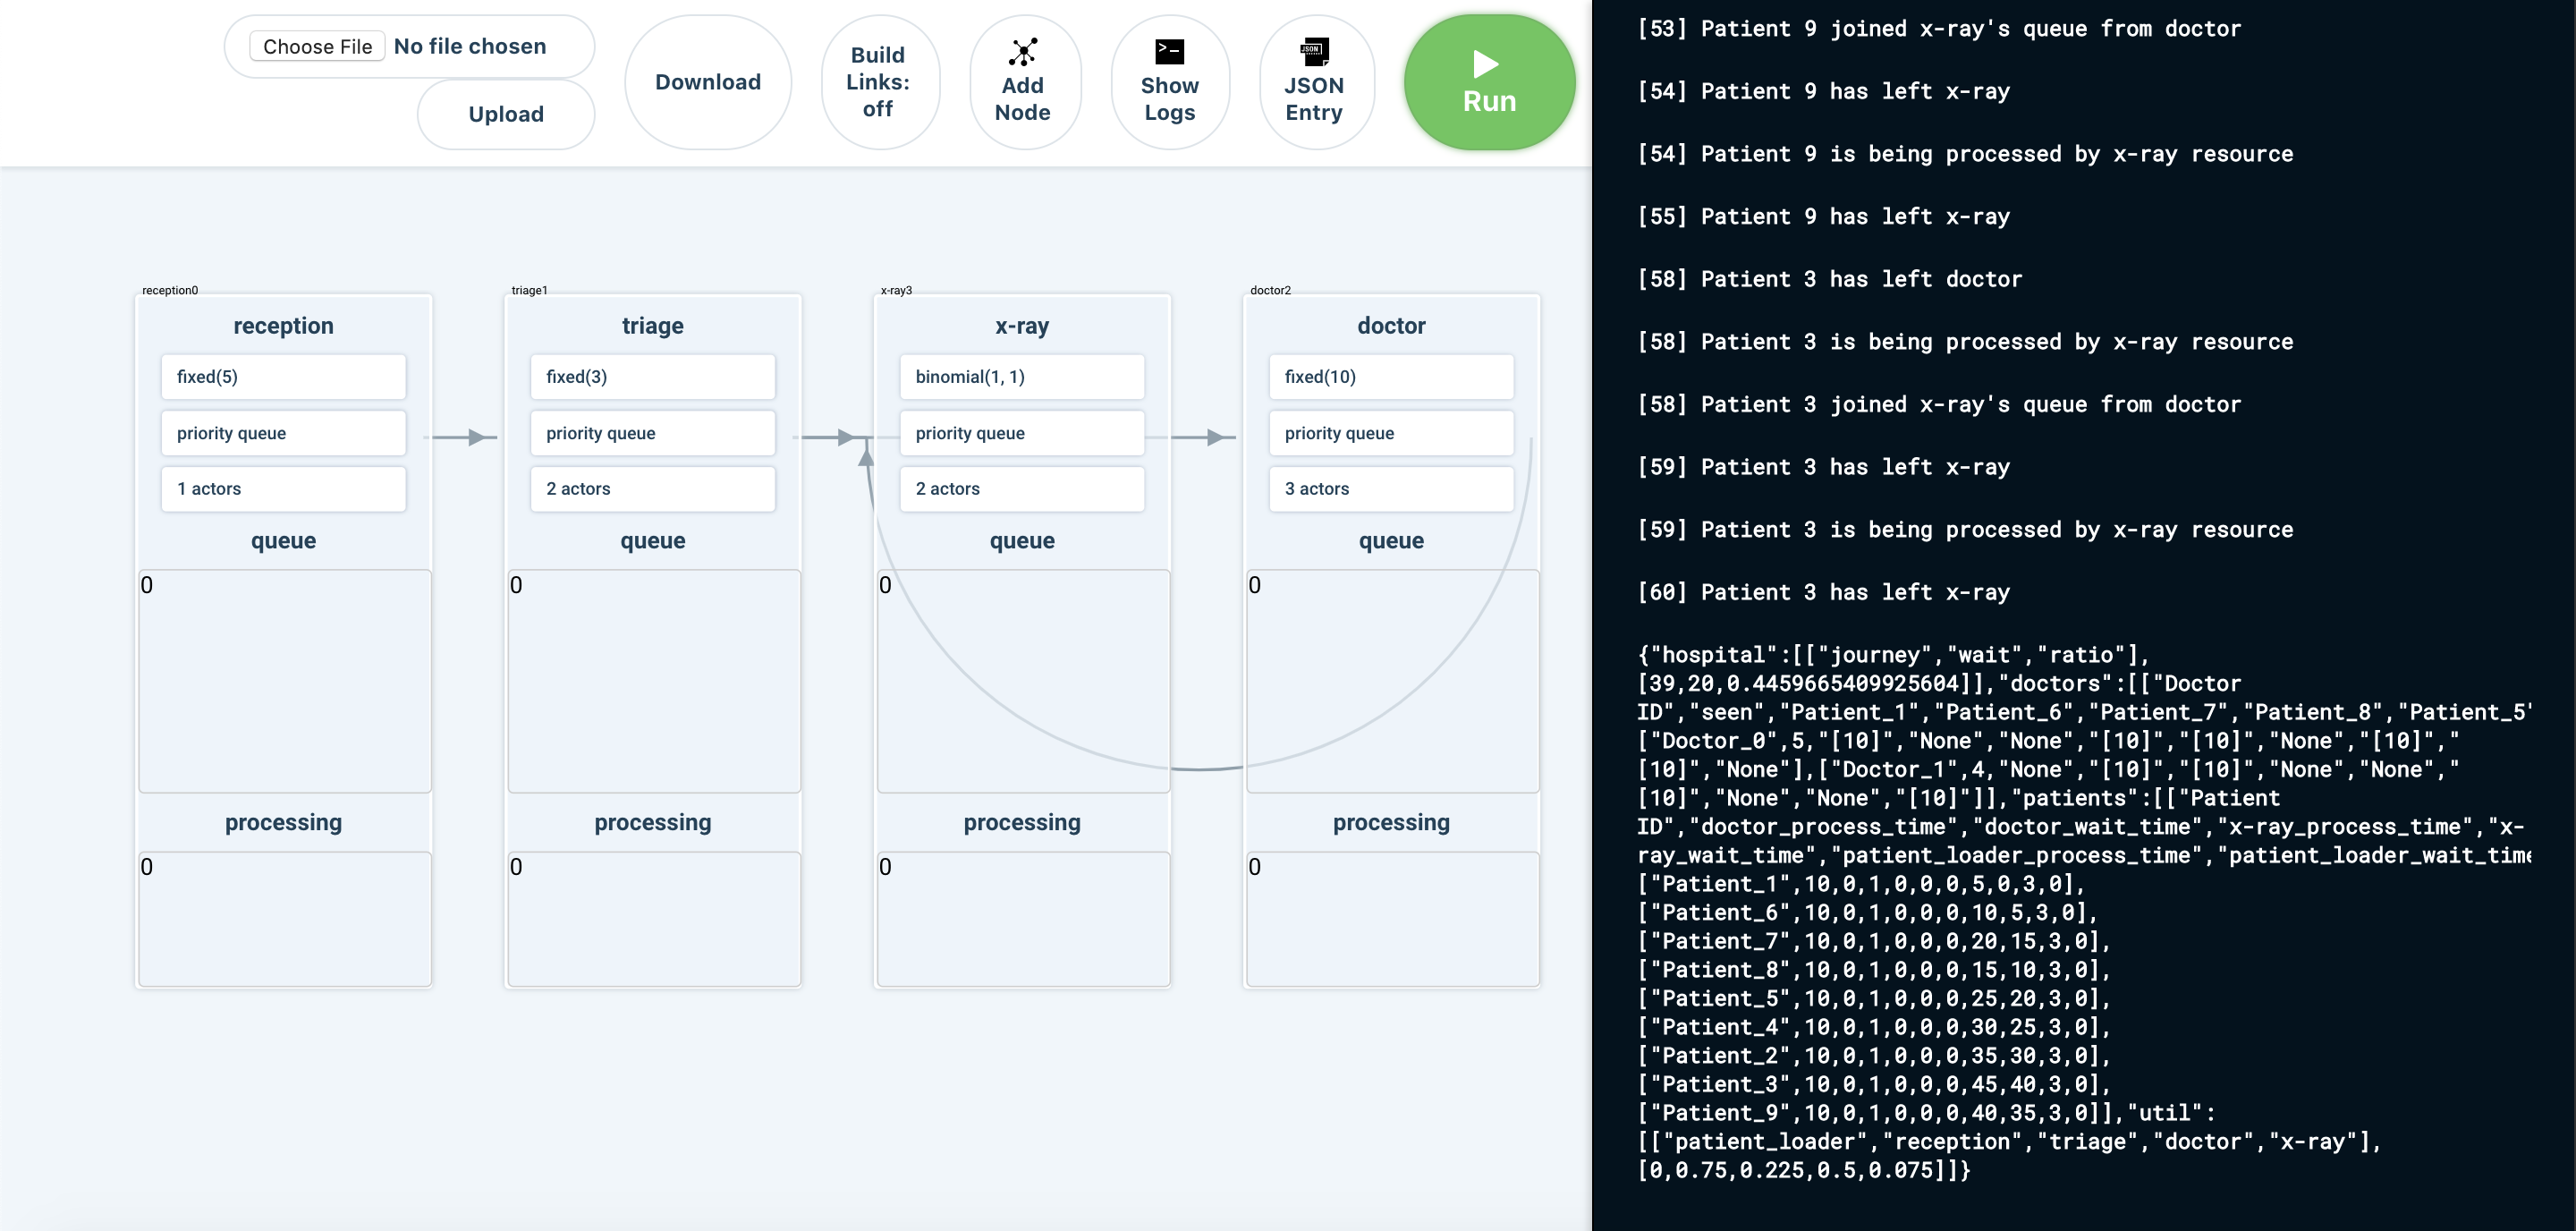
- During the simulation, users can also click on the Show Logs button on the top right corner to watch everything that is happening in text format.
- After the simulation, users can download the statistics generated from the simulation (i.e. average wait time in reception) by clicking the Download button at the top.
- All uploaded CSVs and canvas are saved to /backend/csv and /backend/canvas respectively.
- Once the application begins (your terminal should look the same as the image above), go to http://localhost:5000. If you are using another port - based on REACT_APP_PORT that you have in your .env file. Then, a default canvas will be presented where the hospital workflow can be created using different click operations.
-
The defaults for ports are indicated as such:
The backend APIs are at port 8000 indicated by APP_SERVER_PORT in the .env file. The client host port is 5000 indicated by REACT_APP_PORT in the .env file.
The values of the ports can be customized simply by changing the value in the .env file.
This can be used to test our simulation's API to view the final statistics without having to run the frontend since our frontend limitation is that you would have to run the entire visualization before getting the resulting statistics. This is also customizable in case the port on the user's computer is already in use by a separate application.
To switch from development to production,
change
DEV_ENV=developmentto
DEV_ENV=productionDevelopment environment has the following features:
- Backend:
- Activates the debugger
- Activates the automatic reloader
- Enables the debug mode on the Flask application.
- Frontend:
- Activates hot reloading
- Directly serves files
- Backend:
-
-
Windows 10 64-bit: Pro, Enterprise, or Education (Build 15063 or later)
-
Hyper-V and Containers Windows features must be enabled
- This can be done by running the docker application after installing. The user will be prompted and required to restart the computer in order to finish the required setup.
-
The following hardware prerequisites are required to successfully run Client Hyper-V on Windows 10:
- 64-bit processor with Second Level Address Translation (SLAT)
- 4GB system RAM
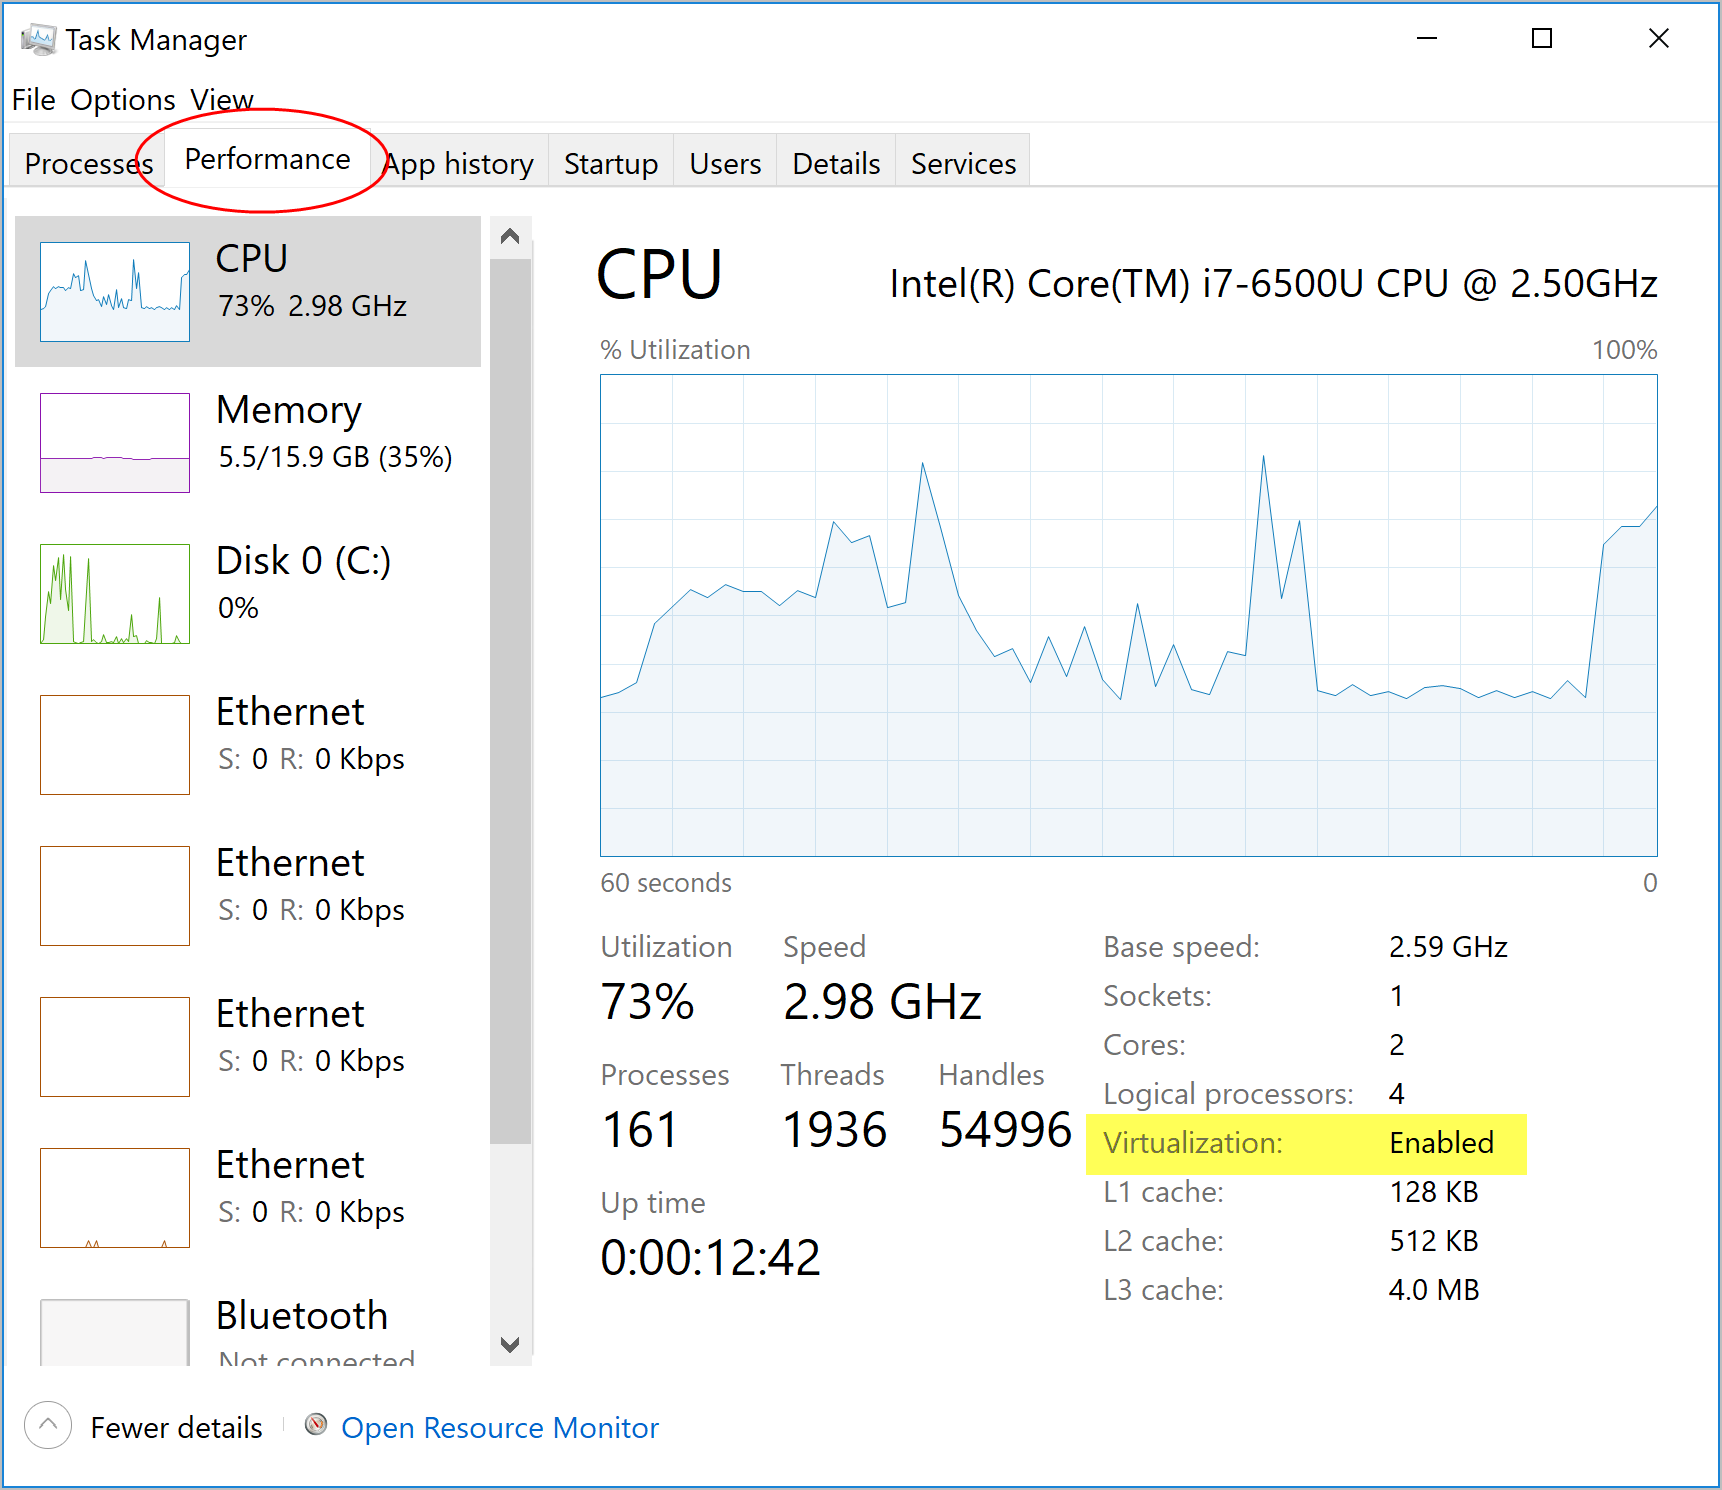
- BIOS-level hardware virtualization support must be enabled in the BIOS settings (see image).
-
-
-
Mac hardware must be a 2010 or newer model, with Intel’s hardware support for memory management unit (MMU) virtualization, including Extended Page Tables (EPT) and Unrestricted Mode. You can check to see if your machine has this support by running the following command in a terminal: sysctl kern.hv_support
-
macOS must be version 10.13 or newer. We recommend upgrading to the latest version of macOS.
-
If you experience any issues after upgrading your macOS to version 10.15, you must install the latest version of Docker Desktop to be compatible with this version of macOS.
Note: Docker supports Docker Desktop on the most recent versions of macOS. That is, the current release of macOS and the previous two releases. As new major versions of macOS are made generally available, Docker will stop supporting the oldest version and support the newest version of macOS (in addition to the previous two releases).
-
At least 4 GB of RAM.
-
VirtualBox prior to version 4.3.30 must not be installed as it is not compatible with Docker Desktop.
-
-
Download the docker installer here and follow the docker setup instructions above. The website directs you to the correct version based on your OS.
-
-
Double-click Docker Desktop Installer.exe to run the installer.
-
If you haven’t already downloaded the installer (Docker Desktop Installer.exe), you can get it from Docker Hub. It typically downloads to your
Downloadsfolder, or you can run it from the recent downloads bar at the bottom of your web browser. -
Follow the instructions on the installation wizard to accept the license, authorize the installer, and proceed with the install.
-
When prompted, authorize the Docker Desktop Installer with your system password during the install process. Privileged access is needed to install networking components, links to the Docker apps, and manage the Hyper-V VMs.
-
Click Finish on the setup complete dialog and launch the Docker Desktop application.
-
-
-
Double-click Docker.dmg to open the installer, then drag the Docker icon to the Applications folder.
-
Install Docker app
-
Double-click Docker.app in the Applications folder to start Docker. (In the example below, the Applications folder is in “grid” view mode.)
You are prompted to authorize Docker.app with your system password after you launch it. Privileged access is needed to install networking components and links to the Docker apps.
The Docker menu in the top status bar indicates that Docker Desktop is running, and accessible from a terminal.
If you just installed the app, you also get a message with suggested next steps and a link to the documentation. Click the Docker menu (whale menu) in the status bar to dismiss this pop-up notification.
-
Click the Docker menu (whale menu) to see Preferences and other options.
-
Select About Docker to verify that you have the latest version.
-
We applied an MIT license to our codebase. Since this project is supposed to be opensource and we are applying an MIT license to our codebase we need not enforce restrictions on our code. Our partner decided on this choice because the one of the goals of the project was to create an open source product where other researchers could easily contribute to. Further we do not want to be liable for any negative impacts/damages caused by our code, under any circumstances.